FAQ
Getting started with Payback
Your time is precious - Get up and running with the ten minute Quick Start Guide.
|
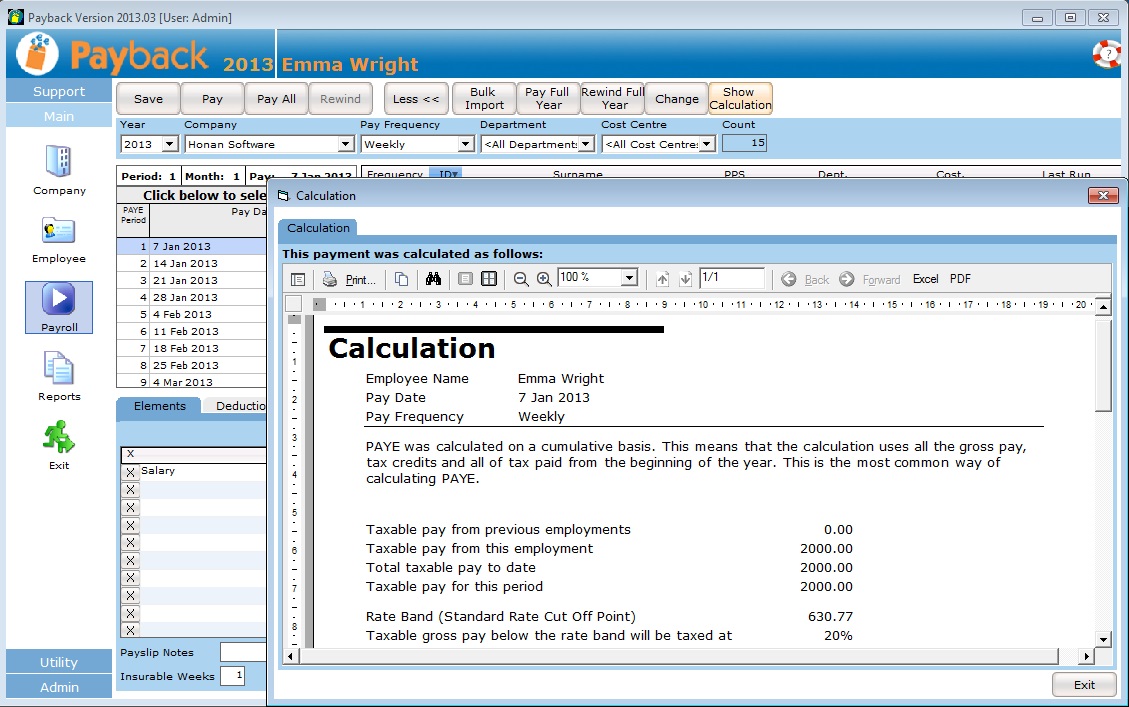
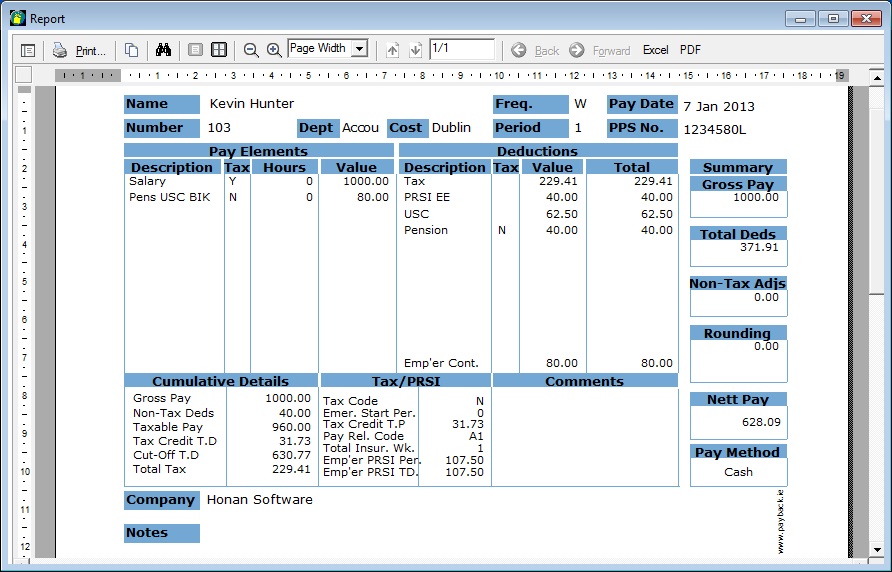
In the Payroll screen, click the 'More>>' button at the top of screen. More buttons will be displayed. Click the 'Show Calculation' button.
The calculation report shows exactly how Payback is calculating the current payment. If the calculation is not what you were expecting, the most common reasons are: |
|||||||||
| PAYE is not correct or is zero |
|||||||||
| Tax credits or Standard Rate Cut Off Point wrong or not entered (Check the Tax tab of the employee screen) | |||||||||
|
Check that you've entered the correct Standard Rate Cut Off Point and Tax Credits in the Employee Screen 'Tax' tab. Ensure that you haven't inadvertently swapped the tax credits and Standard Rate cut off point. (If you do not know this information, put the employee on 'Emergency Tax'). These figures should be the annual amount. |
|||||||||
| Previous periods skipped (The 'Pay' button should be clicked for all periods) | |||||||||
|
Are you clicking the 'Pay' button at the top of the screen to process the pay for the employee? You have to click this button to process the Pay for the employee for the current period, before moving onto the next week or month. |
|||||||||
| Year to Date figures from previous payroll system entered incorrectly | |||||||||
|
Did the employee join your company mid-year?
Did you change Payroll system from another software package, or paper based system mid year? - If you did, then please ensure that you've entered in all the correct information in the Year To Date details in the employee screen. |
|||||||||
| USC is not correct |
|||||||||
| Cut off Point Vs Bands: | |||||||||
|
When entering USC rates in Payback, please use Cut Off Points and not Bands. For Example, these are Cut off Points (USE THESE): |
|||||||||
|
|||||||||
|
These are Bands (DO NOT USE THESE): |
|||||||||
|
Always use Cut off points, and not Bands when entering USC rates into Payback. The 4% figure is generally greater than the 2% figure) Revenue have introduced confusion by their use of terminology. P2C files and paper certificates use Cut Off Points. Revenue helpdesk and other internal systems use Bands. |
|||||||||
| Rounding cut off points: | |||||||||
|
You may have entered: 2% = €837 instead of using: 2% = €836.34 |
|||||||||
| Employees paid lower than €10,036 are paying USC |
|||||||||
|
You may also notice that employees who are paid less than €10,036 are sometimes liable to USC. The ceiling for USC exemption has risen from €4,004 to €10,036 for 2012. However Payback does not automatically apply this exemption. It is not a bug, this is by design. Revenue have advised us that only the rates as advised on the P2C (Tax credits certificate) should be used. Users should not apply exemptions or reduced rates (Medical card holders etc) without a valid P2C. The onus is on the employee/pensioner (not the employer), to advise Revenue if their annual earnings will exceed the exemption threshold. We understand that this will probably cause problems for employers. We have provided the facility for employers to make employees USC exempt. To make an employee USC exempt. |
|||||||||
|
Step 1: Go to the employee screen. Step 2: Select the employee you wish to make USC exempt. Step 3: Click the PRSI/USC tab. Step 4: If the 'USC Exempt' check box is visible, tick this and click update employee. Step 5: If you can not see a 'USC Exempt' check box:
|
|||||||||
| The figures in the P35 do not match |
|||||||||
|
Those differences are due to the way the rounding works. The P35 report rounds down the figures to the nearest Euro for each employee. Using the P35 Breakdown report, the tax from the P35 is 10477. If you include the cents for all payments, it is 10482.44 For the totals at the bottom, each employee's tax and prsi is rounded down and totalled. The P35 report does not have cent for each employee Eg, for two employees |
|||||||||
|
|||||||||
| Rounded: | |||||||||
|
|
|||||||||
| Totaled: | |||||||||
|
|
|||||||||
|
The P30 cent amounts are not rounded in this way, so they'll be larger values. |
|||||||||
| Notes |
|||||||||
|
We often get customers querying if PRSI, PAYE, USC or Income levy are being correctly calculated. Payback has undergone extensive testing. We use the following methods to test calculations:
|
|||||||||
|
Some of the more complex calculations, especially for PRSI, often give different results depending on the method of calculation used. We have noticed that different payroll products will often give different results, especially when various ceilings are breached. Sometimes these differences can be significant, especially for highly paid monthly employees. We are fully confident that Payback calculates the figures correctly. In the past, when customers have queried the results, our support technicians have spent hours manually calculating PRSI, USC, Income Levy and PAYE, this always confirms that Payback is correct. Often the customer is using incorrect rates or making incorrect assumptions. Sometimes the customer is using an equally valid, but different method to calculate figures. Due to the time consuming and resource intensive nature of these queries, we will no longer be doing this. |
|||||||||
|
The USC FAQ is here: http://www.revenue.ie/en/tax/usc/universal-social-charge-faqs.pdf |
|||||||||
|
The Income Levy FAQ is here: http://www.revenue.ie/en/tax/income-levy/income-levy-faqs.pdf |
|||||||||
|
PRSI Rates can be found here: http://www.welfare.ie/en/downloads/SW14.pdf |
If you get a message saying that you're running a demo version, even though you've purchased or renewed your licence, you may not have entered your registration details.
When a customer buys a licence, we email them registration details. This email is sent to whatever email address was used when the licence was purchased. Please check that the Registration instructions email hasn't been emailed to someone else in your organisation, or that your email program hasn't sent the email to spam.
To enter your registration details, click 'Admin' on the left hand side of the screen, click the 'Options' icon, and select the 'Registration' tab. Input your registration details and then click the 'Update' button at the top. You can retrieve your registration details from here:http://www.payback.ie/support/sup_regcode.aspx
| Payback Licencing |
| Summary |
|
When you purchase an annual licence, this allows you to set up unlimited companies and employees in one installation of Payback. You may also set up as many users as you like as long as they are all reading from the same database. The licence prohibits the use on multiple machines where each user is reading from a separate database. The licence is valid for one year. If you purchase a new licence on 20 Aug 2010, it will expire on 20 Aug 2011. If you are renewing a licence, it will be valid for one year from your previous licence expiry. If you renew early, you will still get a full year. When the licence expires, all features of Payback will still be active, but you will not be able to produce reports. This is so that people do not get 'locked' out of Payback if they've forgotten to renew, and need to pay their employees. We give our customers plenty of notice when their licence is due to expire, by post, email and also 6 weeks prior to expiry in the software Please note that we always offer our customers a full year from the time their licence expires. A licence from one of our competitors will only last until the end of the current year (31 December) Before you start using Payback, there is an End User Licence Agreement that you have to agree to. Here is the full text: |
| The Licence Agreement |
|
1) Terms The copyright of the software and documentation described in this License Agreement is the sole and exclusive property of Silveronion Software Ltd. 'The Licensor' trading as Payback Payroll. The original and any copies of the licensed software which are made by the Licensee shall remain the property of the Licensor. The term 'Software' shall include any modified versions, system upgrades and system updates, added features and modules supplied by the Licensor and or it's authorised agents. 2) Payback Unlimited Edition Version of Software The conditions in section 1) of this agreement apply to the version of the software known as 'Payback Unlimited Edition'. The license granted hereunder authorises the Licensee on a non-exclusive basis to use the licensed program in machine readable form on a single computer system. Sale, lease, hire or reassignment to or by a third party is expressly forbidden without the written consent of the Licensor. The license granted hereunder authorises the Licensee on a non-exclusive basis to use the licensed program in machine readable form on a single computer system for a period of 365 days from the date of installation of the product. Sale, lease, hire or reassignment to or by a third party is expressly forbidden without the written consent of the Licensor. Use of the licensed program is restricted to the nominated user who has been issued with a License number by the Licensor. If the nominated user fails to pay for the software within 30 days of the software being issued to them, the nominated user expressly loses the authorisation to use this Software. 3) Conditions of Agreement The licensee expressly agrees that the software or any part of the software cannot be accessed or referred to or otherwise used to create or modify any other payroll or personnel or business software system. The Licensor does not warrant the quality, fitness for purpose or performance of the Software or the associated documentation and all such warranties, whether implied, statutory or otherwise are hereby excluded. The Licensor is not in any circumstances liable for loss or corruption of data or other Software nor for any lost business or profits or anticipated savings or other consequential loss caused by any defect in the software or any breach of its obligations under this agreement. If either or both of the foregoing reasons shall for any reason be held to be invalid in whole or in part it is hereby agreed that the Licensor's liability to the customer for any loss or damage caused by any defect in the software or any breach of the suppliers obligation under the Agreement shall be limited to and shall not exceed the purchase price of the original software package, for any loss caused by the negligence of the supplier, its employees or its agents shall in any event be limited to the said sum. It is hereby agreed that it shall be the responsibility of the customer to obtain an appropriate insurance for any defects in the software and any loss and damage that may be caused by any breach of the Licensor's obligations under this Agreement and in particular to obtain insurance against loss or corruption of data or other software. By proceeding with this installation you signify that you have read and agree with the terms and conditions set out in this document. |
| Temporary or Free Licences |
|
Please do not ask us for free, or temporary licences. Without charging people for licences, we will not be able to stay in business. |
| Refunds |
|
We offer people the opportunity to try a full version of Payback before purchasing. This gives the user the chance to make sure that it does everything that is required, and is suited to their needs. Once we issue a licence code, we are unable to give a refund. This is due to the nature of the product. |
Top 5 Questions
| Moving Payback from an old PC to a new PC |
To copy Payback from an old PC and move it to a new PC, please follow these instructions. |
On your old PC: |
|
Step 1: Backup your Payback data. To do this select 'Admin' on the left and click the 'Backup' icon. Then click the 'Backup' button. Payback will prompt you for a file name. Save the file to somewhere you can easily remember, like your Desktop. Step 2: Copy the data from your old PC to your new PC. Copy the file you backed up to the new PC to a location you can easily remember, like the Desktop. You can use a USB key, a CD-R, Dropbox, or even email yourself the file to copy it to the new PC. |
On your new PC: |
|
Step 1: Download the latest version of Payback onto your new PC from http://www.payback.ie/support/downloads/ Step 2: Install this version of Payback onto your new PC (Run the setup.exe you downloaded in step one) Step 3: Enter your registration details. Click 'Admin' on the left hand side of the screen, click the 'Options' icon, and select the 'Registration' tab. Input your registration details and then click the 'Update' button at the top (You will find your registration details on this screen in your old PC, or it will be in your original registration email) You can also retrieve your registration details from here:http://www.payback.ie/support/sup_regcode.aspx Step 4: Restore your data. Select 'Admin' on the left, click 'Backup', select the 'Restore' tab, and click the 'Restore' button. Choose the backup file you copied across from your old PC, and click 'OK' Step 5: Restart Payback and check your data is correct. |
Enter the employee's email address in the contact tab in the 'Employee' screen. When you use the email payslips function, the payslip will be sent to the email you enter here.
There are three ways to email payslips:
- Using outlook
- Using Payback SMTP server
- Using your own SMTP server
We recommend using the Payback SMTP server to send emails. However if you want to use MS Outlook you can. To change the email server settings, do the following; If Outlook is giving you problems (such as displaying a 'run time error', then please use the Payback SMTP server option.
- Click 'Admin / Options / Preferences'
- Under 'Email payslip options' select 'Payback.ie SMTP Server'
- Enter a 'Reply to' email address (if an email bounces, this is the address the bounce will go to, so we recommend entering your own email address here) Please fill this in.
- Click 'Update' button
- Once you have processed the Pay for a period, all the payslips can be emailed using the 'Email Payslips' option in the reports screen
Sometimes employees are unable to open damaged payslips
If every now and again an employee is unable to open a damaged payslip, please follow these instructions
- In Windows, create a new folder on your local C: drive called: C:\PaybackTemp
- Open Payback and click on where is says 'Support' on the menu at the top left of the screen.
- Click the Support Icon and select the 'Diagnostics' tab.
- Click the button that says 'Temp Location'
- Select the folder you created in step one, above (C:\PaybackTemp)
- Click the OK button.
- Try emailing payslips.
Notes
- Make sure that you have entered the employee's email address correctly in the the 'Employee screen'. Otherwise the payslips will not be delievered to the employee
- When using the recommended 'Payback SMTP' option, please make sure you've entered your own email address in the 'Reply-to email address' field in the Admin / Preferences screen. This is very important, as it is the address that any email bounce-backs will be sent to.
- Make sure that the employees' emails are ending up in their spam folders, or are being blocked as 'spam' by their ISP (some ISPs require 'human verification' before releasing suspected spam emails)
- Check that all email address are correct! (in both the 'Employee' screen, and the 'Preferences / reply-to' box.)
|
Step 1: Retrieve the P2C file:
|
|
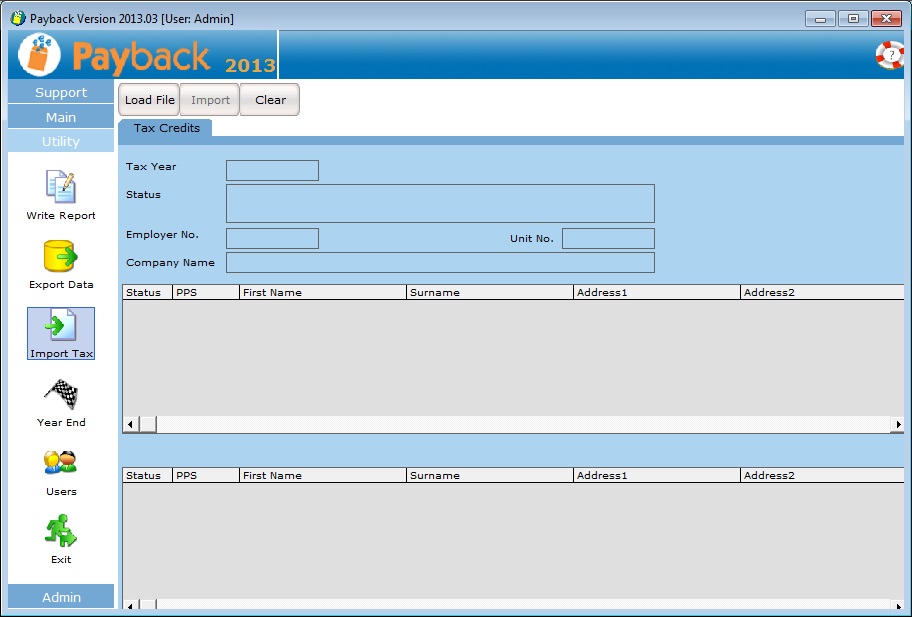
Step 2: Open Payback and click on 'Utility' on the menu at the left, and then select the 'Import Tax' icon. The P2C file import screen will appear.
Step 3: Click 'Load File' at the top of the screen and select the P2C file you downloaded from ROS in step 1. Check the data in the grids, and if you are happy, click the 'Import' button. Make sure that the company has been successfully matched before importing the data. NOTE: Payback matches P2C data using: - Employer No. (Details tab in Company Screen) - PPS No. (Contact tab in Employee Screen) Please make sure that you have entered these correctly before importing P2C files. If you have not entered an employer number for your existing companies, or have entered it incorrectly, then Payback will not be able to match up your data. If you continue with the P2C import, then a duplicate company will be created. If you have not entered PPSNs for any of your employees, or they are incorrect, then (like company, above) Payback will not be able to match the employees up to the P2C data. If you continue with the import then duplicate employees will be set up. If you find that duplicate employees have been set up, these can be deleted by following these instructions:http://www.payback.ie/phpBB3/viewtopic.php?f=6&t=3 Duplicate companies can be deleted following these instructions: http://www.payback.ie/phpBB3/viewtopic.php?f=6&t=420 |
Holiday pay in Payback exists for two main reasons;
- To ensure you don't pay the employees by mistake while they're on holiday
- To ensure that your employees get the correct amount of tax credits, cut-off point and insurable weeks when you're paying them in advance
It has the added benefit of allowing you to keep track of holidays taken.
Scenario
A weekly paid employee who is paid every Wednesday is going on holiday for 2 weeks from the 7th April 2008 to the 18th April 2008. They want their 2 weeks holiday pay in advance to be included in their pay for the 2nd April
Requirements
- You need to pay them 3 weeks worth of pay on the 2nd April payroll run (the current week, plus 2 weeks in advance)
- They should get 3 weeks worth of PRSI insurable weeks, tax credits and cut-off point on the 2nd April
- You need to ensure they don't get paid on the 9th April or the 16th April runs
Method
- In the Payroll screen, select the required employee
- On the Elements tab, select a blank row, select 'Holidays', and click the 'View' button on the right of the grid. The 'calculate leave' pop-up box will appear.
- Highlight the weeks they are on holiday for. In this example you should highlight all the days between the 7th April - 18th April inclusive.
- Ensure 'Insurable weeks' says '2'
- Click 'Ok', this returns you to the Payroll screen
- Ensure the Holiday Pay and the Salary is as required. Also, that the 'Insurable Weeks' at the bottom says '3' (this week plus the 2 holiday weeks)
- Pay the employee as usual
You will also notice that for the following two pay runs (16th April and 23rd April) the employee is in green, indicating they are on holiday and will not be paid.
Notes
It may sometimes be necessary to change the figure in the 'Insurable Weeks' to the correct figure manually. Payback attempts to calculate the insurable weeks based on the holiday days you mark, but you should confirm the number is correct before paying the employee and change it if it doesn't look right. This figure determines the Tax credits and Standard Rate Cut Off Point used.
Payback is in fact doing the 'insurable/tax' weeks calculation correctly, although it might seem counter-intuitive. The reason for this is the way the Revenue tax calendar works. Insurable weeks start from the 1 January onwards. The first week from 1 to 7 January, second week from 8 to 14th January etc. Insurable weeks can be overridden.
The holiday entitlement tab is only a calculator. It is there to give an indication of holiday entitlement. It has no bearing on any calculations in the payroll screen, or how much holiday you can actually allocate to an employee. Payback does not store or use the holiday calculator information. (HR rules can be complex and we recommend confirming any holiday entitlements with a practitioner.)
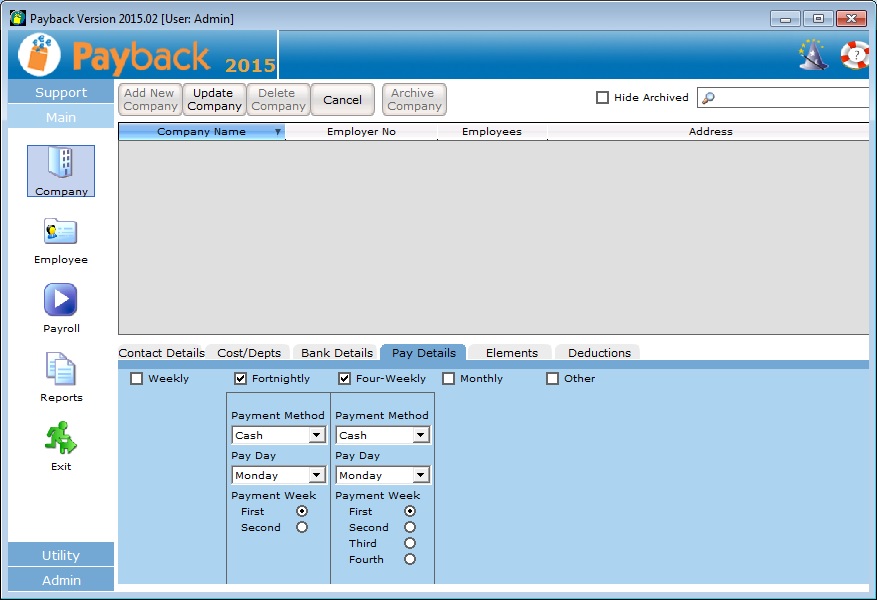
Setting up Payment Frequencies
The pay date can be changed in the Company screen, under the 'Pay details' tab. Payment frequencies can also be set up here:
- Weekly
- Fortnightly
- Four-Weekly
- Monthly
(The following frequencies can be set up under Other)
- Two Monthly
- Quarterly
- Four Monthly
- Six Monthly
- Annually
If a payment has been made for a pay frequency, then it can not be unticked. This is to stop 'Orphan payments'. At least one payment frequency must be set up. Click 'Update Company' at the top of the screen to update the Payment frequency.
The Pay date will be determined by the way you set up the payment frequency. For example, if pay day of Monday is set up for the weekly pay frequency, then the pay date will be the date of each Monday in the year.
Changing Payment Frequency mid year
Once you start processing pay using a payment frequency (eg Monthly) it is possible to change payment frequency mid-year (eg Monthly to Weekly). However, we do not recommend this. Changing Payment frequency mid year can cause problems with tax credits and insurable weeks. For example a monthly paid person has been paid for 3 months, with a total of 13 weeks and are then moved to weekly, but the user starts them on week 12 or 14, then they will end up with the wrong number of insurable weeks.
If the pay date is changed, you may not be able to easily select past, processed payslips. This is because in the Payroll screen payslips are selected according to the pay date in the calendar. (You have to change the pay date back again to see the old payslips and things start to get messy).
We recommend only changing pay frequency at the start of the year, before any payments have been processed. If you have no choice but to change pay frequency mid-year, please consider the above two issues:
- viewing old payslips (with the old payment frequency)
- making sure that the insurable weeks are correct.
(If you've already processed a payment at the 'wrong' pay date, it will be easier to just rewind that payment first before changing the payment frequency or pay date)
2015 Year end and Starting 2016
| Summary |
|
If you are running version 2016.03, then your payroll software is already up to date. You do not need to do anything else. We have released a new version for 2016. It can be downloaded from here: http://www.payback.ie/downloads/setup.exe IMPORTANT: Please back up your data before installing this update. (In Payback, click Admin / Backup / Backup and save the file somewhere like your desktop). Download and run the setup.exe file, and follow the on-screen instructions. This will update your software to v2016.03. If you start Payback and notice your payroll data is not present, then you can restore your data from the back up you made (click Admin / Backup / Restore). When you have successfully upgraded, the version number in the title bar at the top of the screen in Payback should say 2016.03. Use the 'Year' drop down list at the top left of the Payroll screen to select the new year. |
| How to Update |
|
NOTE: Do not uninstall your existing version of Payback. 1. Backup your payroll data (Click 'Admin' on the left, and then 'Backup') |
| Release Notes |
| Budget Changes |
|
PAYE
Employee PRSI (Class A)
Other Employee PRSI PRSA, 2016 Chapter 2 of the Finance Bill 2015 contains an amendment to the USC treatment of employer contributions to an employee’s Personal Retirement Savings Account (PRSA). With effect from 1 January 2016, these contributions will no longer attract a USC liability for the employee. Revenue has previously advised that USC Week 53 should be processed on an emergency basis. Payback has followed this advice. If you processed a week 53 for your employees in 2015, they may be due a refund for USC. Please contact Revenue to arrange the refund. Telephone: 1890 25 45 65 If an employee has not yet received a P2C for 2016, then there rates are determined according to section 4.35(b) of this document:http://www.revenue.ie/en/tax/usc/universal-social-charge-faqs.pdf
|
| New Features |
|
P35 Wizard
CloudPay |
|
The deadline for submitting your P35 return is the 15th February. (We strongly advise checking this date with Revenue as they may decide to change the deadline, and then charge late filing penalties etc). As there is limited support available at the weekends, we would advise completing your P35 return as soon as possible. Here are some guidelines to help you in this process. |
| Payback ROS P35 Process |
Upload your 2015 P35 to ROS as soon as possible. If you have any issues it will give you time to sort them out. |
| Frequently Asked Questions |
|
Q. Is it safe to upgrade to v2016.03, as I'm still running v2015.04 (or some other 2015 version of Payback) A. Yes. Upgrade immediately. Please ensure you perform a backup before upgrading in case there are problems. Q. Someone left and re-joined during the year. They're now appearing as duplicate employees in the printed P35 report. A. The printed P35 report will show duplicate employees as two separate lines - This isn't an issue as Revenue only accept P35s on their own stationery. Our printed P35 report is used mainly to cross-check your figures and to manually transpose figures to the Revenue P35 form. Duplicate employees are merged into one record into the ROS P35 file, based on their PPS number. Q. I want to delete employees from 2015 who no longer work for me. A. You cannot delete Employees from the master file, as the payroll data has to be retained for historic reasons. If you P45 them they will no longer appear on the 'Payroll' screen Q. Pension payments are not appearing on the P35 report A. You may have selected the incorrect 'type' when you were setting up the pension deduction. The 'type' is the only way Payback has of identifying the deduction as a pension. You will need to map the pension deductions so that they are picked up for the P35. Here are the instructions: http://www.payback.ie/phpBB3/viewtopic.php?f=6&t=385 To set up pensions, please follow these instructions: http://www.payback.ie/support/sup_pension.aspx Q. I'm getting an error when I upload to ROS A. Payback have a P35 error fixing facility where it is possible to quickly fix common errors like incorrect PPS numbers etc. To use this facility:
Q. I'm still having problems producing the P35 return. A. Please Check the forum, and the FAQ. If you can not find the answer, then submit a support ticket describing your problem - this is the fastest way to get a response. The support department is very busy in the weeks leading up to the P35 return. We do not recommend email as your query may get lost and will not be logged. Q. The P60s are blank. A. You need to upgrade to 2016.03 (Or higher) and then produce the P60s. If you need to upgrade then click Admin/Backup/Backup tobackup your data (this is very important). Then download and run the upgrade file from http://www.payback.ie/downloads/setup.exe Q. There is no year on the P60s. A. The P60 template issued by Revenue does not have a year on it. However, due to requests from our customers, we have updated the certificate to now include the year. You need to upgrade to 2016.03 (Or higher) and then produce the P60s. If you need to upgrade then click Admin/Backup/Backup to backup your data (this is very important). Then download and run the upgrade file fromhttp://www.payback.ie/downloads/setup.exe Common ROS errors and solutions are listed below. If you're still having problems uploading after reviewing this list, then please check the forum http://www.payback.ie/phpBB3/ and the FAQ http://www.payback.ie/support/sup_faq.aspx If you still can not find a solution, thensubmit a support ticket explaining what the error message is. |
| Medical Insurance and Tax Relief at Source |
|
Revenue now requires employers to enter the gross medical insurance premium eligible for tax relief for each employee that has their gross premium paid by the company. To see if any employees fall into this category, select 'ROS P35' in the reports screen and then click the 'Medical Insurance' button that appears at the top of the screen. Any employees that had thier Gross Premium paid by the company will be listed. If no employees appear then you can ignore this requirement.
|
| Common ROS Errors and Solutions |
|
When you upload the P35 to Revenue in most cases it will upload with no errors. In case you do encounter ROS errors, here are some common ones with suggested solutions; ROS ERROR: Form version 9 ...... ROS ERROR: "PPSN has invalid format in the P35L for John Smith, PPSN: 1111111X" ROS ERROR: "Surname has invalid format in the P35L for John Smith 22, PPSN: 1111111L" ROS ERROR: "Date of Birth is missing and employee cannot be identified in the P35L for John Smith, PPSN: Not Provided." ROS ERROR: "Date of Commencement must be completed where previous pay and tax is entered in the P35L for John Smith, PPSN: 1111111L" ROS ERROR: "Unidentified error in a P35L Employer Tag, Employer Number : Not Provided" ROS ERROR: The value '' of attribute 'number' on element 'ns1:Employer' is not valid with respect to its type, 'registration'. ROS ERROR: "Total PRSI is not completed despite liability in the P35L for John Smith, PPSN: 1111111L" ROS ERROR: "Total Weeks Insurable has too large a value in the P35L for John Smith, PPSN: 1111111L" ROS ERROR: "Initial PRSI Class is missing in the P35L for John Smith, PPSN: 1111111L" ROS ERROR: "Unidentified error in a P35L: PPSN: 1111111L, Name : John Smith." ROS ERROR: "Value '29-08-1994' is not facet-valid with respect to pattern '[0-3]?[0-9]/[0-3]?[0-9]/[1-9][0-9]{3}' for type 'date'" |
| Notes |
|
| Introduction |
|
Mistakes can be easily rectified in Payback. In the past if a user made a mistake while processing payments using other payroll software, correcting would involve a laborious process of restoring old back ups, and possibly losing work. Payback has a 'rewind' feature that allows payments to be reversed, or 'un-done'. Payback allows the following:
|
| Rewind the current processed payment |
|
At the top of the Payroll screen is a 'Rewind' button. Clicking this causes the current payment (For the selected pay date and employee) to be rewound, or undone.
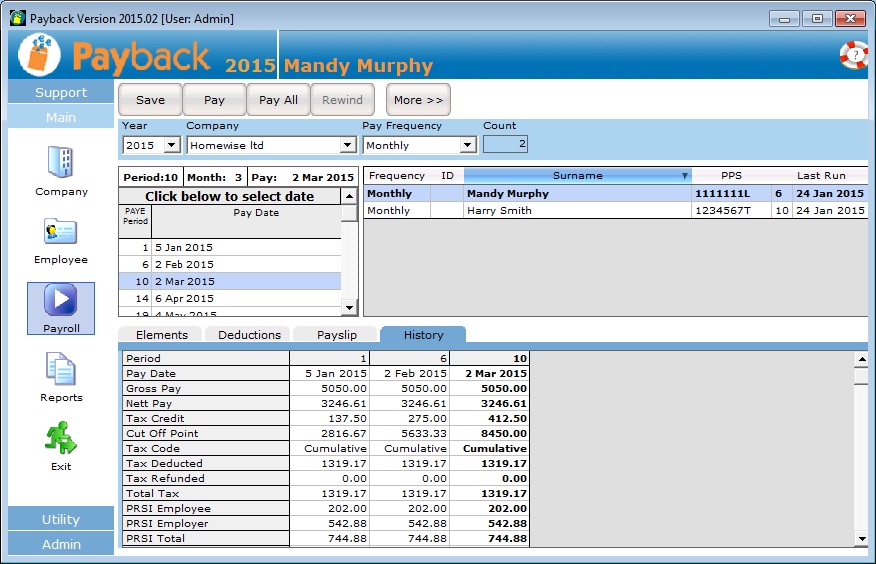
NOTE: Bold text means that the payment has not been processed yet. To process a payment, click the 'Pay' button. In the above screen shot, Mandy has not had her 2 Mar 2015 payment processed yet as it is displayed in bold. Her name is bold in the list of employees and in the history grid, the column for 2 Mar 2015 is also in bold. The figures displayed are preview figures. Harry Smith has had his payment for 2 Mar 2015 processed because it is not in bold. (It is possible to rewind Harry, but not Mandy) |
| Change payments from previous periods |
|
Payroll is generally calculated on a cumulative basis. This means that previous payments impact PAYE, PRSI and USC that is owed for future payments. For example, if an employee was taxed on the emergency basis for January and then they receive their Certificate of Tax Credits before their next pay then they would probably get a tax refund in their February pay. PRSI and USC may also have thresholds and bands that may be breached during the year that may impact future payments. This means that payments need to be rewound in reverse chronological order. For Example: Week 1: 1 Jan to 7 Jan : - Period paid Week 2: 8 Jan to 14 Jan : Period paid incorrectly Week 3: 15 Jan to 21 Jan : Period Paid Week 4: 22 Jan to 28 Jan : Period Paid Week 5: 29 Jan to 4 Feb : Period Not Paid Week 6: 5 Feb to 11 Feb : Period Not Paid ... It is week 5 and a mistake has been noticed for week 2. In order to rewind week 2 to correct the mistake, week 4 and then week 3 first have to be rewound. Payments can only be rewound in reverse order.
The 'Change' button will allow to reprocess a period without first rewinding preceding periods. In the example above, you could follow these instructions:
This automatically reprocesses week 3 and week 4. We advise caution using this method because future payments you've already processed for the employee can be changed. The could impact payslips and P30s. |
| Rewind and Change payments from previous years |
|
To change previous years, Select the year you wish to change from the 'Year' drop down at the top right of the Payroll screen. Please make sure that you have the correct tax credits, standard rate cut off point, PRSI class and USC rates for the employee for the year you wish to make changes to. You will have to edit these in the Employee screen. When you have finished making the changes for the year, remember to change these rates back. Payback will automatically use the correct PRSI settings and calculations appropriate to the selected year. |
| Bulk Rewind a full year for a single or multiple employees |
|
|
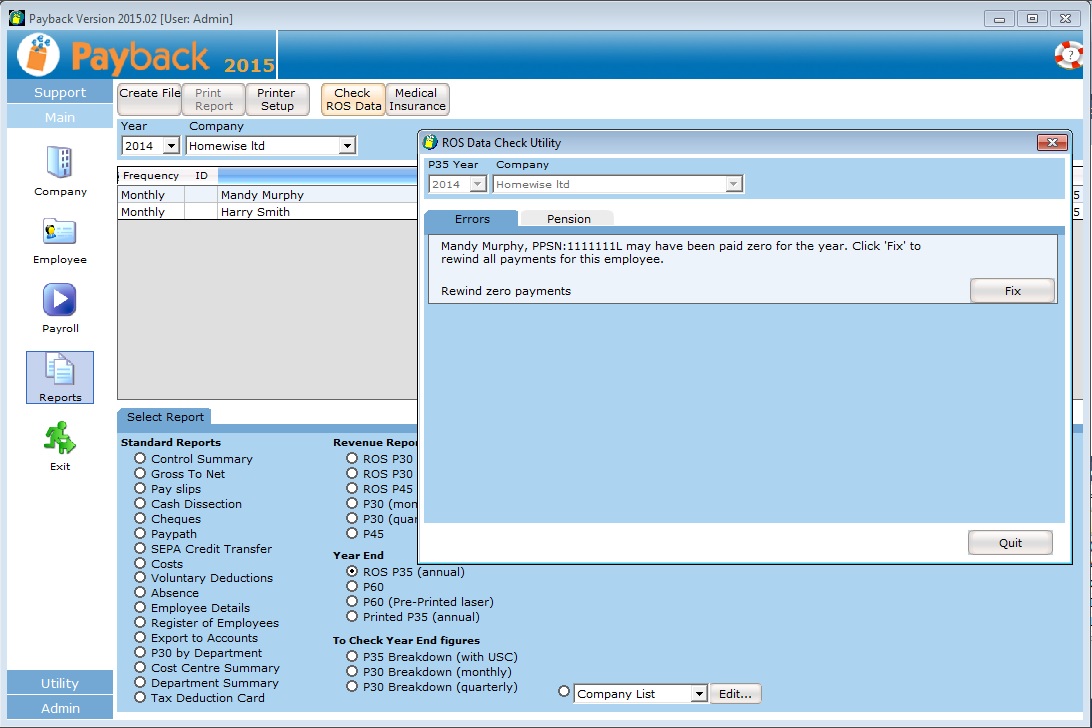
| Automatically fix P35 errors |
|
Another way of making changes to payments is via the Check Ros Data facility. This can be found in the Reports screen. Select the year you wish to create the P35 for and then select the ROS P35 (Annual) report. A button will appear at the top of the screen called 'Check Ros Data'. Using this will allow you to quickly make changes to allow you submit your P35. Example, to fix this error: ROS ERROR: "Total PRSI is not completed despite liability in the P35L for John Smith, PPSN: 1111111L" "Pay has too small a value in the P35L for John Smith, PPSN: 1111111L" The above can appear if an employee has been paid zero for the year. This can happen if the user has processed payslips with net and gross pay of zero. It can also happen if an employee has been on taxable maternity where their credits have been reduced. (We suggest contacting Revenue or your accountant to find out how to submit a return for such employees. You may have to fill out a P11:http://www.revenue.ie/en/tax/it/forms/form11.pdf )
|
| Notes |
|

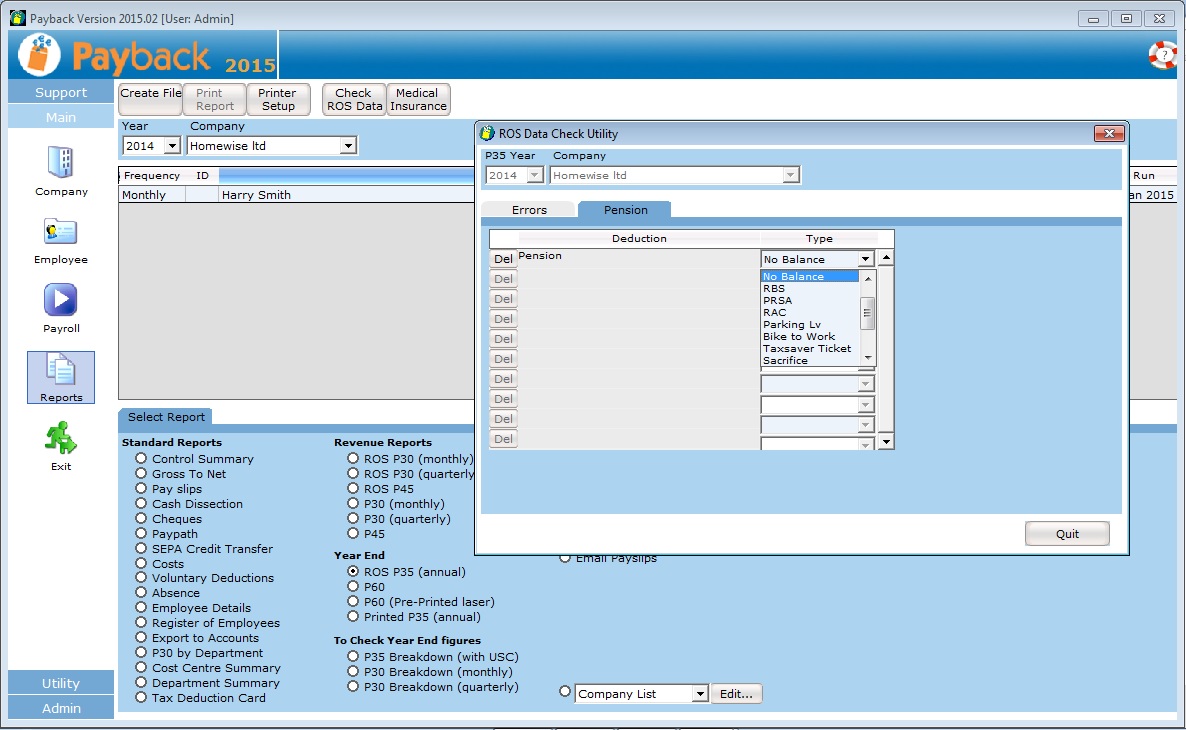
| Pensions have been set up but they are not appearing on the P35LF. |
|
If an employee is set up as paying a pension, but the amount is not appearing on the P35LF, please make sure you have the correct pension type mapped to the deduction (RAC, RBS, or PRSA) The good news is that Payback has a utility to map pension deductions to the correct Pension type. Follow the instructions below to map pensions.
|
| Choosing what to map your pension deductions to |
|
The listed types refer to the following:
If you do not know which one to select, ask the pension provider. |
| When moving to the new year, the fortnightly dates start on the incorrect week. |
|
When setting up the fortnightly (or four-weekly) frequency the payment week is selected. For Fortnightly, this can be 'First' or 'Second'. For Four-weekly it can be 'First', 'Second', 'Third' or 'Fourth'. Setting this determines the first, and subsequent, payment dates. |
|
| Determining on which week the pay date will fall |
|
Fortnightly - First week is selected. Weeks highlighted in red (odd weeks) indicate the pay date. Week 1: 1 Jan to 7 Jan Week 2: 8 Jan to 14 Jan Week 3: 15 Jan to 21 Jan Week 4: 22 Jan to 28 Jan Week 5: 29 Jan to 4 Feb ... ... Week 51: 17 Dec to 23 Dec Week 52: 24 Dec to 30 Dec Week 53: 31 Dec Fortnightly - Second week is selected. Weeks highlighted in red (even weeks) indicate the pay date. Week 1: 1 Jan to 7 Jan Week 2: 8 Jan to 14 Jan Week 3: 15 Jan to 21 Jan Week 4: 22 Jan to 28 Jan Week 5: 29 Jan to 4 Feb ... ... Week 51: 17 Dec to 23 Dec Week 52: 24 Dec to 30 Dec Week 53: 31 Dec Four-weekly - First week is selected. Weeks highlighted in red indicate the pay date. Week 1: 1 Jan to 7 Jan Week 2: 8 Jan to 14 Jan Week 3: 15 Jan to 21 Jan Week 4: 22 Jan to 28 Jan Week 5: 29 Jan to 4 Feb ... ... Week 49: 3 Dec to 9 Dec Week 50: 10 Dec to 16 Dec Week 51: 17 Dec to 23 Dec Week 52: 24 Dec to 30 Dec Week 53: 31 Dec (Red if pay day falls on 31 dec) Four-weekly - Third week is selected. Weeks highlighted in red indicate the pay date. Week 1: 1 Jan to 7 Jan Week 2: 8 Jan to 14 Jan Week 3: 15 Jan to 21 Jan Week 4: 22 Jan to 28 Jan Week 5: 29 Jan to 4 Feb ... ... Week 51: 17 Dec to 23 Dec Week 52: 24 Dec to 30 Dec Week 53: 31 Dec |
| Starting new year but the pay date is incorrect. Why is this? |
|
An example. Fortnightly payment frequency was set up with the Second week being the payment week. Wednesday was selected as the Payday. The pay dates for 2014 look like this: Week 1: 1 Jan to 7 Jan Week 2: 8 Jan to 14 Jan : Pay date is Wed 8 Jan 2014 Week 3: 15 Jan to 21 Jan Week 4: 22 Jan to 28 Jan : Pay date is Wed 22 Jan 2014 Week 5: 29 Jan to 4 Feb ... ... Week 51: 17 Dec to 23 Dec Week 52: 24 Dec to 30 Dec : Pay date is Wed 24 Dec 2014 Week 53: 31 Dec Following this pattern, the next expected pay date would be Wednesday 7 January 2015. This is two weeks after the last pay date in 2014 (Wednesday 24 Dec 2014) However, 7 January 2015 falls in the first PAYE week of 2015, not the second. The Fortnightly payment frequency was set up for every second week in the year. Payback chooses 14 January 2015 as the pay date as this is the second PAYE week of the year - conforming to the way the frequency was set up in the company screen. |
| How to fix the pay dates |
(In other words, change the payment week) If you are using the Four-weekly payment frequency, you will have to select the appropriate Week for your first payment. Please refer to the PAYE calendar to determine which week you should select Week 53 and the PAYE Calendar explained |
| Notes |
|
Common Queries
Payments and deductions are set up using a combination of Elements and Voluntary Deductions. It is possible to set up all kinds of scenarios. We have made it easier for you by providing a 'Quick Setup' facility Instructions for this can be found here: Quick Setup
However, sometimes people need to set up payments or deductions that are more complex. Maybe employees are owed money from previous periods, the company is making donations or you want to enter in the Net amount and let Payback calculate the Gross etc, etc... In these cases, elements and deductions can be manually set up. Instructions for manually setting up elements and deductions can be found here: Manually set up elements and deductions
| Quick Setup Cycle to work/Salary Sacrifice | ||||||||||||||||||
|
Similar to the travel pass scheme, an employer and employee may enter into a salary sacrifice arrangement whereby the employee agrees to forego part of his or her salary to cover the costs associated with the purchase of the bicycle/safety equipment. From the 2013 version onward, there is now an easier way to process Cycle to work, by using 'Quick Setup'. Cycle to Work should be deducted from the salary by means of salary sacrifice before any tax / PRSI calculations are made. The Revenue leaflet advises to treat the scheme as Benefit in Kind. |
||||||||||||||||||
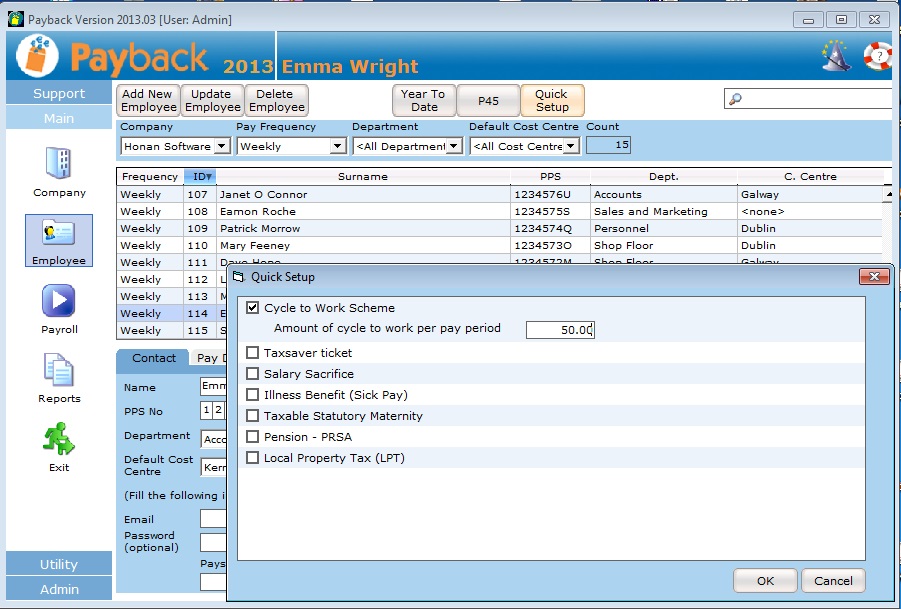
|
Step 1: Select the employee in the Employee screen. Step 2: Click the 'Quick Setup' button at the top of the screen. Step 3: Tick the 'Cycle to Work Scheme' tick box in the Quick Setup screen. Step 4: Enter the amount of sacrifice (cycle to work) per pay period. Step 5: Click 'Ok', then click 'Update employee'
|
||||||||||||||||||
| Enter Cycle to work directly into elements and deductions grids | ||||||||||||||||||
|
To do a salary sacrifice in Payback, assuming a gross of €1000 and a salary sacrifice of €100, for version 9 or greater (with USC) please set up the elements and deductions like this: |
||||||||||||||||||
|
||||||||||||||||||
|
Now we should make a deduction from the Salary of €100, because the employee is not getting this amount in their wage packet. When deducting this amount, the Tax, PRSI and USC should stay the same from step one. The deduction will look like this: |
||||||||||||||||||
|
||||||||||||||||||
|
Please note: you should manually adjust the salary. Manually reduce the salary amount (eg €1000) by the salary sacrifice amount (€100). |
||||||||||||||||||
| Notes | ||||||||||||||||||
|
||||||||||||||||||
|
The cycle to work scheme is described here: http://www.revenue.ie/en/practitioner/law/bik-exemption-for-bicycles.pdf The Taxsaver scheme is described here: http://www.revenue.ie/en/spotlights/travel-pass.html |
| Quick Setup Illness Benefit | ||||||||||||
|
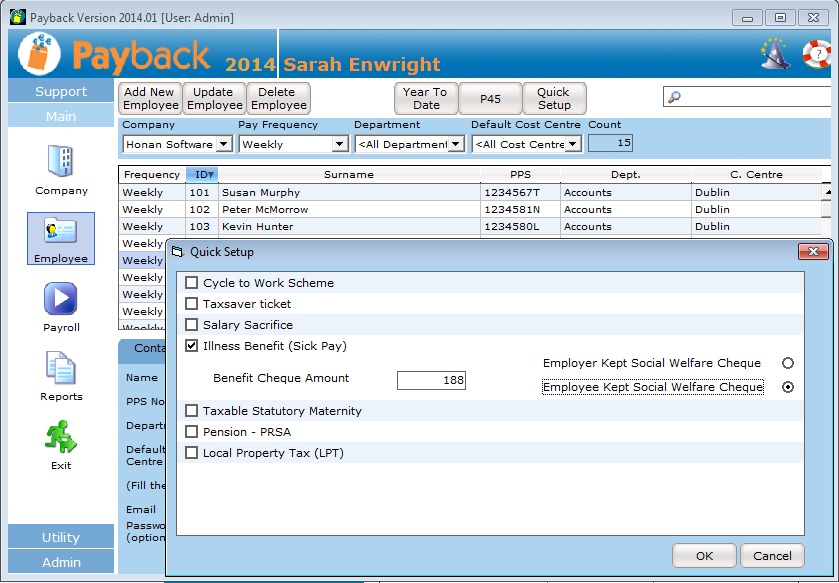
From 6 Jan 2014 Illness Benefit payment will not be made for the first six days of illness (up from three days). This means that a person will not be entitled to Illness Benefit for the first six days of their claim (unless the person was receiving Illness Benefit, Injury Benefit or a jobseekers' payment immediately before their claim). Claims with a commencement date before 6 Jan 2014 and those coming from Maternity Benefit will not be paid for the first three days of illness. Illness Benefit is taxable. However, it is paid to the employee without any deduction of income tax. This is why Illness Benefit is put through the payroll - so that it can be correctly taxed. |
||||||||||||
|
||||||||||||
| Enter Illness Benefit directly into elements and deductions grids | ||||||||||||
|
Example One: Illness benefit of €188 where the employer keeps the social welfare cheque |
||||||||||||
|
||||||||||||
|
You do not have to set up any deductions in this scenario. The social welfare amount should be paid back to the employee because the employer kept the cheque. Note that the Social Welfare amount has been taxed. |
||||||||||||
|
Example Two: Illness benefit of €188 where the employee keeps the social welfare cheque |
||||||||||||
|
||||||||||||
|
In this example, we also need to make a deduction. This is because the Employee kept the social welfare cheque and no social welfare payment was handed over to the company. The Benefit amount is added as an element so that the correct tax can be applied. The Benefit amount is then taken off again because the company should not pay the benefit amount to the employee. (The employee has already received it). The Benefit amount is only appearing on the payslip for tax reasons. |
||||||||||||
|
||||||||||||
| Notes | ||||||||||||
|
| Local Property Tax (LPT) |
|
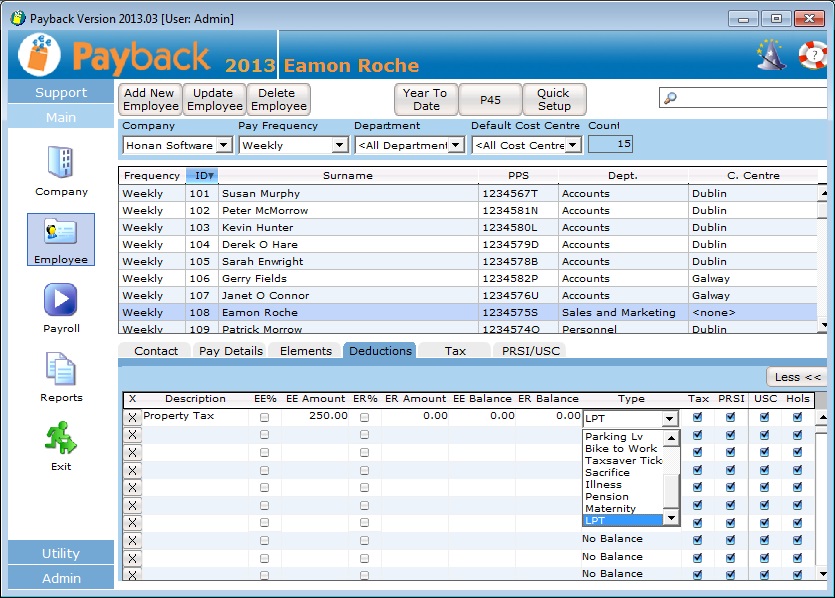
From the 1 July 2013, Employers will have to collect Property Tax through payroll. Revenue have instructed that this tax should be deducted both for employees that choose this method of payment and also as a compliance measure. Employers will be legally obliged to enforce this deduction. Employers should only deduct, or stop deducting, Local Property Tax where they have been instructed to do so by the Revenue. This instruction can come either via a Tax Credit Certificate, or a P2C file downloaded from ROS. Employers have no descretion in this matter, even if the net pay is zero, below protected earnings or the employee objects. When you import the P2C file, if you get the error message 'String Value (ID_EXEMPT_INDICATOR] too long' it means that you are running an old version of Payback. You should upgrade to the latest version of Payback, and try the import again. |
| How to import a P2C file into Payback to set up LPT |
|
Step 1: Retrieve the P2C file:
|
|
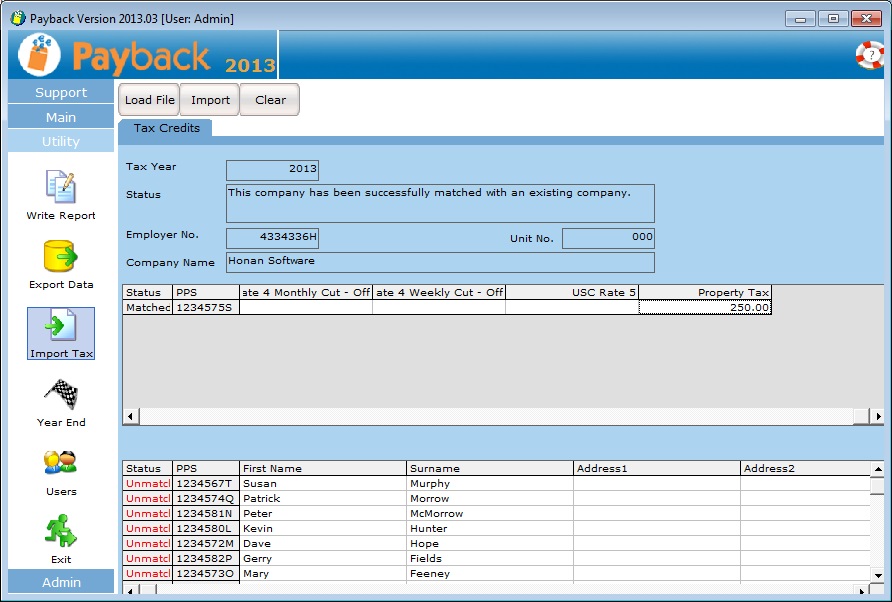
Step 2: Open Payback and click on 'Utility' on the menu at the left, and then select the 'Import Tax' icon. The P2C file import screen will appear.
Step 3: Click 'Load File' at the top of the screen and select the P2C file you downloaded from ROS in step 1. Check the data in the grids, and if you are happy, click the 'Import' button. Make sure that the company has been successfully matched before importing the data. NOTE: Payback matches P2C data using: - Employer No. (Details tab in Company Screen) - PPS No. (Contact tab in Employee Screen) Please make sure that you have entered these correctly before importing P2C files. If you have not entered an employer number for your existing companies, or have entered it incorrectly, then Payback will not be able to match up your data. If you continue with the P2C import, then a duplicate company will be created. If you have not entered PPSNs for any of your employees, or they are incorrect, then (like company, above) Payback will not be able to match the employees up to the P2C data. If you continue with the import then duplicate employees will be set up. If you find that duplicate employees have been set up, these can be deleted by following these instructions:http://www.payback.ie/phpBB3/viewtopic.php?f=6&t=3 Duplicate companies can be deleted following these instructions: http://www.payback.ie/phpBB3/viewtopic.php?f=6&t=420 In this example, the employee Eamon Roche has a property tax deduction of €250.00 for 2013
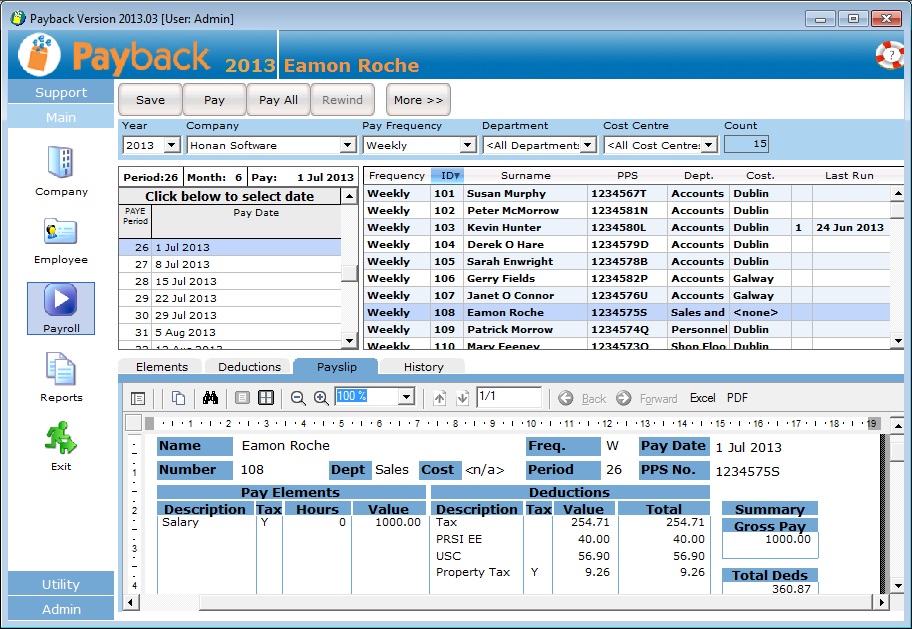
Step 4: Go to the Payroll screen and make sure that the Property Tax deduction is on the payslip.
|
| How to set up Property Tax (LPT) from a tax credit certificate |
|
There are two ways to manually set up Property Tax (LPT) in Payback. The deduction can be set up via the deductions grid in the Employee screen, or it can be set up using the 'Quick Setup' facility. |
| Using Quick Setup |
|
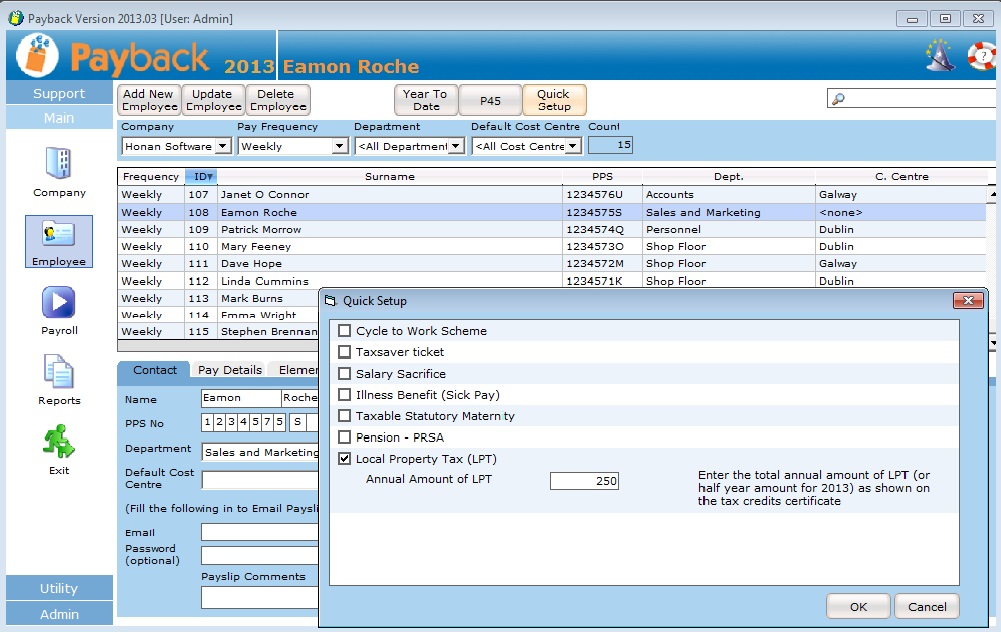
Step 1: Go to the employee screen and select the employee you wish to set up the Property Tax deduction for. Step 2: Click the 'Quick Setup' button at the top of the employee screen.
Step 3: Tick 'Local Property Tax (LPT) and enter the annual amount of property tax. (For 2013, half the amount of property tax is to be paid. From 2014 onwards the full amount is to be paid. Enter the exact amount shown on the Tax Certificate in the box) Step 4: Click 'OK' and then click 'Update Employee' Step 5: Check that the Property Tax is being deducted in the Payroll screen. |
| Entering Property Tax directly into the Deductions grid |
|
Step 1: Go to the employee screen and select the employee you wish to set up the Property Tax deduction for. Step 2: Click the Deductions tab and click on the first blank row. Step 3: Enter 'Property Tax' (or suitable description) in the description column and type the Annual amount of LPT in the EE Amount column Step 4: Click 'More>>' at the top right of the grid. More columns will appear. Under the 'Type' column, select LPT. Step 5: Click Update employee. The screen should look like below:
Step 6: Check that the Property Tax is being deducted in the Payroll screen. |
| How Property Tax (LPT) is reported |
|
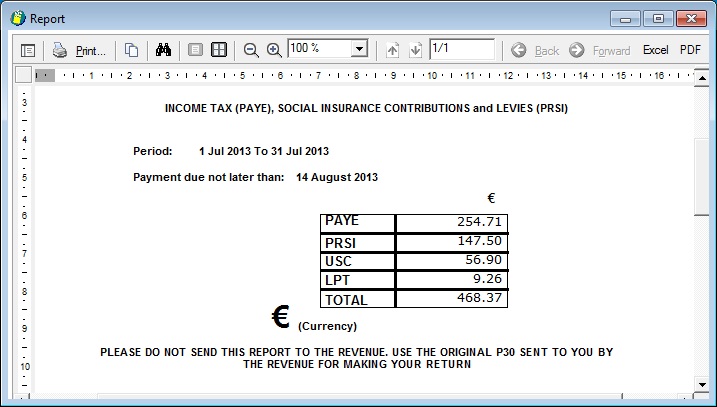
The P30 and P45 have now changed. The P30 now has four items, PAYE, PRSI (Employer + Employee), USC and LPT. An example is shown below:
The P45 also has a new field for 'Total amount of Local Property Tax deducted in this period of employment - if applicable.' |
| Notes |
|
Property tax should only be deducted for pay dates on or after 1 July 2013. On pay dates before 1 July 2013, the property tax will be zero. Payback does not allow the property tax to be changed in the Payroll screen. If you want to change this deduction you should do so either by importing a new P2C file, or from deductions grid or 'quick setup' in the Employee screen. Annual amounts should always be used. Payback will automatically calculate the liability per payment period. The Property Tax liability is spread across the remaining payments for the year. In the above 'Eamon Roche' example, there are 27 payment weeks from 1 July until the end of 2013. The €250.00 is spread evenly across the remaining weeks. (€9.26 a week). If the employee does not have enough net pay to cover the property tax, then the deficit is carried forward and spread across the remaining payment periods. As Property Tax is a flat rate deduction (not percentage based, or based on earnings) It is possible that an employee can now have zero net pay, or less than protected earnings. Such scenarios should be resolved with Revenue. Employers are still legally obliged to make the deduction. Property tax can be deleted in Payback by removing the deduction in the Employee screen deductions tab for the employee and clicking 'Update Employee' More information about the Property Tax can be found here: http://www.revenue.ie/en/tax/lpt/ |
Payback allows you to transfer payments electronically, directly into employee bank accounts. To do this, you should first create a SEPA bank file containing the employee payment and bank account details. This can then be uploaded to your bank.
Before SEPA was introduced, the file format was called 'Paypath', or 'Standard 18'. The banks have phased out Paypath and now only SEPA files are accepted.
SEPA files are text XML files and can be created by following these instructions:
http://www.payback.ie/support/quick-tutorials/sepa-paying-employees-by-credit-transfer-paypath/
How to set up Pensions (PRSA, CWPS and other pensions)
Why kind of pension should I set up?
- RAC stands for Retirement Annuity Contract
- RBS stands for Retirement Benefit Scheme.
These are terms used on the P35.
If your pension is not a PRSA or a RAC then it is probably an RBS. This should be confirmed with your accountant or pension provider.
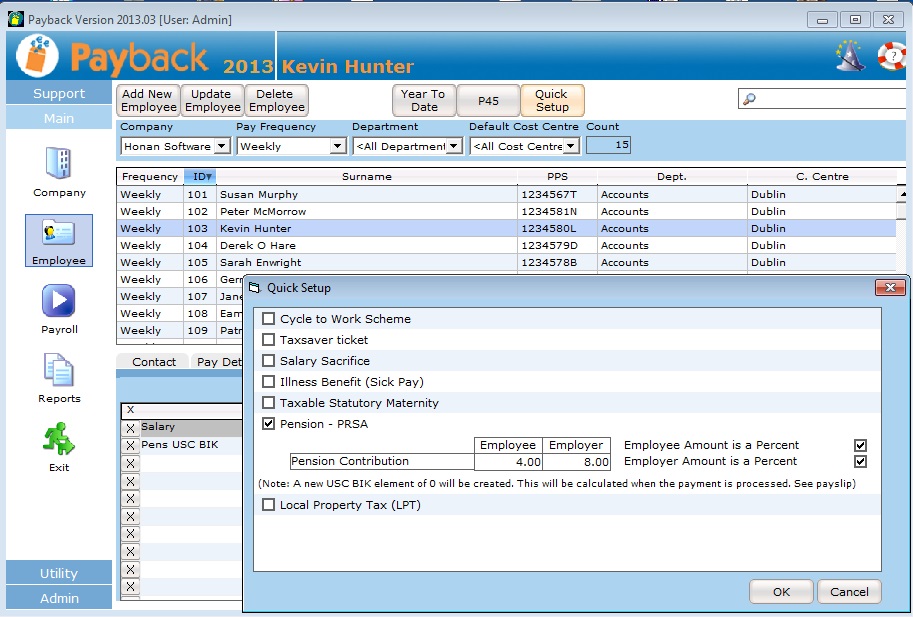
How to set up a PRSA using Quick Set up
Step 1: Select the employee in the Employee screen.
Step 2: Click the 'Quick Setup' button at the top of the screen.
Step 3: Tick the 'Pension - PRSA' tick box in the Quick Setup screen.
Step 4: Enter the Contribution amounts, and tick the appropriate boxes if the contributions are a percentage.
Step 5: Click 'Ok', then click 'Update employee'
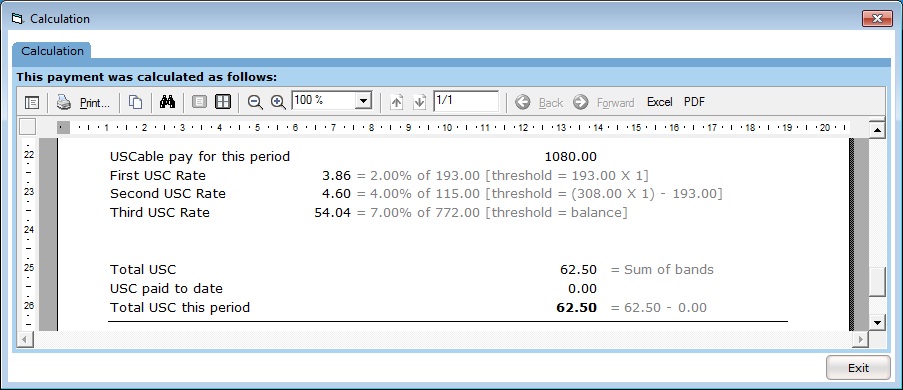
A USC PRSA Benefit in Kind element will be automatically added. This element will appear on the payslip as the value of employer contribution. It is a notional amount which means it only appears for USC calculation purposes. The employee does not get this amount as part of their salary.
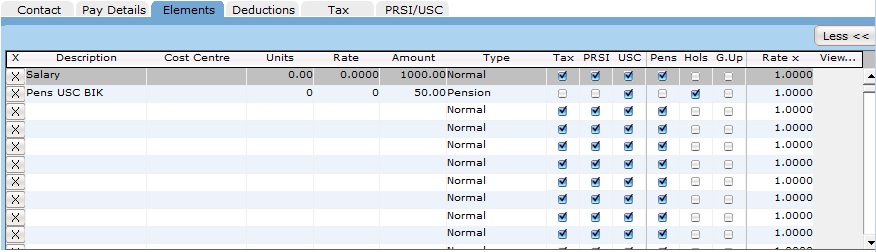
It appears in the elements grid as a zero amount (see below)
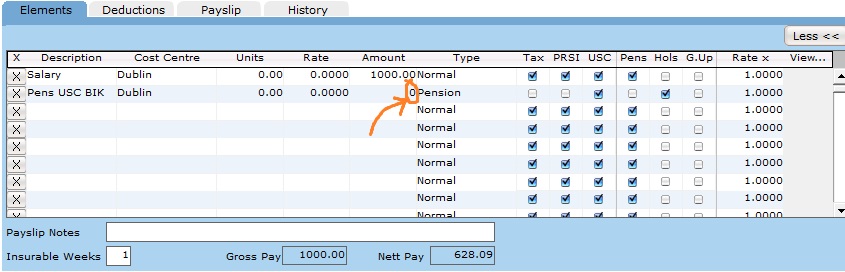
The USC PRSA Benefit in Kind Element is automatically calculated and is displayed as the correct amount on the payslip (see below)
In this example, the USC PRSA Benefit in Kind Element calculated at €80, which is the employer contribution. The employer was set up to contribute 8% (8% of €1000 = €80). This notional amount is added onto the gross pay to calculate the USC liability. Click More>> and then the Show Calculation button at the top of the screen to see this:
PRSA by entering directly into Elements and Deductions Grids
Alternatively, PRSA details can be entered directly into the elements and deductions grids. There is no advantage to doing this over using Quick Setup. PRSAs should be set up in the Employee screen. Go to the employee screen and click on the appropriate employee.
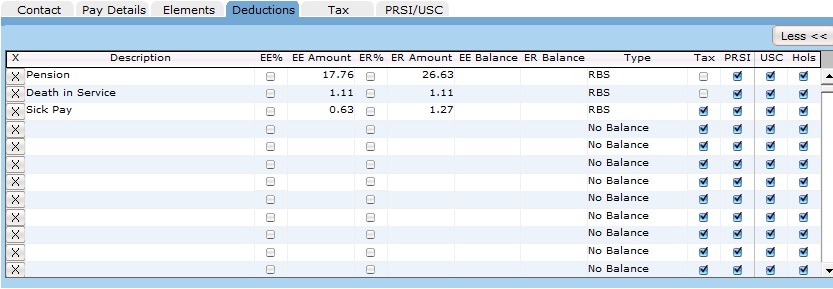
- Select the Deductions tab
- Click on the Description column of the deductions grid. A drop down will appear. Select 'PRSA Pension (Personal Retirement Savings Account)'.
- Deductions have the following columns:
- EE% = a tick box that determines whether the employee pension contribution is a percentage amount (eg 5% contribution) or a flat amount (eg €100). This defaults to ticked, which means the contribution is a percent of pensionable gross salary.
- EE Amount = The employee contribution. (in either percent or flat amount, depending on whether EE% is ticked or not)
- ER% = Tick this if the employer amount is a percentage of employee pensionable gross pay. Untick if the employer contribution is a flat amount.
- ER Amount = The employer contribution. (in either percent or flat amount, depending on whether ER% is ticked or not)
- PRSAs default to percent contribution amounts. Enter the employee an employer contribution amounts in the EE and ER columns described in step three.
- The employee should now pay USC BIK on the pension. To set this up in Payback an element has to be created as well as the pension deduction.
- Note the employer pension contribution. (you'll be able to see this from the payslip)
- In the elements grid in the employee screen, set up a new element called PRSA USC BIK (or something like that)
- Put the Employer Pension contribution as the amount
- Click the 'More>>' button at the top right of the elements grid, to display more columns.
- Under the 'Type' column in the elements grid, select 'Pension'
- Make sure USC is ticked. PRSI and Tax should be unticked.
- Click 'Update Employee' at the top of the employee screen.
The row should look like this (Where the employer contributes €50):
Setting up a CWPS
More information about the construction workers' pension scheme can be found here: http://www.cwps.ie
The rates to use are here: http://www.cwps.ie/rates/
To set this up in Payback, go to the Employee screen, select the employee and click on the Deductions tab. Click the 'More>>' button so that you can see all the columns in the deductions grid. Add the following deductions:
Click Update employee to save your changes.
Setting up other pensions
In the deductions grid in the employee screen, select 'RAC Pension (Retirement Annuity Contract)' in the description drop down. Enter the amounts and click 'Update'. The 'Type' will be automatically set to 'RAC' and will appear in the P35. (You can overwrite the description once you have selected it. If you do this, just make sure the type stays as 'RAC')
Notes
Employee PSRI contributions now are liable to Employer PRSI. (set at 50% for 2011) In order for Pension deductions to appear in the P35LF report you must ensure the deductions are set up as 'pension' types otherwise Payback won't know they are pensions and they won't appear on the P35LF.
- On the 'Company' screen, go into the 'Deductions' tab.
- Add a new deduction row, enter the desired description e.g. 'CWPS Pension'
- On the right-hand side there is a column called 'Type', click the drop-down for the row and ensure the correct pension type is selected (e.g. for CWPS pensions, the type should be set to RBS - Retirement Benefit Scheme)
If required, the same procedure can be carried out on the Employee / Deductions grid by clicking the 'Details' button on the right-hand side of the grid and checking the 'type' column. The important thing is to make sure that an appropriate pension type has been selected for the deduction, otherwise Payback will just treat it like a normal deduction and it won't appear on the P35LF.
This document outlines how pension contributions should be treated for PRSI: http://www.revenue.ie/en/practitioner/ebrief/2011/no-362011.html
Section 1.16 of the November 2011 USC FAQ Deals with PRSAs http://www.revenue.ie/en/tax/usc/universal-social-charge-faqs.pdf
Instructions for setting up maternity and paternity pay can be found here:
http://www.payback.ie/support/quick-tutorials/maternity-and-paternity-pay/
| Medical insurance premiums VHI, Aviva, Laya etc | ||||||
|
Where the employer pays the full premium for employees and the employee does not make good any amount to the employer, PAYE and PRSI must be applied to the gross (pre Tax Relief at Source) premium. To ensure that the employee is granted the relief afforded by TRS, the employee will be given a tax credit (at the standard rate) for the gross premium in his or her certificate of tax credits. On the Invoice from the medical insurance provider, there should be a grossed billed amount and a TRS (Tax Relief at Source) amount. The TRS amount should be 20% of the gross amount. For example; |
||||||
|
||||||
|
Step 1: Get your employees to apply for health insurance tax credit if they have not already got this. The tax credit amount is 20% of the gross premuim (In the above example, this should work out at (20% of (100x12)) = €240 Step 2: Apply a BIK (Benefit In Kind) amount each pay period for the gross premium. For the example above, in Payback; |
||||||
|
||||||
|
Step 3: Pay the TRS amount to the revenue, each month (€20 for the above example) |
||||||
| Notes | ||||||
|
More information can be found here: http://www.revenue.ie/en/tax/it/leaflets/medicali2.pdf and http://www.revenue.ie/en/tax/it/reliefs/medical-insurance.html |
| How to delete an employee |
|
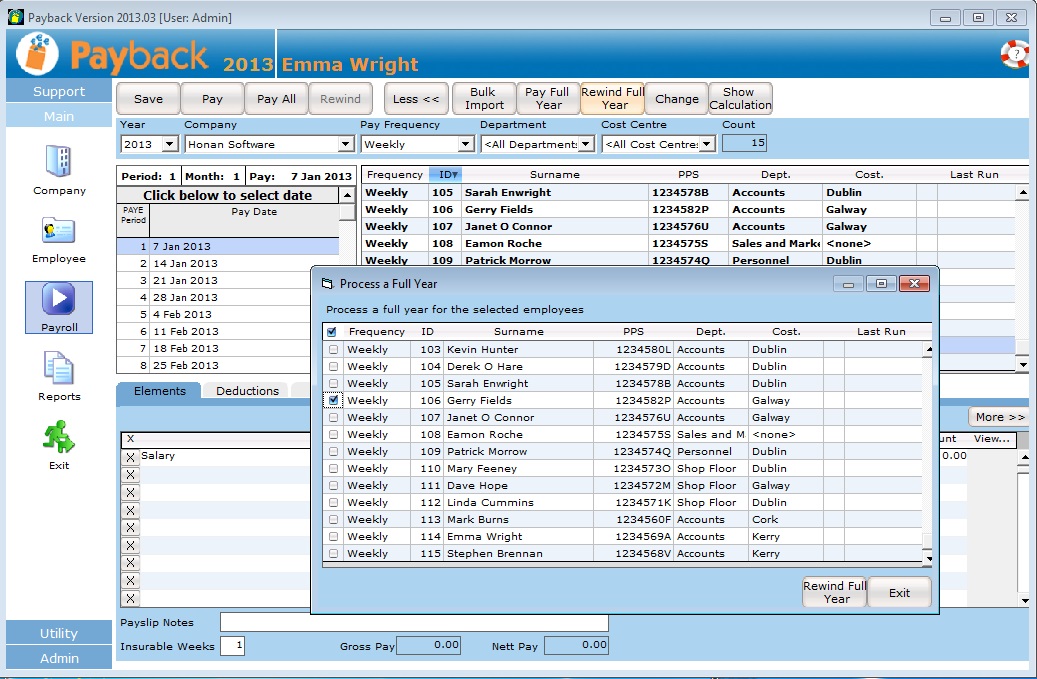
We do not advise that employees are deleted, unless they have been set up in error. Employees that have left your employment should be P45d rather than deleted. You may need to retain the data for P35, revenue audit, employment law or other reasons. The delete button becomes disabled if one or more pay periods have been processed. This is by design and is to prevent accidental deletion of payroll data. To premanently delete an emplotee, in the Payroll screen, click the More>> button and select 'Rewind Full Year'. This will allow you to rewind all payments for the year at once. You will not be able to reverse this action, so make sure you select the correct employee!
When all the payments have been rewound, you can delete the employee in the employee screen. The 'Delete' button at the top of the screen will no longer be disabled. |
| How to delete a company |
|
It is possible to set up unlimited companies, so we would advise people not to delete companies. Some customers rename old companies (such as OLD_Jone and Co Ltd) There is no quick way to delete companies from Payback. This is to stop people accidently deleting companies. To delete a company you have to delete all the employees first. |
|
Step 1: Rewind all payments for the employees. In the payroll screen, click the More>> button and select 'Rewind Full Year'. Select all the employee and rewind them (see above) Step 2: Delete the employees. In the employee screen, delete all of the employees by selecting each employee and clicking delete. If the delete button is greyed out, make sure the employees haven't been paid for other years. (rewind the payments if they have) Step 3: Delete the company. Once all the employees have been deleted, you can delete the company. |
| What to do if your P45 is rejected or the figures seem to be incorrect |
P45 information is be taken from multiple locations. The employee contact details (such as name and address etc) are taken from the Employee screen. The figures and PRSI information is retrieved from the payments that have been processed in the Payroll screen and is merged with any figures that may be present the Year to Date screen.
Year to Date - This Employment (old system tab)

If you moved from an different Payroll system mid year to Payback, then there may be year to date figures entered for the employee. There may also be figures incorrectly entered in this section. To check or amend these figures:
- In the employee screen, select the employee
- Click the 'Year to Date' button at the top of the Employee screen
- Either a Year to Date wizard will appear, or a screen with two tabs at the top (P45 and Old System)
- (If the Year to Date wizard appeared, this means that no year to date details were recorded for the employee)
- If there are two tabs at the top of the screen, click the 'Old System' tab.
- Make any necessary changes and click 'Update Employee'
NOTE: Any figures entered in the Old System Tab apply to the current employment for the year specified
Year to Date - Previous Employment (P45 tab)
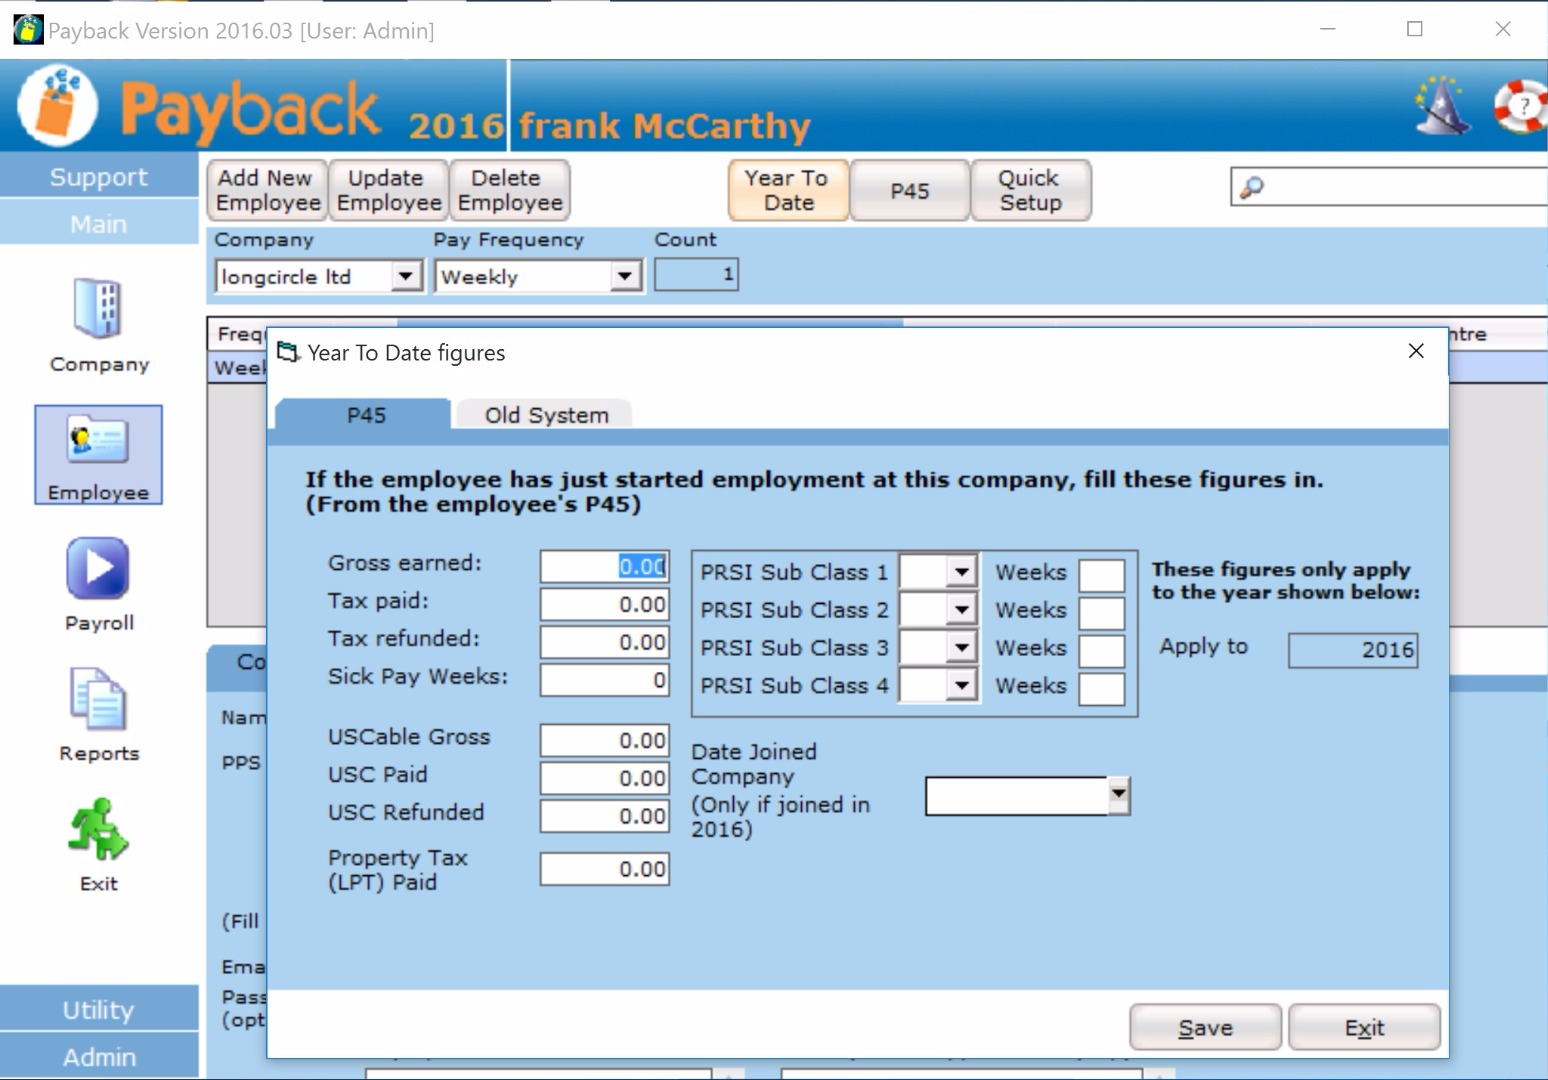
If the employee worked somewhere else during the year, and supplied a P45 then there may be year to date figures entered for the employee. There may also be figures incorrectly entered in this section. To check or amend these figures:
- In the employee screen, select the employee
- Click the 'Year to Date' button at the top of the Employee screen
- Either a Year to Date wizard will appear, or a screen with two tabs at the top (P45 and Old System)
- (If the Year to Date wizard appeared, this means that no year to date details were recorded for the employee)
- If there are two tabs at the top of the screen, click the 'P45' tab.
- Make any necessary changes and click 'Update Employee'
NOTE: Any figures entered in the P45 Tab apply to the previous employment for the employe and year of the 'Date Joined Company' field.
Processed payments in the Payroll Screen
Any payments process for the employee in the Payroll screen will also be used in the P45. (Processed payments are in normal text. Unprocessed are bold)
| Section | Name | Description | How is it Calculated? | |||
| Details | Employer Attributes (employer name, number etc) | Name of employer, employer number etc.. | Company Screen | |||
| Details | Employee Attributes (employee name, PPSN etc) | Name and address of employee, PPSN etc.. | Employee Screen | |||
| Details | start | Employment Start Date | Employee Screen (Tax Tab) | |||
| Details | end | Employment End Date | Employee Screen (Tax Tab) | |||
| PAYE | taxcredit | The weekly or monthly tax credit for the employee, depending on whether they were paid weekly or monthly. | Employee Screen (Tax Tab) | |||
| PAYE | cutoff | The weekly or monthly cut off point for the employee, depending on whether they were paid weekly or monthly. | Employee Screen (Tax Tab) | |||
| PAYE | emergency | True if emergency tax was applied. False or omitted otherwise. | Employee Screen (Tax Tab) | |||
| PAYE | totalpay | Employee's total pay for the year. |
|
|||
| PAYE | totaltax | Amount of PAYE deducted or refunded in total this year. |
|
|||
| PAYE | thispay | Payment to employee in this employment. |
|
|||
| PAYE | thistax | Amount of PAYE deducted or refunded in this employment. |
|
|||
| PAYE | thistaxrefunded | True if the amount entered in 'thistax' attribute is a refunded amount otherwise false. |
|
|||
| PAYE | lumpsum | Amount of lump sum paid to the employee. | Employee Screen (P45 Button) | |||
| PRSI | total | Total PRSI contribution |
|
|||
| PRSI | employee | Employee's PRSI |
|
|||
| PRSI | weeks (total) | Total weeks insurable employment |
|
|||
| PRSI | class | PRSI Class |
|
|||
| PRSI | weeks (per class) | This is the number of weeks at the given class. |
|
|||
| Disability | benefit | Amount of illness benefit received by the employee |
|
|||
| USC | totalpaytodate | Total Gross Pay for USC purposes from 1 January to Date of Cessation |
|
|||
| USC | totalusctodate | Total USC Deducted from 1 January to Date of Cessation |
|
|||
| USC | totalpaythisemp | If employment started since 1 January enter Gross Pay for USC purposes for this period of employment only |
|
|||
| USC | totaluscthisemp | If employment started since 1 January enter USC Deducted or USC Refunded for this period of employment only |
|
|||
| USC (cutoff) | amount | Weekly/Monthly Cut-Off Point 1, 2 or 3 | Employee Screen (PRSI/USC Tab) | |||
| LPT | amount | Amount of LPT paid on behalf of employee throughout employment |
|
| ROS Error | Solution |
| "Value '29-08-1994' is not facet-valid with respect to pattern '[0-3]?[0-9]/[0-3]?[0-9]/[1-9][0-9]{3}' for type 'date'" | Your Windows date format may be incorrect.Make sure that the date parts (day/month/year) are separated by slashes '/' rather than minus signs '-'. You can change this in regional settings in Windows: forum post |
| Field: Total Tax deducted from 1 January to Date of Cessation; Cannot be greater than the amount entered in the 'Total Pay from 1 January to Date of Cessation' | Check the Year to Date figures for tax paid in both Old System and P45 tab. |
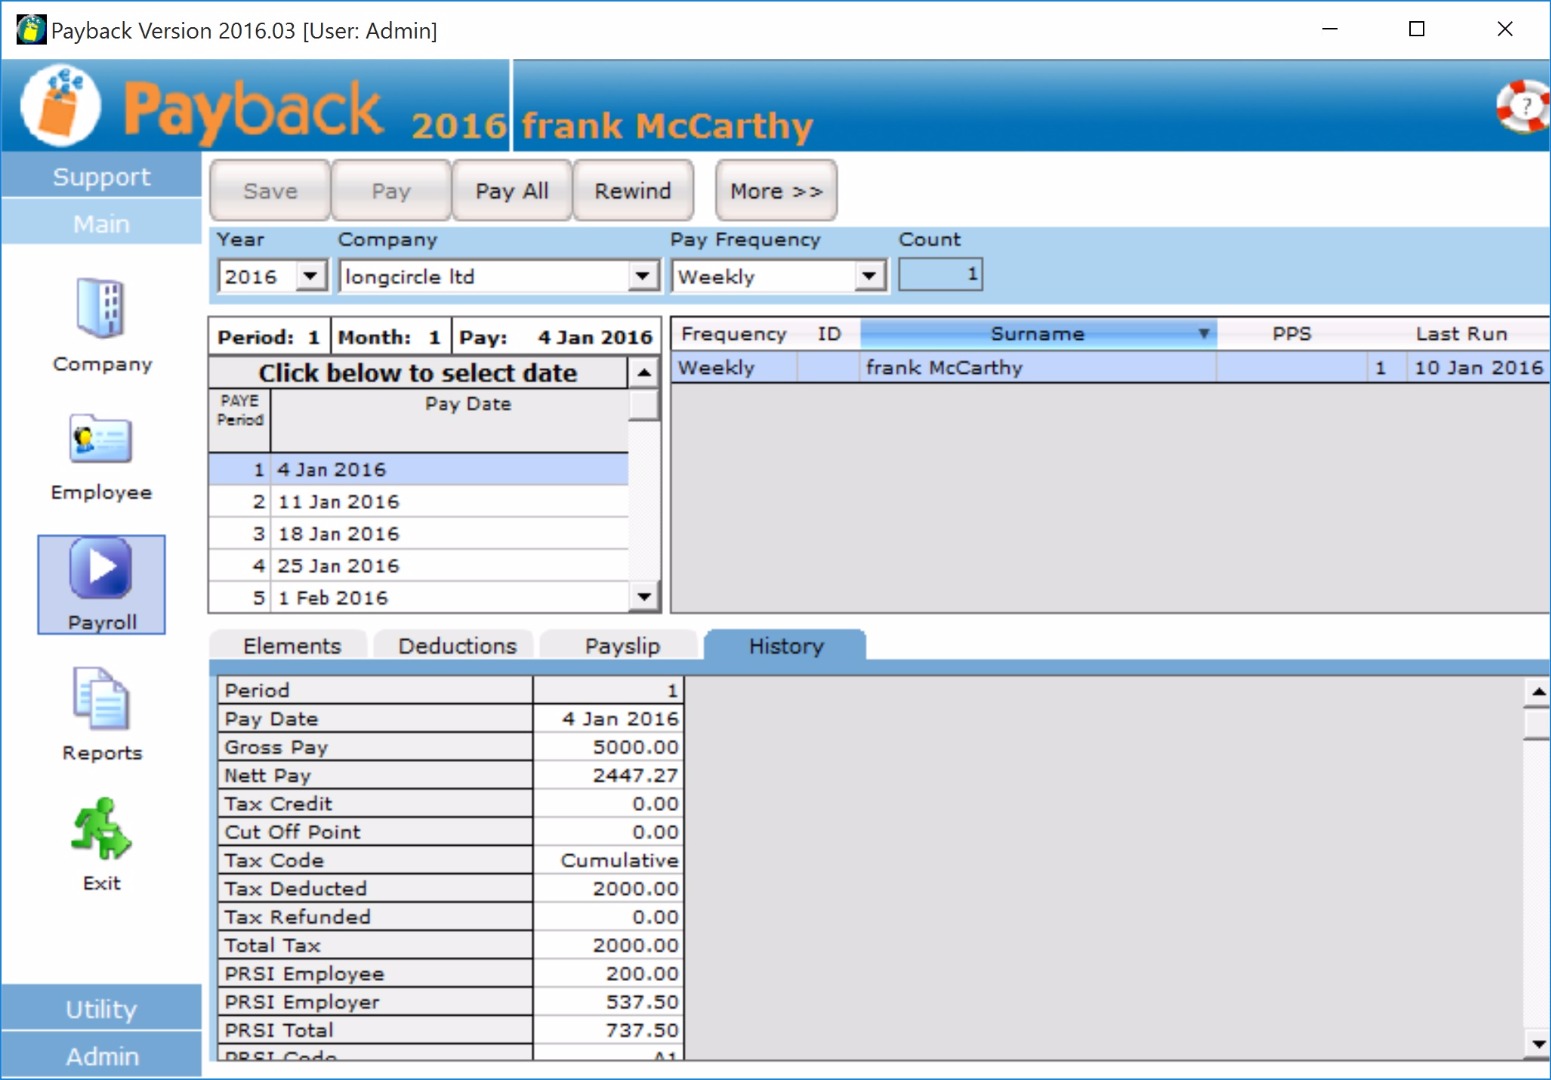
This message may appear when you click the 'Pay' button:
Warning: You have skipped the previous pay period for [employee]. Continue?
Pay is generally calculated on a cumulative basis. This means that all previous periods should be processed before processing the current one. There are circumstances where you can ignore this message, such as if you've deliberately skipped a period because you wanted to pay zero, or at the beginning of the year.
If this message is appearing and you do not know why, click the 'History' tab in the Payroll screen. Here you will see all the periods that have been processed. The current (unprocessed) period will be in bold. Make sure that there are no gaps (eg, for monthly the months are Jan, Feb, Mar, Apr etc..., or for weekly, 1, 2, 3, 4, 5 etc...)
Pay is generally calculated on a cumulative basis. This means that all previous periods should be processed (pay button clicked) before processing the current or future pay period. If you select future dates in the calendar with out clicking 'Pay', then the PAYE will drop because previous periods will appear to have been 'skipped' (or paid zero).

In the above example an employee has been set up with annual salary of €52000. Here is what happens when the calendar is clicked for future dates without the 'Pay' button being clicked:
| Pay date | Gross Pay | PAYE | Net Pay |
|---|---|---|---|
| 7 Jan 2013 | 1000.00 | 245.81 | 657.29 |
| 14 Jan 2013 | 1000.00 | 136.54 | 779.66 |
| 21 Jan 2013 | 1000.00 | 104.81 | 824.49 |
Why is it doing this?
On the 21 Jan 2013 the tax calculation is:
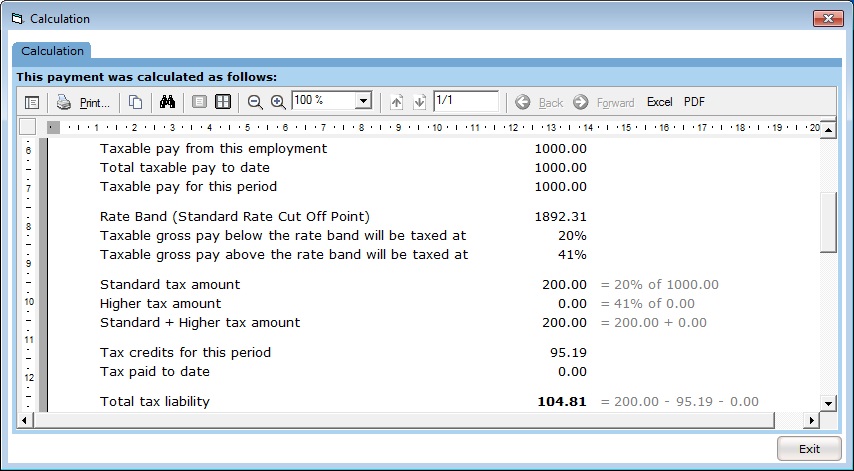
Note that the tax paid to date is zero, and the taxable pay to date is €1000. This is because the 7th and 14th of January were not processed.
If you want to see what your pay amount in a future pay period is, then you will have to first process all prior periods (click 'Pay' button). The History tab shows which periods have been processed. The current, unprocessed period is in bold.
|
Sometimes when you set up a new employee, they do not appear in the Payroll screen. This is by design. Here is a list to check to see why the employee isn't appearing: |
|
If the Calendar in the Payroll or reports screen is displaying dates in the wrong year, then the correct year can be selected from the drop down list at the top left corner of Payroll or Reports screen.
With the 2013 version of payback, it is possible to process payments and make returns for previous years. To do this, select the year you wish to process in the Payroll screen. It is at the top left of the screen. When you select the year, the calendar will display dates appropriate to the year you have selected. There is also a Year drop down in the reports screen. Selecting this will allow reports and returns for previous years to be created.
It is possible to process years going back to 2004. Please process years in order (eg, start from 2006 then 2007 then 2008 etc., not 2009 then 2006).
Please ensure you have the correct tax information (tax credits and Standard rate cut off point etc.) entered for employees, relevant for the year you are processing. This can be updated in the Employee screen.
You have already processed the pay for this year, and now want to process the year before You should always process years in order (see above). However, if you have already processed payments for an employee for (for example 2013) and now you want to process 2012 for the same employee, the easiest way to do this is set up a new employee record. Otherwise a 'payment skipped' message will appear.
Payback uses all the correct PRSI, Income levy, PAYE and USC rates going back through previous years. If you wish to process prior years, you do have to enter the relevant tax credits and standard rate cut off point for each employee for the year you are processing.
Holiday pay in Payback exists for two main reasons;
- To ensure you don't pay the employees by mistake while they're on holiday
- To ensure that your employees get the correct amount of tax credits, cut-off point and insurable weeks when you're paying them in advance
It has the added benefit of allowing you to keep track of holidays taken.
Scenario
A weekly paid employee who is paid every Wednesday is going on holiday for 2 weeks from the 7th April 2008 to the 18th April 2008. They want their 2 weeks holiday pay in advance to be included in their pay for the 2nd April
Requirements
- You need to pay them 3 weeks worth of pay on the 2nd April payroll run (the current week, plus 2 weeks in advance)
- They should get 3 weeks worth of PRSI insurable weeks, tax credits and cut-off point on the 2nd April
- You need to ensure they don't get paid on the 9th April or the 16th April runs
Method
- In the Payroll screen, select the required employee
- On the Elements tab, select a blank row, select 'Holidays', and click the 'View' button on the right of the grid. The 'calculate leave' pop-up box will appear.
- Highlight the weeks they are on holiday for. In this example you should highlight all the days between the 7th April - 18th April inclusive.
- Ensure 'Insurable weeks' says '2'
- Click 'Ok', this returns you to the Payroll screen
- Ensure the Holiday Pay and the Salary is as required. Also, that the 'Insurable Weeks' at the bottom says '3' (this week plus the 2 holiday weeks)
- Pay the employee as usual
You will also notice that for the following two pay runs (16th April and 23rd April) the employee is in green, indicating they are on holiday and will not be paid.
Notes
It may sometimes be necessary to change the figure in the 'Insurable Weeks' to the correct figure manually. Payback attempts to calculate the insurable weeks based on the holiday days you mark, but you should confirm the number is correct before paying the employee and change it if it doesn't look right. This figure determines the Tax credits and Standard Rate Cut Off Point used.
Payback is in fact doing the 'insurable/tax' weeks calculation correctly, although it might seem counter-intuitive. The reason for this is the way the Revenue tax calendar works. Insurable weeks start from the 1 January onwards. The first week from 1 to 7 January, second week from 8 to 14th January etc. Insurable weeks can be overridden.
The holiday entitlement tab is only a calculator. It is there to give an indication of holiday entitlement. It has no bearing on any calculations in the payroll screen, or how much holiday you can actually allocate to an employee. Payback does not store or use the holiday calculator information. (HR rules can be complex and we recommend confirming any holiday entitlements with a practitioner.)
|
Step 1: Retrieve the P2C file:
|
|
Step 2: Open Payback and click on 'Utility' on the menu at the left, and then select the 'Import Tax' icon. The P2C file import screen will appear.
Step 3: Click 'Load File' at the top of the screen and select the P2C file you downloaded from ROS in step 1. Check the data in the grids, and if you are happy, click the 'Import' button. Make sure that the company has been successfully matched before importing the data. NOTE: Payback matches P2C data using: - Employer No. (Details tab in Company Screen) - PPS No. (Contact tab in Employee Screen) Please make sure that you have entered these correctly before importing P2C files. If you have not entered an employer number for your existing companies, or have entered it incorrectly, then Payback will not be able to match up your data. If you continue with the P2C import, then a duplicate company will be created. If you have not entered PPSNs for any of your employees, or they are incorrect, then (like company, above) Payback will not be able to match the employees up to the P2C data. If you continue with the import then duplicate employees will be set up. If you find that duplicate employees have been set up, these can be deleted by following these instructions:http://www.payback.ie/phpBB3/viewtopic.php?f=6&t=3 Duplicate companies can be deleted following these instructions: http://www.payback.ie/phpBB3/viewtopic.php?f=6&t=420 |
When the Import button is clicked, the following data is imported
If an employee is found and matched
- The date of the P2C file import is internally stored
- PAYE Basis (either week one or cumulative)
- PAYE Exempt (either exempt, ie. exclusion order, or not exempt)
- Total Annual tax credit (other payment frequencies are calculated from the annual amount)
- Total Annual Standard Rate Cut off point (other payment frequencies are calculated from the annual amount)
- If the Marginal Rate differs from the Higher rate, then Tax at Marginal Rate flag is updated if applicable
- USC Exemption flag
- All USC Rates
- LPT Annual amount if applicable
If an employee is not found and is added
- PPS Number
- First Name and Surname
- First three lines of Address
- The date of the P2C file import is internally stored
- PAYE Basis (either week one or cumulative)
- PAYE Exempt (either exempt, ie. exclusion order, or not exempt)
- Total Annual tax credit (other payment frequencies are calculated from the annual amount)
- Total Annual Standard Rate Cut off point (other payment frequencies are calculated from the annual amount)
- If the Marginal Rate differs from the Higher rate, then Tax at Marginal Rate flag is updated if applicable
- USC Exemption flag
- All USC Rates
- PRSI Class defaulted to A
- Payment frequency default to first payment frequency set up for the company
- Payment method defaults to Cash
- LPT Annual amount if applicable
If you want to pay an employee for a portion of a month, because they are a new starter, here are the instructions:
In the Company Screen
- Select the 'Pay Details' tab, and ensure 'Weekly' is selected as a pay frequency option. Click the 'Update Company' button at the top of the screen
In the Employee Screen
- Select the employee who has started, select the 'Pay Details' tab, and change their payment frequency to 'Weekly'. click the 'Update Employee' button at the top of the screen
In the Payroll Screen
- Select the Employee who is Starting.
- On the 'Elements' tab, Enter the total amount of pay (eg, two weeks worth of gross pay)
- In the 'Insurable Weeks' box at the bottom of the screen enter '2' (or however many weeks you're paying them for) - This ensures their PRSI, Tax and USC is calculated correctly
- Click the 'Save' button at the top of the screen.
- Click the 'Pay' button. You will be prompted that you are skipping previous pay periods, ignore this prompt and continue.
Once the employee has been paid, you may now go into the Employee screen and change their payment frequency to Monthly.
Here's how to process pay for employees leaving mid-month.
In the Company Screen
- Select the 'Pay Details' tab, and ensure 'Weekly' is selected as a pay frequency option. Click the 'Update Company' button at the top of the screen
In the Employee Screen
- Select the employee who is leaving, select the 'Pay Details' tab, and change their payment frequency to 'Weekly'. click the 'Update Employee' button at the top of the screen
- On the 'Employee / Pay Details' tab, make a note of the last payment period.
In the Payroll Screen
- Select the Employee who is leaving. If you want to pay them 2 weeks salary, then add 2 weeks to the last payment period and select this in the calendar grid. e.g. if the last payment period was 26, and you want to pay them for 2 weeks then the period you need to select from the calendar grid is 28 (26 + 2). This is to ensure they get the correct amount of tax credits and cut-off point.
- On the 'Elements' tab, click on the next blank row and type 'Salary' directly into the row. Under the amount column enter the figure from the top 'Salary' row. This will ensure they get paid for 2 weeks (if paying for 3 weeks, multiply this figure by 2)
- In the 'Insurable Weeks' box at the bottom of the screen enter '2' (or however many weeks you're paying them for) - This ensures their PRSI is calculated correctly
- Click the 'Save' button at the top of the screen.
- Click the 'Pay' button. You will be prompted that you are skipping previous pay periods, ignore this prompt and continue.
Once the employee has been paid, you may now go into the Employee screen and process their P45 as usual.
Sometimes employers may wish to pay an employee for a portion of a month, for example if an employee starts mid-month and it was agreed that only half the month would be paid in the first month's wages.
If you only wish to pay your employee for 15 days in March at €100/day:
- Click on the Employee icon to display the Employee screen.
- Select the employee from the list and click on the 'Pay Details' tab
- Set the Salary to 0 (You can change this back afterwards)
- Click the 'Update' button at the top of the screen
- Click the 'Payroll' icon to go into the payroll screen
- In the elements grid, is should say 'Salary 0'
- Click the blank row under 'salary', and type '15 Days'
- Type 1500 under the amount column and click 'Pay' to process the March pay.
- Change the salary back to the full amount in the employee screen, for subsequent months.
Note that Payback is pretty flexible, and there sometimes is more than one way to do things. An alternative method would be to change the salary to €18000 (1500*12) for March, or to set the employee up as 'Flat rate' for March. This will allocate a full month's tax credits and standard rate cut off point.
If you need to add days (for holidays etc) or deduct days (for unpaid leave etc) and need to calculate a daily rate, you can follow this suggestion. Employment law is quite complex, so we can only make suggestions. We would advise confirming days and rates with an employment law practioner. You may also find the following link useful:
This is the working time act: http://www.irishstatutebook.ie/pdf/1997/en.act.1997.0020.pdf
The employee should be paid an amount calculated at the normal weekly rate or, as the case may be, at a rate proportionate to the normal weekly rate. You will need to calculate the weekly rate from the annual salary, and then the daily rate.
For example, if the employee works 5 days per week:
- annual salary / 52 = weekly rate
- weekly salary / 5 = daily rate
Here is more information about holiday pay entitlement:http://www.citizensinformation.ie/en/employment/employment_rights_and_conditions/leave_and_holidays/annual_leave_public_holidays.html
Example 1: One of my employees left in April and I P45'd them. They went to work somewhere else for a few months. They have just returned and I want to re-employ them. How do I do this?
The easiest way to do this is set them up as a new employee. Remember to put their P45 information in the employee screen. The P35 sums employees up based on their PPS number, so please ensure that you use the same PPS number
Example 2: One of my employees left in April and I P45'd them. They have not worked anywhere else since then and they have had no taxable income. They have just returned and I want to re-employ them. How do I do this?
If the employee has not had any taxable income from the time they were last employed, then the easiest solution would be just to 'undo' the P45. Click the P45 button at the top of the employee screen, and then select 'Undo P45'
(Either solution - setting up a new employee, or undoing the P45 - will work in this case)
NOTE: Employee records with the same PPS number are merged for the P35.
To tell payback that an employee has left, you will have to issue a P45. They will stop appearing in the payroll screen for paydates after their leaving date. Here are instructions on how to issue a P45:
- In the Employee screen, select the employee and click the 'P45' button at the top of the screen.
- The P45 dialogue will appear. Enter the leave date for the employee.
- If there is a taxable lump sum enter it, and tick the 'deceased' box if the employee has died.
- Click the 'Process P45' button.
- A P45 Part(1) form will be displayed. This contains all the P45 information for the employee
- Go to the Reports screen.
- Select 'ROS P45'. Only employees that have been P45d will appear in the employee grid.
- Tick the employees you wish to produce the ROS P45 for.
- Click 'Create File' at the top of the reports screen
- Save the file to a location you will be able to find it later (Like your desktop)
- Go to your web browser and log into ROS.ie
- Submit the P45 file to ROS
- Once the file has been successfully transmitted, a PDF document should be sent to your inbox.
This PDF document will have a unique notice number assigned to it. You will be able to print copies of Parts 2, 3 and 4 of the P45 by opening the PDF document and selecting 'Print'. P45 stationery for printing of copies of Parts 2, 3 & 4 on the one page is available from Revenue.
You can now print a copy of the P45 (If you need to)
- Click the 'Reports' icon on the main menu
- Select 'P45'. The employee shuold appear in the list.
- Note, employees will only appear on this screen if you've already P45'd them from the Employee screen
- Select the employee and click 'Print Report' at the top of the screen.
(P45s printed directly from Payback are no longer acceptable to Revenue. They insist on their own stationery being used.)
If you've issued a P45 in error, it can be easily undone. Here's how;
- Go to the Employee screen.
- Select the employee from the list and click the 'P45' button at the top of the screen.
- Click the 'Undo P45' button.
You can now carry on processing this employee as if you never issued a P45.
Notes
If you need assistance with ROS please contact: ROSHelp@Revenue.ie
(P45s printed directly from Payback are no longer acceptable to Revenue. They insist on their own stationery being used.)
P45 Parts 2, 3 and 4 should be given to the employee on the date the employment ceases. The employee will need these parts to give to their new employer, claim tax refunds or claim social welfare benefits, such as Jobseeker's Benefit.
P45 stationery can be ordered from here: http://www.revenue.ie/en/online/order-forms-leaflets-online.html
Here is some general information about P45s http://www.revenue.ie/en/business/paye/guide/employers-guide-paye-cessation.html
Revenue now require that P45s are only acceptable if printed on their stationery. The P45 printed from Payback is not acceptable.
P60s printed from Payback are acceptable (until Revenue decide otherwise)
To produce a P45 on Revenue Stationery, you need to first upload the P45 to ROS. When you have successfully done this, a P45 PDF is sent to you ROS inbox that you can then print on Revenue Stationery.
More information here: https://www.ros.ie/info/faq/p45faq.html
Processing Redundancy through Payback
If you are only paying the statutory tax free lump sum follow these instructions:
- Create a new element in the Payroll screen for the employee.
- Type 'Stat Redundancy' (or other suitable description) in the description column
- Click the 'More>>' button at the top right of the elements grid
- Untick USC, PRSI, Pens and Tax.
For an amount of €10000 It should look like this:
| Description | Amount | TAX | PRSI | USC | Pens |
|---|---|---|---|---|---|
| Stat Redundancy | 10000.00 | Unticked | Unticked | Unticked | Unticked |
If you are also paying taxable redundancy, Follow these Instructions:
- Add another element in the Payroll screen for the employee.
- Type 'Taxable sum' (or other suitable description) in the description column
- Click the 'More>>' button at the top right of the elements grid
- Tick USC, PRSI and Tax.
For an amount of €5000 It should look like this:
| Description | Amount | TAX | PRSI | USC | Pens |
|---|---|---|---|---|---|
| Stat Redundancy | 10000.00 | Unticked | Unticked | Unticked | Unticked |
| Tax Lump Sum | 5000.00 | Ticked | Ticked | Ticked | Unticked |
Notes
Please note that for tax issues such as this you should always consult your accountant or tax advisor before processing payments to determine if payments are liable to USC, Tax and PRSI. Tax rules are also liable to change.
Here are useful guides to redundancy payment: http://www.revenue.ie/en/tax/it/leaflets/it21.html
http://www.welfare.ie/en/downloads/guide_redundancy_payments.pdf
http://www.welfare.ie/en/Pages/Redundancy-Payments-Frequently-Asked-Questions.aspx
Redundancy payments and tax
From Welfare.ie: A statutory redundancy lump sum, which under the law must be paid, is entirely tax-free. Only a payment above and beyond the statutory payment (an ex-gratia payment) is taxable, but only when it goes over a certain limit. For further information on this, callers should be referred to the Central Telephone Information Office of the Revenue Commissioners at 1890 60 50 90.
Redundancy Payments and PRSI
(Source: http://www.welfare.ie/en/Pages/Lump-sum-payments-when-employment-ends.aspx) Certain lump sum payments made to employees when they leave their employment are not reckonable earnings for PRSI purposes. Examples of such payments are redundancy payments, gratuities or ex-gratia lump sum payments and payments in lieu of notice to an employee when they retire or leave their employment (see Revenue's information leaflet IT21 Lump Sum Payments on Redundancy/Retirement regarding the tax treatment of such payments).
However, a Health Levy (Class K contribution) is paid on the lump sum payment, or part of such a payment, that is treated as pay for income tax purposes.
Redundancy Payments and USC
(Source: http://www.revenue.ie/en/tax/usc/universal-social-charge-faqs.pdf)
1.11 Will redundancy payments be subject to the charge? Statutory redundancy payments are exempt from the charge. Statutory redundancy payments amount to 2 weeks pay per year of service plus a bonus week subject to a maximum payment of €600 per week. In addition, ex-gratia redundancy payments in excess of the statutory redundancy amount are exempt from income tax, and therefore also the Universal Social Charge, up to certain limits. These limits are up to €10,160 plus €765 per complete year of service in excess of the statutory redundancy. This basic exemption can be further increased by up to €10,000 if the person is not a member of an occupational pension scheme. There is a lifetime tax exempt limit of €200,000 on ex-gratia payments. Any relevant emoluments paid which are in excess of these limits are subject to the Universal Social Charge. It should be noted that the charge applies after granting the statutory exemptions set out above, and after granting any additional deduction for Standard Capital Superannuation Benefit (SCSB).
Enter the employee's email address in the contact tab in the 'Employee' screen. When you use the email payslips function, the payslip will be sent to the email you enter here.
There are three ways to email payslips:
- Using outlook
- Using Payback SMTP server
- Using your own SMTP server
We recommend using the Payback SMTP server to send emails. However if you want to use MS Outlook you can. To change the email server settings, do the following; If Outlook is giving you problems (such as displaying a 'run time error', then please use the Payback SMTP server option.
- Click 'Admin / Options / Preferences'
- Under 'Email payslip options' select 'Payback.ie SMTP Server'
- Enter a 'Reply to' email address (if an email bounces, this is the address the bounce will go to, so we recommend entering your own email address here) Please fill this in.
- Click 'Update' button
- Once you have processed the Pay for a period, all the payslips can be emailed using the 'Email Payslips' option in the reports screen
Sometimes employees are unable to open damaged payslips
If every now and again an employee is unable to open a damaged payslip, please follow these instructions
- In Windows, create a new folder on your local C: drive called: C:\PaybackTemp
- Open Payback and click on where is says 'Support' on the menu at the top left of the screen.
- Click the Support Icon and select the 'Diagnostics' tab.
- Click the button that says 'Temp Location'
- Select the folder you created in step one, above (C:\PaybackTemp)
- Click the OK button.
- Try emailing payslips.
Notes
- Make sure that you have entered the employee's email address correctly in the the 'Employee screen'. Otherwise the payslips will not be delievered to the employee
- When using the recommended 'Payback SMTP' option, please make sure you've entered your own email address in the 'Reply-to email address' field in the Admin / Preferences screen. This is very important, as it is the address that any email bounce-backs will be sent to.
- Make sure that the employees' emails are ending up in their spam folders, or are being blocked as 'spam' by their ISP (some ISPs require 'human verification' before releasing suspected spam emails)
- Check that all email address are correct! (in both the 'Employee' screen, and the 'Preferences / reply-to' box.)
To print to pre-printed payslips you have to first change the payslip format. To do this:
- Click Admin on the menu at the left of the screen.
- Click the Options icon.
- Select the preferences tab.
- On the preferences tab there is a drop down called 'Payslip Format'
- Select either '1 Payslip and 1 copy pre-printed' or '2 payslips pre-printed' (Depending on whether you need to keep copies of the payslips)
- Click the 'Update' button at the top of the screen.
- Exit Payback and then start Payback again.
You will now be able to print to the pre-printed payslips.
There have been reports of error messages when attempting to use the 'email payslips' functionality, e.g. run time error – 214024894 (80070002)
Solution
Try re-installing Microsoft Outlook and ensuring all your Windows Updates are up to date and installed. If this doesn't work, then please refer to 'workaround' solution below.
We have researched this issue in detail, but have been unable to recreate it. The 'Automation error' message you see is generated by Outlook and is a generic error message that could be caused by anything. The interface to Outlook mail has been tested on numerous PC configurations, and it works fine. But in some scenarios/configurations (or combination of different MS service packs or software versions) there's obviously something that goes wrong, but we've been unable to pinpoint the cause. We are redeveloping the email functionality to use an email function 'internal' to Payback (as we've discovered we can't depend on Outlook as a reliable platform for the email interface) In the meantime. If you want a manual workaround for emailing payslips, then try this;
- Run the Payroll for a period
- Go into the Payroll screen
- Click the 'Payslip' tab
- Click the 'PDF' button top right of the report
- Save the file with a name (employee name for example) and location you'll remember
- Do this for all the employees
- Now, go into your normal email program, and create an email to the employee, attaching their payslip as created in step 5
- Do this for all the employees
Alternatively, just use the Payback Webserver option and make live easier!
If the standard reports do not contain in the information you need, you can also extract information from Payback in two other ways: The Report writer or The Export Data Utility.
How to use the Export Data Utility
- Click Utility at the left of the screen
- Click 'Export Data' icon. The Export Data screen will appear.
This screen has three buttons across the top, Excel, CSV and Copy to Clipboard. Clicking one of these three buttons determines how you want to get the data. You can choose either as an Excel worksheet, a Comma separated text file, or copy to the windows clipboard, allowing you to paste the data into another application, such as Microsoft Word.
There are three tabs. Select, Employees and Data. We recommend that you work from the left to the right
- Which data are you looking for? Click the Select tab. Here you will see five lists of various fields. Tick the ones you want displayed. Untick any that you do not want to see. By clicking the 'Select all', you can quickly tick or untick all fields at once in the list. When you are happy with your selection, proceed to step two.
- Select the Employees In most cases, you will want to display the data for all employees. If that is the case, you can proceed onto step three. If you only want information for certain employees, tick the only the ones you wish to see, and proceed onto step three.
- What date? The next step is to select a date to report on. You can either select a date, a date range, or a pay period to run the extract for. To specify a date range (eg the whole of 2009), put the start date as 1 Jan 2009 and the end date as 31 Dec 2009. If you just want 15 June 2010, type 15 Jun 2010 into both the start and end date fields. Alternatively, you can click on the calendar to specify a pay period.
- Output the report You will see the data appear in the grid. You can still go back and change the fields, employees or date range. If you are happy with the extract, please click one of the three buttons at the top of the screen (Excel, CSV or Copy to Clipboard) to complete your data extract.
To set up expenses:
If it is an ongoing expense, (you expect it to happen every pay period), set it up in the employee screen. Set up once-off expenses in the payroll screen.
- Click on the last row of the elements grid.
- A drop down will appear.
- Select 'Expenses'
- Put the amount of expenses in the Amount column.
- You can also overwrite 'Expenses' to 'Mileage' etc.
(Make sure the expenses are not being taxed by clicking on the 'Details>>' button at the top right of the grid. 'Tax', 'PRSI' and 'Levy' should all be unticked.)
Notes
The Civil Service mileage rates can be found on the Revenue website (They keep changing the Link address)
Google maps is very handy for finding out the distance between two places (click 'get directions'); http://maps.google.com/
Sometimes specific data is required, like the total mileage claimed for a certain employee for a particular time frame.
To get this (and other) data, use the Export Data screen. To access this, click Utility on the menu at the left and then click the 'Export Data' icon. Under the 'Select' tab, there is a list of elements that will be displayed in the extract. Tick whichever elements you want to report on (eg, 'expenses') Next, click the 'Employees' tab and select the employees you wish to report on. These will be displayed in the grid. Finally, click the 'Data' tab and select a date range.
The data you require will appear in the data grid. This can be exported to Excel, CSV file or to the Windows clipboard by selecting the appropriate button at the top of the screen.
I would like to analyse the hours my employees have worked during certain dates, how do I do this?
Payback has a facility to export data. To use this;
- Click 'Utility' on the main menu at the left of the screen.
- Click the 'Export Data' Icon.
- Towards the right hand side of the data export screen is a box listing all the elements you've set up. Tick 'Select all' check box under this list.
- Click the 'Data' tab.
- Input the required date range near the top of the screen.
- Click the 'Excel' button at the top of the screen.
The Payback version number is in the title bar of the main Payback window.
Another way you can find the version is to select 'Admin', click the 'Support' icon and select the 'Diagnotics' tab. The version is displayed third from the top.
Please ensure that you are always running the most up to date version of Payback.
Payback does not currently have a utility to directly import data from other Payroll applications. If you need to import existing Payroll data mid-year, here is how:
- Manually set up the company and employees, in the Company and Employee screens.
- In the employee screen, click the 'Year to Date' button at the top of the screen. The Year to Date utility will appear.
- In the Year to Date utility, Select the 'I am moving payroll system to Payback, mid-year. I used to use another product, or calculate payroll manually. I want to copy the Year to Date figures for the employee from my old system.' and click 'Next'
- Enter in the appropriate Year to Date figures.
You can also use a P2C file to set up the company and employees. If you import a ROS P2C file, this will automatically set up the company and employees if they do not already exist in Payback. Once you have entered the Year to Date figures, you can continue processing payments in Payback from the pay date you stopped using your previous system. It is important that you select the correct pay date do not miss any weeks. Otherwise the tax credits and cut off point will be incorrect.
Notes
It is always best to process payments from the beginning of the year in Payback. The advantages to doing this are:
- You will have a complete record of payslips and processed payments
- Starting mid-year can sometimes cause problems with insurable weeks, especially with monthly paid employees.
If you have a low number of employees, or it is near the beginning of the year, we would recommend that the payments are re-processed in Payback.
Setting up Payment Frequencies
The pay date can be changed in the Company screen, under the 'Pay details' tab. Payment frequencies can also be set up here:
- Weekly
- Fortnightly
- Four-Weekly
- Monthly
(The following frequencies can be set up under Other)
- Two Monthly
- Quarterly
- Four Monthly
- Six Monthly
- Annually
If a payment has been made for a pay frequency, then it can not be unticked. This is to stop 'Orphan payments'. At least one payment frequency must be set up. Click 'Update Company' at the top of the screen to update the Payment frequency.
The Pay date will be determined by the way you set up the payment frequency. For example, if pay day of Monday is set up for the weekly pay frequency, then the pay date will be the date of each Monday in the year.
Changing Payment Frequency mid year
Once you start processing pay using a payment frequency (eg Monthly) it is possible to change payment frequency mid-year (eg Monthly to Weekly). However, we do not recommend this. Changing Payment frequency mid year can cause problems with tax credits and insurable weeks. For example a monthly paid person has been paid for 3 months, with a total of 13 weeks and are then moved to weekly, but the user starts them on week 12 or 14, then they will end up with the wrong number of insurable weeks.
If the pay date is changed, you may not be able to easily select past, processed payslips. This is because in the Payroll screen payslips are selected according to the pay date in the calendar. (You have to change the pay date back again to see the old payslips and things start to get messy).
We recommend only changing pay frequency at the start of the year, before any payments have been processed. If you have no choice but to change pay frequency mid-year, please consider the above two issues:
- viewing old payslips (with the old payment frequency)
- making sure that the insurable weeks are correct.
(If you've already processed a payment at the 'wrong' pay date, it will be easier to just rewind that payment first before changing the payment frequency or pay date)
To password protect Payback, you should set up a user. Once at least one user is set up, a log in screen with a username and password appears every time you open Payback.
Setting up a user
- Click 'Utility' on the side menu (bottom left)
- Click the 'Users' Icon.
- Enter a new user name and password.
- ype the same password again, in the Confirm Password box. (Try to use a password that you'll remember)
- Click the 'Add New User' button at the top of the screen.
Payback can be set up as a multi-user system. To set up users:
- Click 'Utility' on the menu at the bottom left of the screen.
- Click the 'Users' icon. The screen to set up users will appear.
- Click 'Add New User' button at the top of the screen.
- Enter a user name and password that you will remember.
- Enter the same password into the confirm password box (This is to ensure you have not mis-typed the password)
- Select the security level. The most common one to select here is 'Administrator'. You must have at least one administrator set up in Payback.
- Type your email address. If you forget your password, then you'll be able to get it sent to this email address.
- Click 'Update User' at the top of the screen.
If you want to set up payback so that users can access Payback from different machines (networked version), please follow these instructions:Network version/more than one user
To make an employee USC exempt
- Go to the Employee Screen and select the employee
- Select the PRSI/USC tab
- Click 'Change' that appears under the USC rates table, a new screen will appear.
- Click the 'Standard Rates' button on this new screen
- Click 'Yes' when the message "Clear USC rates and use standard rates" appears.
- The new screen will disappear
- Tick the 'USC Exempt' tick box on the employee screen.
- Click 'Update Employee'
|
Important notes about cumulative USC: Only the rates as advised on the P2C should be used. Users should not apply exemptions or reduced rates (Medical card holders etc) without a valid P2C. Generally, USC should be on the same basis as PAYE. We have included a warning that will alert the user if the basis for USC calculation differs to that of PAYE. The ceiling for USC exemption has risen from €4,004 to €10,036 for 2012. Employees will only be exempt from USC if this is what is in the P2C. Payback does not automatically apply this exemption. The onus is on the employee/pensioner (not the employer), to advise Revenue if their annual earnings will exceed the exemption threshold. USC rates can be changed in the following ways in Payback: |
|
|
Click the 'Change' button (under the USC rates grid in the PRSI/USC tab in the employee screen) if you want to either use Standard USC rates, or when you want to manually enter USC rates. 'USC Exempt', 'Medical Card', 'Age over 70' or 'Emergency' can only be used with Standard USC Rates. To make an employee USC exempt
How to make an employee pay reduced standard rates
I have an employee that has USC exemption, but they breached the threshold for one or more payments, what should I do? The onus is now on the employee to inform Revenue whether or not they are USC exempt for the year. Payback no longer automatically makes people exempt from USC, and this is by design. This will of course cause problems, but these are the instructions from Revenue. Revenue have introduced confusion by their use of terminology. P2C files and paper certificates use Cut Off Points. Revenue helpdesk and other internal systems use Bands. When entering USC rates in Payback, please use Cut Off Points and not Bands. For Example, these are Cut off Points: 2% €10036 4% €16016 7% Balance. These are Bands: 2% €10036 4% €5980 (16016-10036) 7% Balance Always use Cut off points, and not Bands when entering USC rates into Payback. Example: One rate at 2% - the balance not liable to USC - In the PRSI/USC tab in the employee screen, click the 'Change' button to bring up the USC dialogue. - Select 2 USC bands - Enter the figures for the first (2%) band. - Click save. In the PRSI/USC tab, the USC rates should look like this: Code: % Weekly Monthly Annual 2 193 836.33 10036 0 Balance Balance Balance |
If one of your employees is also employed by another employer (they have two jobs) and you do not have a certificate of tax credits, you should put them on the emergency basis of tax.
Inform the employee that they should contact the revenue commissioners to get them to issue two new tax credit certificates to both of their employers. When you get their new certificate of tax credits you can then take them off emergency tax.
For the benefit-in-kind exemption to apply, the employer must incur the expense of the bus/train or ferry pass. It will not be sufficient for an employer to purchase a pass and recover the cost from the employee - in such circumstances the expense will have been incurred by the employee.
Enter this in Quick Setup in the Employee screen.
Payback has a built in BIK calculator. Select 'Benefit In Kind' from the drop down in the elements grid, and then click the 'View...' button that appears at the right of the grid.
You can also manually enter BIK amounts in Payback:
- Type the description into the elements grid. (eg company car)
- Click the 'More>>' button at the top right of the elements grid
- Change the Type to 'BIK'.
- Enter the BIK amount in the Amount column.
The ready reckoner is here: http://www.revenue.ie/en/tax/it/leaflets/benefit-in-kind/ready-reckoner.html
More information about BIK is here: http://www.revenue.ie/en/tax/it/leaflets/benefit-in-kind/index.html
If you've being incorrectly applying BIK for an employee, and wish to reverse it, here's how. The 'opposite' to benefit in kind is an non-taxable element.
For example:
Month 1 - BIK incorrectly added. More tax is paid when it shouldn't be
| Description | Amount | PAYE | PRSI | USC |
|---|---|---|---|---|
| Salary | 4000.00 | Ticked | Ticked | Ticked |
| BIK | 1000.00 | Ticked | Ticked | Ticked |
Total Gross Pay is 5000, so Taxed on 5000.
Month 2 - Refund of BIK - correction made to error in Month 1
| Description | Amount | PAYE | PRSI | USC |
|---|---|---|---|---|
| Salary | 3000.00 | Ticked | Ticked | Ticked |
| BIK refund | 1000.00 | Unticked | Unticked | Unticked |
Total Gross Pay for month 2 is now 3000, so only Taxed on 3000.
Total Gross Pay for month 1 and 2 = 8000 (5000+3000). So for month1 and month 2 combined, the employee is Taxed on 8000
So the solution is to:
- Add up all the incorrect BIK from prior payments (from 1 January)
- Subtract the amount in step one from the taxable salary amount
- Add a new element, and untick Tax, PRSI and USC, for the amount in step one.
This will mean that the gross pay and tax will be the same as if you never deducted the BIK, and the end of year reports should also be correct.
To use and report cost centres, please follow these steps:
- Select the company you wish to set up cost centres for in the Company screen.
- Click on the 'Cost/Depts' tab.
- Enter your cost centres in the cost centre grid. For example '001' for cost centre code, 'Dublin' for cost centre description
- Click 'Update Company' at the top of the company screen.
In the employee screen, a default cost centre drop down will now appear in the contact screen.
- For each employee in the employee screen, select their default cost centre. This is where costs incurred by this employee will be allocated unless otherwise assigned.
- Click 'Update employee'
Go to the Payroll screen. You will now notice a new column in the elements grid called 'Cost Centre' (Between 'Description' and 'Unit')
- For each element in the element grid, select a cost centre using this drop down.
- Process the payments for the employees by clicking the Pay button.
Reporting cost centres.
- Go to the report screen.
- Select the 'Cost Centre Summary' report.
- Click 'Preview report'.
- The report will show all payments grouped and totalled by cost centre.
As PRSI is calculated on a 'week one' basis, Payback won't make any automatic adjustments to YTD PRSI contribution (if the class was entered incorrectly for example).
If the incorrect PRSI class was entered on the employee screen but the pay or P30 for that pay period hasn't been issued yet then; rewind the payment in the payroll screen, select the correct PRSI class on the employee screen, and then re-process the payment on the payroll screen.
Refunding PRSI payments is the responsibility of Dept of Social and Family Affairs. See this page for more info on obtaining a refund:http://www.welfare.ie/en/Pages/PRSI---PRSI-Refunds-Section.aspx
If you wish to deduct an amount from an employee each pay period in order to pay off a loan, it can be set up as follows;
- Click 'Employee' on the left
- Select the required employee from the grid
- Click the 'Deductions' tab
- Select the next blank row in the Deductions grid
- Select 'Loan' form the dropdown
- Enter the repayment amount under 'EE Amount'
- Enter the loan balance under 'EE Balance'
The loan and the balance will then appear on the payslip on the Payroll screen from this point forward. When the loan is paid, then you can remove the deduction by deleting the row from the 'Deductions' grid.
We do not have a contact Phone number.
The best way to contact us is to submit a ticket. That way your query is logged and we have a record of it. Your message won't be lost in the thousands of spam emails we get every day. To raise a support ticket, click here: Support Ticket
Our support page with all your support options can be found here: Support Page
You can also email us on support@payback.ie or sales@payback.ie, although we can not guarantee a response to emails.
Our postal address is: Payback Payroll, Lixnaw Village, Co Kerry, Ireland.
Why we don't offer phone support
We offer online support via our support portal. All Customer Care Advisors are real, friendly humans working from our headquarters in Ireland. We love answering questions, solving problems, and helping you run your Payroll.
We don't offer phone support because we truly believe it wouldn't be possible to provide the same effective assistance over the phone. We decided to keep our support online for a few reasons:
- We can instantly view your payroll data, system details, and other information so we can troubleshoot effectively.
- It's faster. We can quickly get to the bottom of your questions without putting you on hold.
- With phone calls we cannot easily analyse what is causing problems for our customers. Rather than answer the same question multiple times over the phone, it is far better to find out why people are having a problem in the first place and improve the system. This way everyone wins.
- Online support keeps detailed records in one place. This ensures nothing gets lost in translation if we need to escalate your issue. We'll always have access to previous tickets so you won't have to repeat questions. We get to know our customers.
Keeping support online allows us to keep our pricing low while maintaining a feature-rich and ever-improving product with amazing technical support. You won't be put through to unqualified staff or to a disinterested support centre.
The data entered in the "Company Name" field, when registering Payback, does not have any impact anywhere else in the software. We do not use it for anything other than for registration purposes to generate a code that is unique to you.
Payback will only work under Windows and not the Apple OS.
However, it is possible to install Windows on a Mac using parallels, bootcamp or other application, and then run Payback on that.
(we have done that on a Mac book air we have here)
Alternatively, we have also recently launched our Cloud version: www.cloudpay.ie This can be accessed using a web browser. It does not have the same features of the desktop version, for example:
- Fewer Reports
- No 'Quick Setup' Facility (Bike to work, etc have to be manually set up)
- 'Slower' user interface because it is browser based
There is also no way to import your existing data, so you will not be able to view old desktop version reports. Please let us know if you would like us to move the remainder of your Payback licence to Cloudpay.
We release the current year's ROS P35 format in December of that year. For example, for 2018 payroll, we will release the 2018 ROS P35 format in December 2018.
This is because Revenue make frequent changes to the ROS P35 format and we do not know what the final version will be until later on in the year.
If you need to submit a P35 for the current year and you are unable to wait until December, you may be able to use the ROS offline facility.
Database Questions
| How to back up your data |
|
We strongly advise users to make frequent back ups of their payroll data. A back up should always be made before downloading and installing a Payback update. This is because if the upgrade process does not pick up your data, you will be able to easily restore your payroll data from the back up you made. You will not have to go searching for your data. Base your back up schedule on much much data you are prepared to lose. For example, if you can live with losing a full month's data, then back up once a month. We often get support requests from customers where their hard drives have failed, so data loss is a very real scenario. Save a copy of your backup on a separate hard drive, preferably in the cloud (like dropbox). Ideally, backups should be stored in a separate building. Note that it is not possible to open or view your back up file by double clicking it in Windows. Back up files can only be restored in Payback. |
| To create a back up of your data |
|
Step 1: Click 'Admin'. This is at the bottom left of the screen. Step 2: Click the 'Back up' icon - the Back up screen will appear Step 3: Click the 'Back up' button. Step 4: You will be asked for a filename. Call it something like JanPayroll and save it to the desktop or somewhere you'll be able to find it. Click 'Save' Step 5: Copy your back up somewhere secure, that is not the same hard drive as your live copy.
|
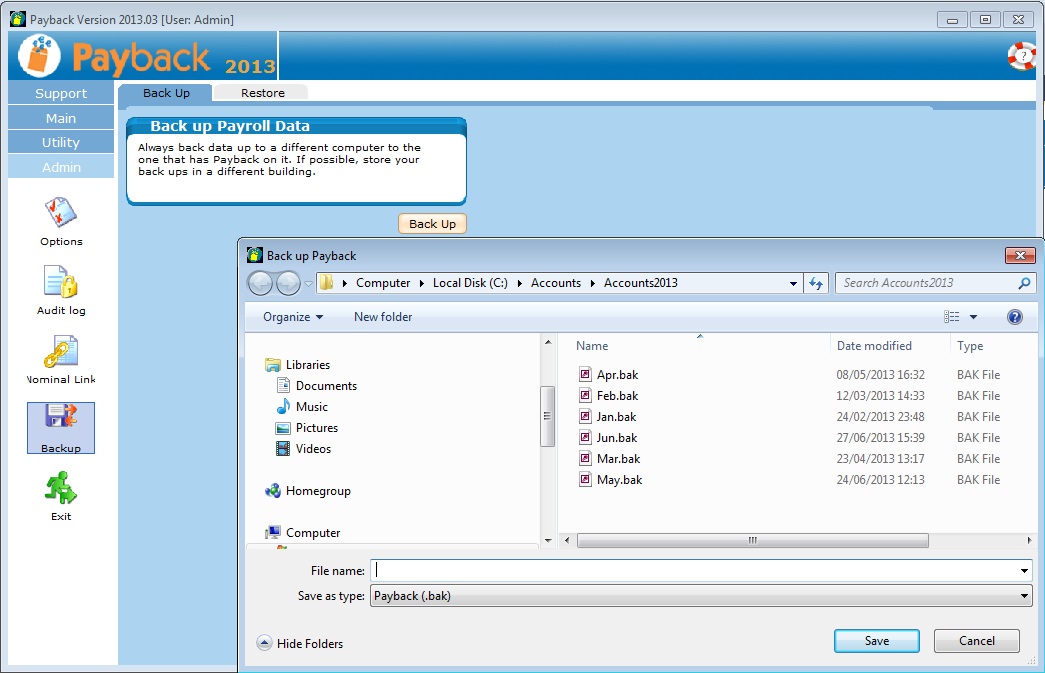
How to restore your data Note that Restoring Data will clear any existing data.
Step 1: Click 'Admin', This is at the bottom left of the screen
Step 2: Click the 'Back up' icon - the Back up screen will appear
Step 3: Click the 'Restore' tab, and then the 'Restore' button.
Step 4: You will be asked for a filename to restore.
Step 5: Please wait until the file is restored. Payback will close when the file is restored.
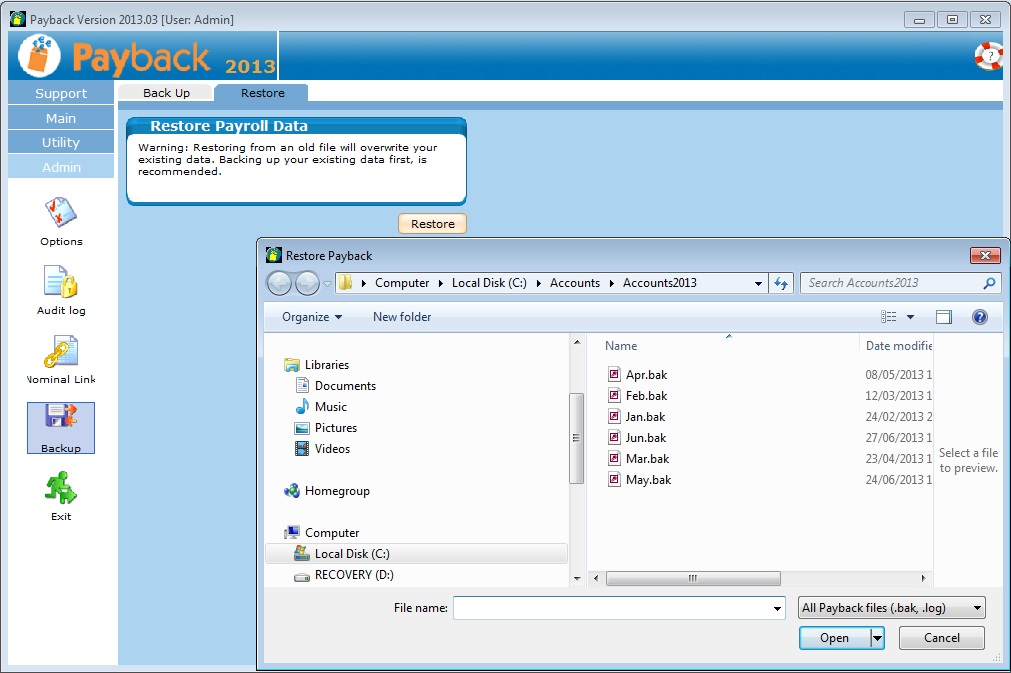
| Moving Payback from an old PC to a new PC |
To copy Payback from an old PC and move it to a new PC, please follow these instructions. |
On your old PC: |
|
Step 1: Backup your Payback data. To do this select 'Admin' on the left and click the 'Backup' icon. Then click the 'Backup' button. Payback will prompt you for a file name. Save the file to somewhere you can easily remember, like your Desktop. Step 2: Copy the data from your old PC to your new PC. Copy the file you backed up to the new PC to a location you can easily remember, like the Desktop. You can use a USB key, a CD-R, Dropbox, or even email yourself the file to copy it to the new PC. |
On your new PC: |
|
Step 1: Download the latest version of Payback onto your new PC from http://www.payback.ie/download.shtml Step 2: Install this version of Payback onto your new PC (Run the setup.exe you downloaded in step one) Step 3: Enter your registration details. Click 'Admin' on the left hand side of the screen, click the 'Options' icon, and select the 'Registration' tab. Input your registration details and then click the 'Update' button at the top (You will find your registration details on this screen in your old PC, or it will be in your original registration email) You can also retrieve your registration details from here:http://www.payback.ie/support/sup_regcode.aspx Step 4: Restore your data. Select 'Admin' on the left, click 'Backup', select the 'Restore' tab, and click the 'Restore' button. Choose the backup file you copied across from your old PC, and click 'OK' Step 5: Restart Payback and check your data is correct. |
| If have had a virus, or hard disk failure and need to reinstall Payback |
| A backup was made |
|
Did you make a recent backup of your data? If you did, then you can reinstall Payback and then restore your backup. |
|
Step 1: Download the latest version of Payback onto your new PC from http://www.payback.ie/download.shtml Step 2: Install this version of Payback onto your new PC (Run the setup.exe you downloaded in step one) Step 3: Enter your registration details. Click 'Admin' on the left hand side of the screen, click the 'Options' icon, and select the 'Registration' tab. Input your registration details and then click the 'Update' button at the top (You will find your registration details on this screen in your old PC, or it will be in your original registration email) You can also retrieve your registration details from here:http://www.payback.ie/support/sup_regcode.aspx Step 4: Restore your data. Select 'Admin' on the left, click 'Backup', select the 'Restore' tab, and click the 'Restore' button. Choose the backup file you copied across from your old PC, and click 'OK' http://www.payback.ie/support/sup_restore.aspx Step 5: Restart Payback and check your data is correct. |
| A backup was not made |
|
If you didn't make a backup, then there might be a copy somewhere on your computer. If you or a technician is trying to restore your data, the Payback database name depends on what version number you were using for example (If you were using version 2013.03): paydata2013_03.log Payback databases are by default stored in c:\paybackdata\ Payback also makes an automatic back up every time an update is run. As a last resort you could try looking for files like this: 270613233351.bak where the numbers are the date and time the back up was made. If you find a database, continue with steps above to re-install Payback NOTE: We not have access to, or keep back ups of your data. Always make frequent backups of your data. http://www.payback.ie/support/sup_backup.aspx
|
| Two or more computers using the same database - how to set this up |
| Payback can be set up so that more than one person can use it at once, reading off the same database. |
|
|
Step 1: Open Payback on one of the machines and select 'Support' at the top left of the screen. Step 2: Click the 'Support' icon Step 3: Select the 'Diagnostics' tab Step 4: Click the 'Database location' button. A file dialogue box will appear. |
|
|
|
Step 5: Select the data file on your server (eg: Q:\Data\Payback\paydata2013_03.log) Step 6: Restart Payback. Step 7: Ensure that you are reading the correct datafile by making a test payment (you can rewind this afterwards) Step 8: Enter your registration details on each machine that is running Payback. These can be copied from the Admin>Registration Screen of the first machine.
|
|
Repeat steps 1-8 for all the machines you wish to run Payback from. |
| IMPORTANT: |
|
If you are running a networked version of Payback, you should ensure that all machines are running the same version of Payback. If you update to a newer version of Payback, run the same update on all the machines so they are all running the same version. (Failing to do this may cause different machines to see a different copy of the data, which causes confusion!) |
| Setting up multiple users |
| Payback can be set up as a multi-user system. To set up users: |
|
Step 1: Click 'Ulility' on the menu at the bottom left of the screen. Step 2: Click the 'Users' icon. The screen to set up users will appear. |
|
|
|
Step 3: Click 'Add New User' button at the top of the screen. Step 4: Enter a user name and password that you will remember. Step 5: Enter the same password into the confirm password box (This is to ensure you have not mis-typed the password) Step 6: Select the security level. The most common one to select here is 'Administrator'. You must have at least one administrator set up in Payback. Step 7: Type your email address. If you forget your password, then you'll be able to get it sent to this email address. Step 8: Click 'Update User' at the top of the screen. |
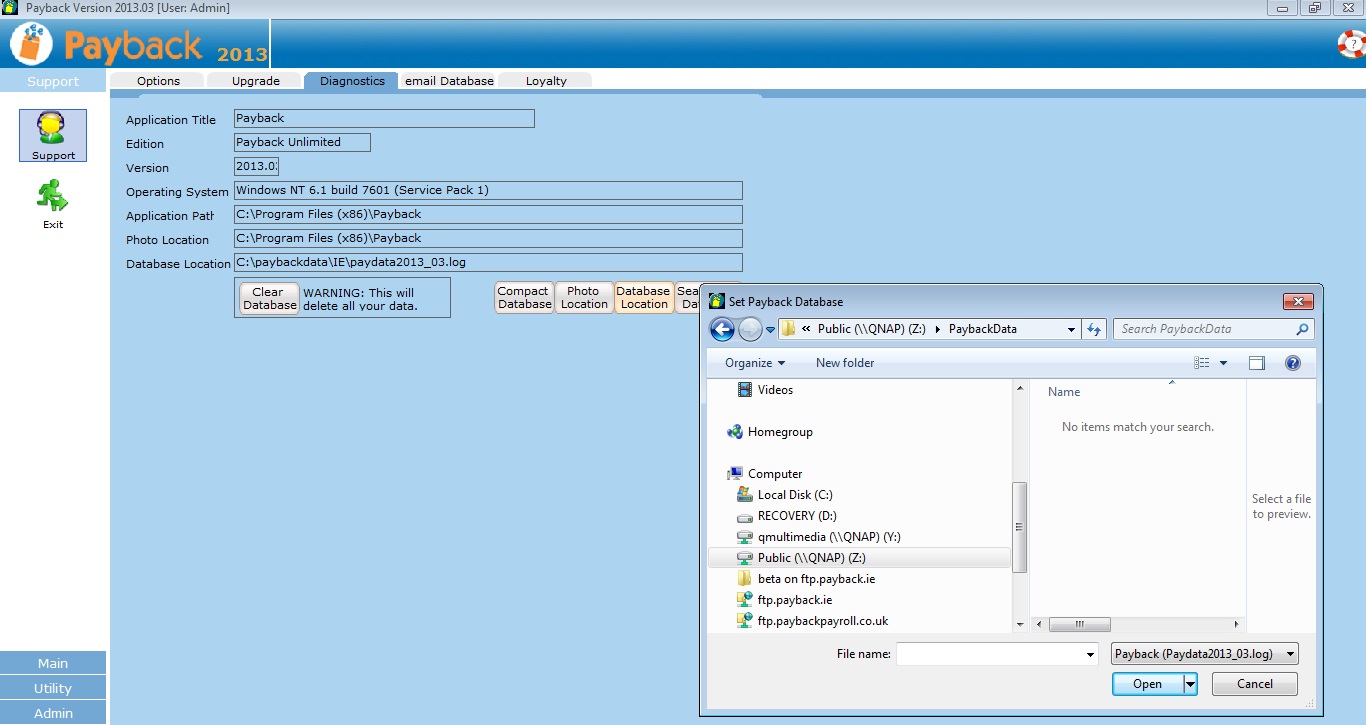

| If you have successfully upgraded, but your data is missing, please restore from your back up: |
|
Step 1: Click 'Admin', This is at the bottom left of the screen Step 2: Click the 'Back up' icon - the Back up screen will appear Step 3: Click the 'Restore' tab, and then the 'Restore' button. Step 4: You will be asked for a filename to restore. Step 5: Please wait until the file is restored. Payback will close when the file is restored. |
| How to restore my backup |
| You ran an update without backing up your data and now your data is missing. |
|
You upgraded Payback without first making a back up of your data. Now when you go into Payback all your data is missing. If you did not back up your data before upgrading, it gets a bit more difficult to restore. The good news is that your data is probably on your computer somewhere. The bad news is that you'll have to find it. Payback does not delete or overwrite data files. When an update is run, your data is copied to a new database, leaving the old database intact. Payback also automatically backs up your data whenever you restore a database. If you did not back up your data before upgrading, you will have to search your computer for your 'missing' data. To make this task easier, we have a Data File locator in Payback. To use this tool, follow these instructions: |
|
Step 1: Click 'Support' in the menu at the left, then click the 'Support' icon. The Support screen should appear. Step 2: Select the 'Diagnostics' tab. Step 3: Click the 'Search for datafiles' button.
Step 4: The grid will fill with all your old Payback databases. It may take some time to completely search your hard disk and find all the files, so please be patient while this process completes. Step 5: You will need to select one of these databases and restore it. Check the 'Last Used Date' to find the latest one. The version number should be the version you have just upgraded from (eg, the version number should be 2013.02 if upgrading from version 2013.02 to 2013.03) (Do not select the Red file - this is your current, empty database) Step 6: Double click the file you wish to restore, and restart Payback. Step 7: Check your data. If it is too old, or the wrong data, select a different file (step 5) to restore. |
| If you've moved Payback from one computer to another and your database did not copy across. |
|
On the old computer, make a back up of your data. Step 1: Backup your Payback data. To do this select 'Admin' on the left and click the 'Backup' icon. Then click the 'Backup' button. Payback will prompt you for a file name. Save the file to somewhere you can easily remember, like your Desktop. |
| How to back up my data |
|
Step 2: Copy the data from your old PC to your new PC. Copy the file you backed up to the new PC to a location you can easily remember, like the Desktop. You can use a USB key, Dropbox or even email yourself the file to copy it to the new PC. |
|
If you've installed Payback, and entered your registration details on the new computer, you can restore the backup you made: Step 3: Restore your data. Select 'Admin' on the left, click 'Backup', select the 'Restore' tab, and click the 'Restore' button. Choose the backup file you copied across from your old PC, and click 'OK' |
| How to restore my backup |
|
For more information, please refer to this: |
| Move from old PC to new PC |
| If have had a virus, or hard disk failure and need to reinstall Payback. |
|
Click here for more information: |
| Hard disk has failed |
| You just logged in and your data seems to have disappeared. |
|
Are you logging in to Windows as a different user? Please make sure you log in to Windows as the same user. In Windows 7 and Windows vista it can appear that you've lost your data when you change users. |
|
Have you, or someone else, changed the database location within Payback? You can change the database location by selecting 'Admin' on the left and select the 'Support' icon. Click the 'Diagnotics' tab. Clicking the 'Database Location' button will allow you to change the location that Payback uses for the database. |
|
Note: From version 2012.01 onwards, we have improved the way that Payback accesses your data. Unless you are using an old version (versions 9.03 or earlier) of Payback or have moved your database to c:\program files\, this should not apply. Behind the scenes, Windows can sometimes move files to a virtual store. This is one reason why we always recommend backing up your data before upgrading. It can be difficult to predict if and where Windows will move your data file. |
|
Did you turn on or off the UAC (User Access Control)? When User Access Control is switched on, Windows creates a virtual store for anything saved to c:\program files\ which includes the payback folder. The virtual store is a shadow copy of the 'real' c:\program files\ folder. We suggest returning the UAC to its original state, ie switch it off if you turned it on. |
| Please always make regular back ups of your data! To do this: |
|
Select 'Admin' on the left and click the 'Backup' icon. Then click the 'Backup' button. Payback will prompt you for a file name. Save the file to somewhere you can easily remember, like your Desktop. |
| How to back up my data |
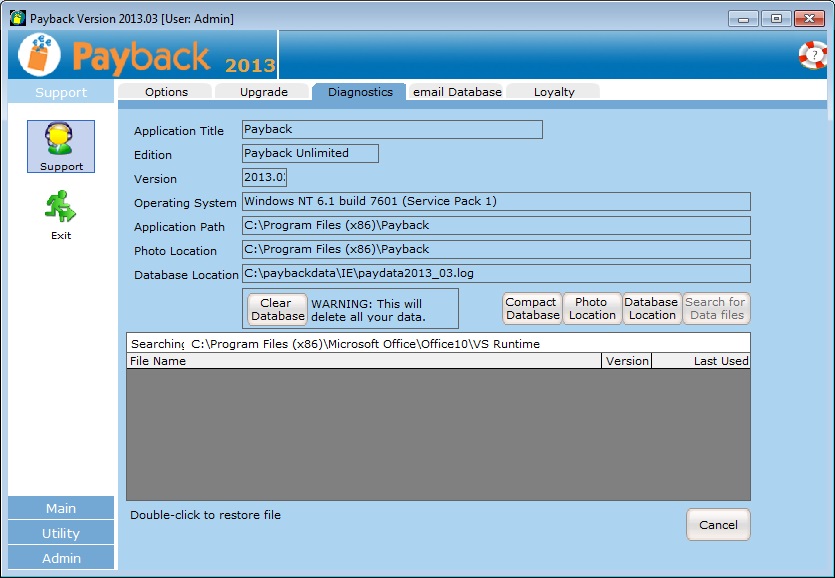
How to send us your database
Sometimes we may have to see your data in order to resolve your support queries. You can send us your data by following the instructions below. (Note that your computer should be connected to the internet for this to work) Please also include any relevent information, like Company and Employee names.
To send us your data
- Click 'Support'. This is at the top left of the screen.
- A support icon will appear. Click on the Support icon.
- Click the 'email database' tab at the top of the support screen
- Click the 'email database' button
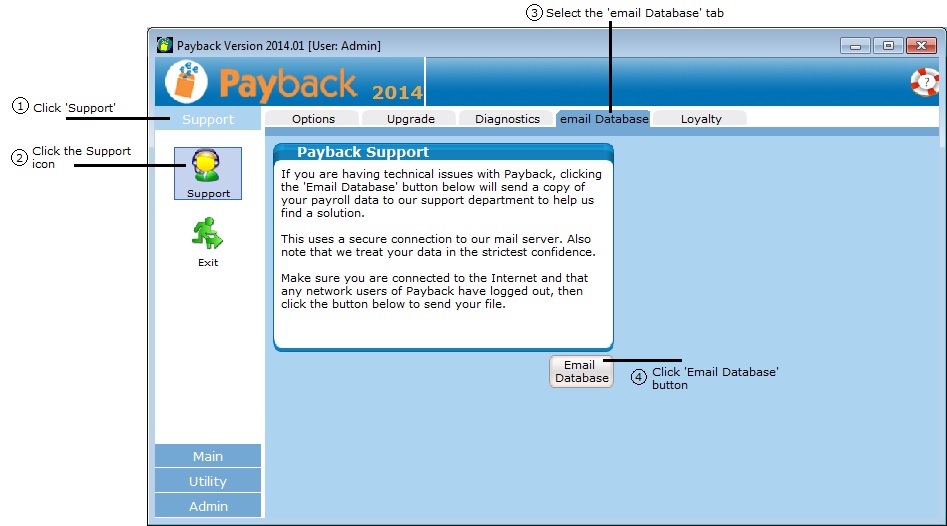
If you wish to read a client's database, please follow these instructions:
If you are running the same version as your client:
Copy the client datafile (eg, paydata2017_05.log) to a new folder and then changing the database location in Payback to check it.
Support>SupportIcon>Diagnostics tab>Database Location
If you are running a different version to your client:
- Back up your existing database
- Restore your client's database
- Check or make changes to your client's database
- When you have finished, restore the data you backed up in step one.
Here is how to back up and restore data:
http://www.payback.ie/support/quick-tutorials/backing-up-and-restoring-data/
Archive
| Summary |
|
If you are running version 2014.01, then your payroll software is already up to date. You do not need to do anything else. We have released a new version for 2014. It can be downloaded from here: http://www.payback.ie/downloads/setup.exe IMPORTANT: Please back up your data before installing this update. (In Payback, click Admin / Backup / Backup and save the file somewhere like your desktop). Download and run the setup.exe file, and follow the on-screen instructions. This will update your software to v2014.01. If you start Payback and notice your payroll data is not present, then you can restore your data from the back up you made (click Admin / Backup / Restore). When you have successfully upgraded, the version number in the title bar at the top of the screen in Payback should say 2014.01. Use the 'Year' drop down list at the top left of the Payroll screen to select the new year. |
| How to Update |
|
NOTE: Do not uninstall your existing version of Payback. 1. Backup your payroll data (Click 'Admin' on the left, and then 'Backup') |
| Release Notes |
| Budget Changes |
|
The main change in the Budget was to Employer PRSI. The 4.25% employer PRSI rate currently applied to employees with weekly earnings of €356 or less, will revert to the original 8.5% rate from 1 January 2014. The halving of the 8.5% employer rate to 4.25% was implemented on a 2½ year time limited basis to apply from 1 July 2011 until the end of 2013. There are no changes in the higher 10.75% employer PRSI rate. |
| SEPA |
|
Information about Payback and SEPA can be found by clicking here. Different banks require different fields to be filled for SEPA credit transfers. For example, a SEPA compliant file might be acceptable to AIB, but be rejected by BoI. In addition to this, not all banks are SEPA ready. This means we will have to release further updates as more banks become SEPA ready. If your bank is not yet SEPA ready, you can continue to use the Paypath standard to transfer wages. |
| Illness Benefit |
|
From 6 Jan 2014 Illness Benefit payment will not be made for the first six days of illness (up from three days). This means that a person will not be entitled to Illness Benefit for the first six days of their claim (unless the person was receiving Illness Benefit, Injury Benefit or a jobseekers' payment immediately before their claim). Claims with a commencement date before 6 Jan 2014 and those coming from Maternity Benefit will not be paid for the first three days of illness. |
| Summary |
|
If you are running version 2015.02, then your payroll software is already up to date. You do not need to do anything else. We have released a new version for 2015. It can be downloaded from here: http://www.payback.ie/downloads/setup.exe IMPORTANT: Please back up your data before installing this update. (In Payback, click Admin / Backup / Backup and save the file somewhere like your desktop). Download and run the setup.exe file, and follow the on-screen instructions. This will update your software to v2015.02. If you start Payback and notice your payroll data is not present, then you can restore your data from the back up you made (click Admin / Backup / Restore). When you have successfully upgraded, the version number in the title bar at the top of the screen in Payback should say 2015.02. Use the 'Year' drop down list at the top left of the Payroll screen to select the new year. |
| How to Update |
|
NOTE: Do not uninstall your existing version of Payback. 1. Backup your payroll data (Click 'Admin' on the left, and then 'Backup') |
| Release Notes |
| Budget Changes |
|
USC
|
| Bug Fix |
|
If no start date or end date was entered in the Benefit In Kind screen while setting up a car or a van, a 'Type Mismatch' error would appear. This is now fixed. A blank start date is defaulted to the first day in the year, and a blank end date is defaulted to the last day in the year. |
| New Features |
|
There is now a new Register of Employees report. This can be found in the Reports screen. |