Introduction

From version 2017.06 onwards, Payback has a fully integrated self service facility.

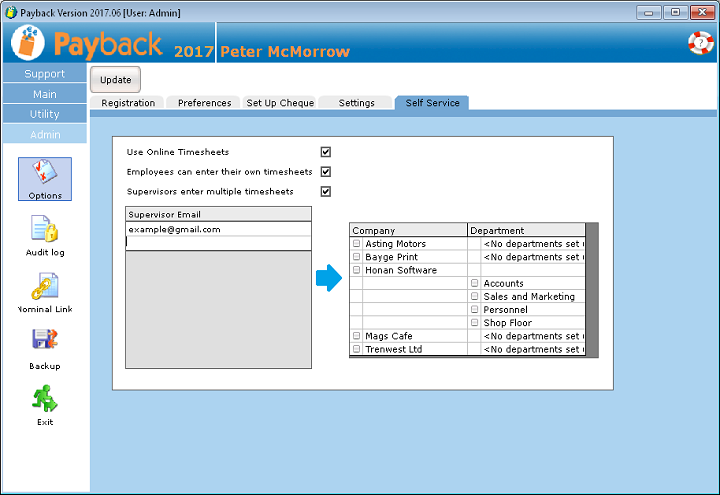
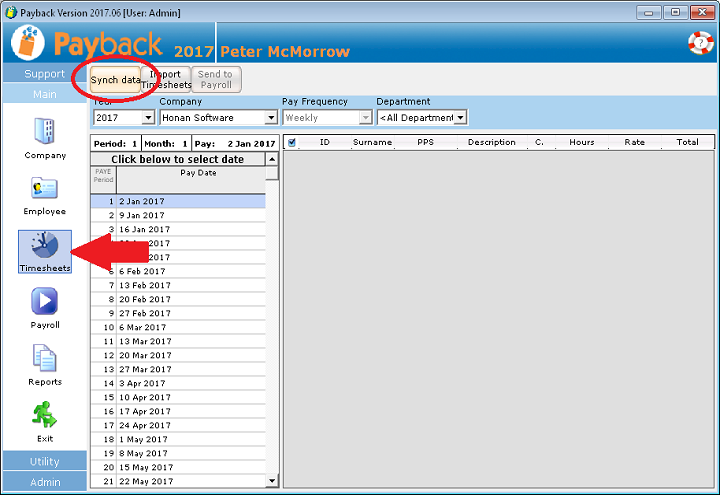
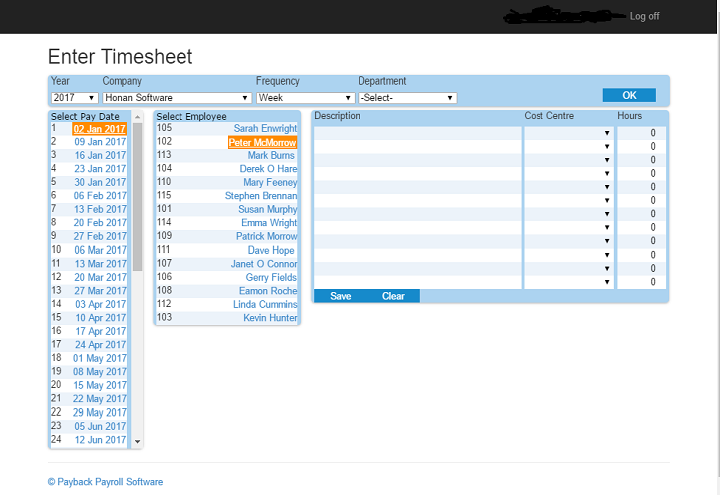
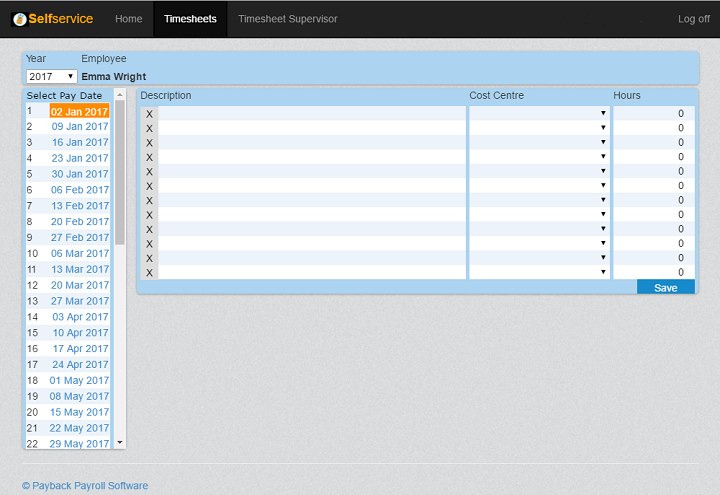
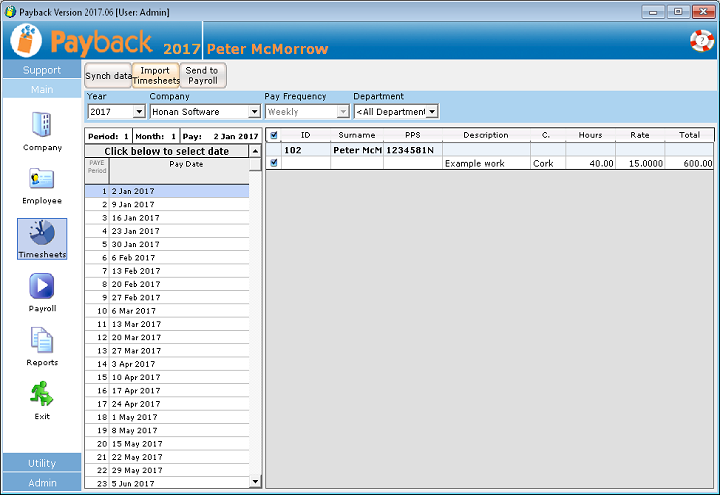
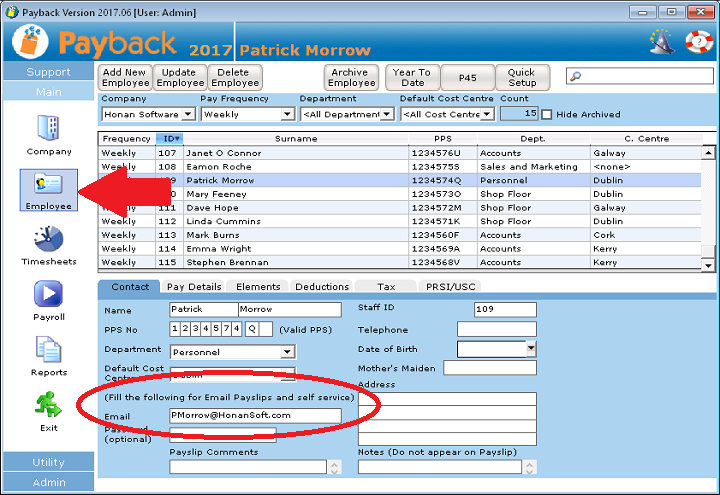
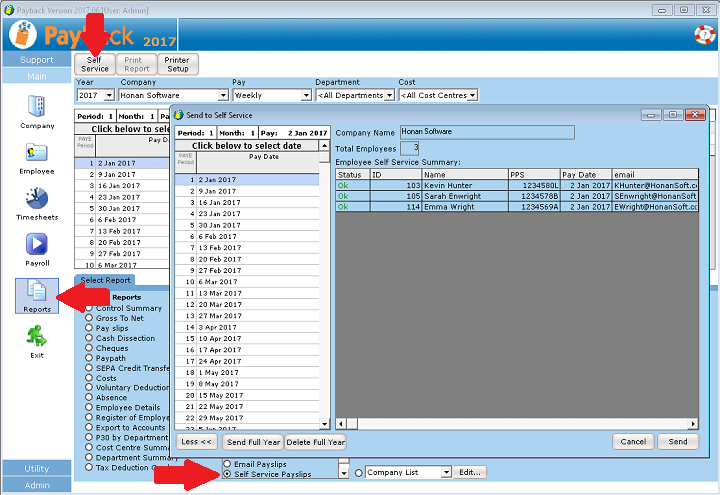
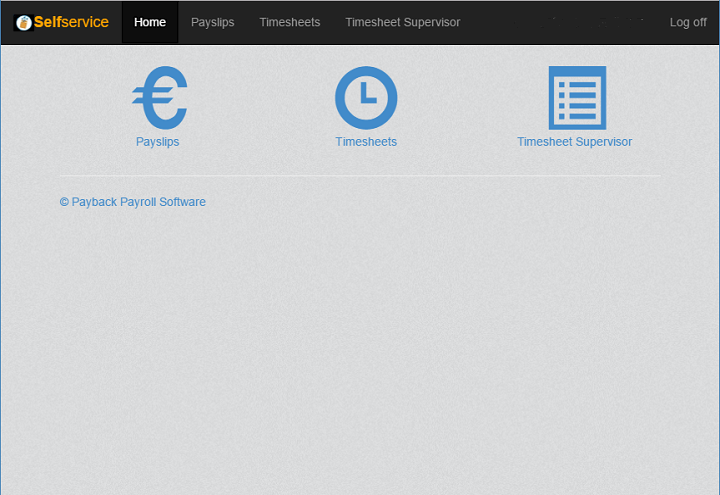
Using this, employees can view their payslips online and enter timesheets remotely. Supervisors can enter timesheets in bulk, for multiple users. All the data is stored securely in the Cloud.

The self service facility has been designed to be used on any device including mobile phones, tablets and desktop computers.


Online Timesheets Instructions

Hourly Rate and Email

Make sure that you have entered an hourly rate for all employees for whom you intend to import hours for. You can do this (in Payback) in the Pay Details tab of the Employee screen, shown opposite.

If employees are going to enter their own timesheets, enter a valid email address for the employee in the Contact tab. This should be the email address they create their online account with.

Activate online timesheets

Payback version 2017.06 on wards has a new 'Self Service' option. You will find this under Admin>Options.

There are two ways of entering online timesheets. Employees can enter their own timesheet or a supervisor can enter the timesheets for multiple employees. 

To allow a supervisor enter multiple timesheets, tick the 'Use Online Timesheets' and 'Supervisors enter multiple timesheets' options. Two grids will appear; one for supervisors and the other for the companies and departments the supervisor will be able to enter timesheets for.

Enter a valid Supervisor email address (This will be used to log into the online timesheets system). Tick the companies and departments you would like the supervisor to enter the timesheets for.

Click 'Update' when you have finished.


Synchronise Data

A new icon called 'Timesheets' will appear in the main menu at the left of the screen. (You may have to re-start Payback for this to appear.) Click this to enter the Timesheets screen.

You will need to synchronise your data with the online system. Timesheet data is stored in the Cloud, so you will have to ensure that the same information is in the Cloud as is in your desktop system. Click 'Synch Data' to upload your timesheet data.

Supervisor Input timesheets

Supervisors can enter timesheets for multiple employees.

Go to this web address:

http://ietimesheets.azurewebsites.net

(This address will soon change to www.timesheets.ie, when it has propagated)

The first time you visit this, you'll have to set up an account and log into the system. Click 'Register as a new user' to set up you account. When you are setting up your account, it is important that you use a supervisor email that you specified in the 'Acitvate Online Timesheets' step above. This must be a valid email address that you have access to. When you have set up your account you will receive a verification email. Open this email to verify your account.

  1. Select the Year
  2. Select the Company
  3. Select the Payment Frequency
  4. If you have are using departments, select the department.
  5. Click the 'OK' button at the right of the screen.
  6. Click on the Calendar to select the Pay date. When you have done that, the employee list will fill.
  7. Select an Employee
  8. Enter the description, cost centre and number of hours worked directly into the grid.
  9. When you have finished the employee, click 'Save' at the bottom of the time entry grid.
  10. Select another employee and repeat steps 8 and 9.


Employee Input timesheets

Employees can enter their own timesheets

The employee should go to this web address:

http://ietimesheets.azurewebsites.net

(This address will soon change to www.timesheets.ie, when it has propagated)

The first time an employee visit this, they'll have to set up an account and log into the system. This works the same way as setting up a supervisor account.

  1. The employee only has to select the year. This defaults to the current year
  2. Click on the Calendar to select the Pay date. 
  3. Enter the description, cost centre and number of hours worked directly into the grid.
  4. When finished, click 'Save' at the bottom of the time entry grid.


Import Timesheets into Payback

Once all the timesheets have been entered, they can be imported into Payback.

Open Payback and go to the Timesheets screen. Click the 'Import Timesheets' button at the top of the screen. The grid will fill with all the previously entered timesheet data for the selected pay date. Note that the rates have been copied across from the employee screen and the totals are correct.

When you are happy with the data, click 'Send to Payroll'.

The Payroll screen will now have the imported data for each employee.


Timesheet Problems and their Solutions

Incorrect Email

If an employee creates a self service account for entering their timesheets and this error appears:

This email address has not been associated with any uploaded employees.

It means that the email address you have entered for the employee in Payback does not match the email address the employee created their self service account with, or the email address in Payback is blank.

Solution

Make sure that you have entered a valid email address for the employee in the Contact tab of the Employee screen and this is also the email address the employee is using to create their account. You will have to re-synchronise the data in the timesheet screen if you have updated the employee's email address in the employee screen.

No Companies uploaded

If an employee creates a self service account for entering their timesheets and this error appears:

No companies for this user have been uploaded.

It could mean that:

1. The wrong email address is being used (see above)

2. The data has not yet been synchronised in Payback.

Solution

Make sure that the correct email address has been used, and then synchronise the data in the Timesheets screen.


Online Payslip Instructions

Enter valid email addresses

Enter a valid email address in the Employee screen for any employees who are going to use online payslips. Note that the password box is only for password protecting emailed payslips and is not required for setting up online payslips.

This email address should be the same email address that the employee uses when setting up their Self Service account.

Upload Payslips to Self Service

When all the employees have valid email addresses and their payments have been processed in the Payroll screen, their payslips are ready to be uploaded to Self Service.

In the Reports screen select the Self Service Payslips option and click the Self Service button at the top of the screen. A screen similar to email payslips will appear. Click the Send button to submit the payslips to the Cloud.

Payslips can also be uploaded or deleted in bulk. Click the More>> button to see these two options. All processed payments for the currently selected year for all employees will be either deleted or uploaded to the Cloud. Note that payslips for previous periods that have been Grossed Up will not currently be bulk uploaded. This is a technical constraint.


Using the Self Service portal

Self Service Menu

Employee timesheet entry, Supervisor bulk timesheet entry and online Payslips are all handled through the online Self Service portal. A user can have access to more than one facility.

It is possible for a user to have access to both their own, single timesheet entry and also be a supervisor where they enter the timesheets of others.

Depending on how the user is set up in Payback, they may see more than one option when they log into the Self Service portal. 

Note that if you are only using one facility, like online payslips, then the user will be taken directly to online payslips and they will not see any icons or menu.


Important Notes

To successfully use online timesheets and payslips the two systems must be kept synchronised.

There are two independent databases, your Payback desktop database stored on your local computer and the self service database which is in the Cloud. The data that is in the Cloud should match the data that is stored on your local computer. Payback automatically handles this synchronisation but there are some important points to bear in mind.

  • The link between the two databases is based on Registration Name. This means that if two or more payback installations are using the same registration details then data in the Cloud will keep synchronising to the last database that was uploaded. The result is that the Cloud data will keep getting deleted.
  • If you restore a database prior to 2017.06 but have already synchronised data, then the data that you had previously synchronised will be deleted from the Cloud. This is because the Cloud database will see the old data as 'orphan records' when the new database is synchronised. In practice this should be a rare occurrence as users generally do not do this. 
  • Employee payslips are matched by email address. This means that if an employee leaves your employment and joins a new company who also use Payback, then all their old, and new payslips will be available to them - from both employments.
  • Grossed-up payslips from previous years will not be uploaded to the Cloud. This is because of a technical constraint.

Try out a fully functional version of Payback. You can process payroll for all your employees for 2 pay periods.

Visit our secure webstore

Download a Free Trial

Get started with a free trial. You can process two full payments and be confident that Payback does everything you require at no risk.