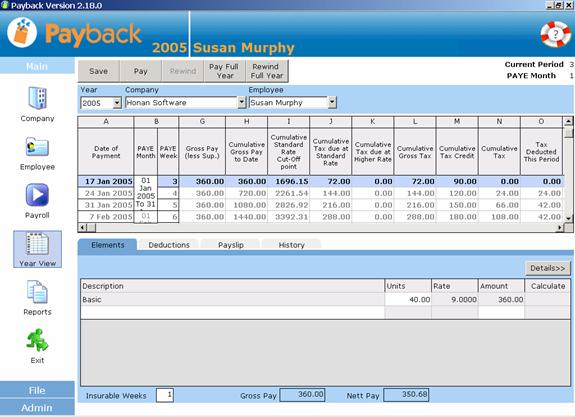
The year view screen is similar to the standard Payroll screen. This screen was developed to help people who are used to using a paper based or spreadsheet system. The main part of the screen is laid out like a tax deduction card.
This screen is especially useful if the payroll run is straightforward. If someone always gets the same pay each week, all periods can be processed at once.
1. Select the Year. This will default to the current year.
2. Select the Company by clicking on the arrow. A list of companies will appear.
3. Select the Employee by clicking on the employee arrow.
4. The tax deduction grid will fill. This might take a bit of time, especially if the employee is being paid weekly, and the pay is being grossed up.
5. The current pay period will be selected (blue), on the grid.
6. The employee’s payment information will display at the bottom half of the screen. Check that these figures are correct. For convenience, the Gross and Nett pay is displayed at the very bottom of the screen.
7. Click the ‘Pay’ button at the top of the screen to process the period.
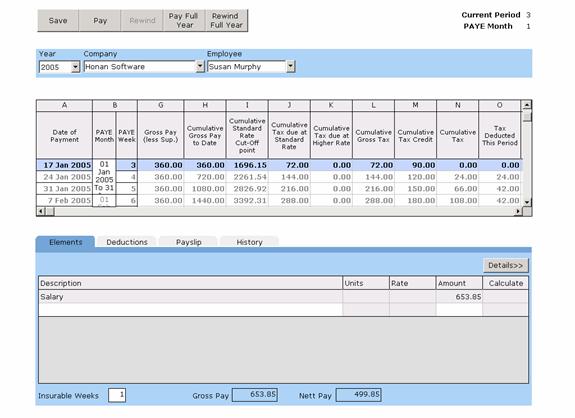
The current unprocessed period is displayed in Bold. Once you process the period for an employee, the row will be displayed in normal text and the next period will turn bold. You can see at a glance which periods have been processed.
You can move around payment periods by simply clicking on the tax deduction grid. Note that although the figures are filled in on the grid, the period is not processed until you click the ‘Pay’ or ‘Pay Full Year’ button at the top of the screen. You will only be able to process the payment period displayed in bold on the grid.
The Year View screen is split into four sections.
Buttons at the top of the screen
Filtering which employee to pay
Tax Deduction Card for selected employee
Employee’s payment information
The details for the pay is directly copied from the employee screen. The elements and voluntary deductions are a direct reflection of what was set up for the employee. Details can be amended in the Year View screen, but they will only be saved for the current payment period. To permanently change payroll information, use the employee screen.
At the bottom half of the screen are the payment detail tabs for the employee and period you have selected to pay. There are four tabs, five if you are paying with ‘Split Pay’.
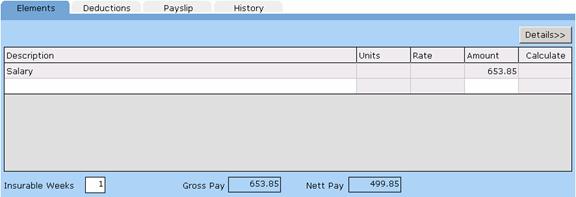
This is similar to the elements tab in the employee screen. The element details that were set up for the selected employee are copied across to this tab. If you make any changes to the elements tab in the Year View Screen, they will only be valid for the current pay period.
If you need to make permanent changes, such as a salary increase, use the elements tab in the employee screen. The elements tab on the Year View screen is useful for making temporary changes to the payment details, that you wish to process for the current period. If an employee has done overtime, or is going on holidays, this is where the details should be input.
Note the three figures at the bottom of the screen; Insurable weeks, Gross Pay and Nett Pay. The Gross Pay and Nett Pay are useful as a quick check to see if the figures are as expected. The ‘Insurable Weeks’ defaults to the number of weeks in the payment period. This can be overwritten if the employee leaves mid-payment period. For example, if the employee leaves after two weeks, in a four weekly payment period, this value can be over-written from ‘4’ to ‘2’.
Click the ‘Save’ button at the top of the screen to save any changes you have made to the elements for the current period. Clicking the ‘Save’ button will not process the payment. This will allow you to enter all the details for a pay period for all you employee, before processing the wages.
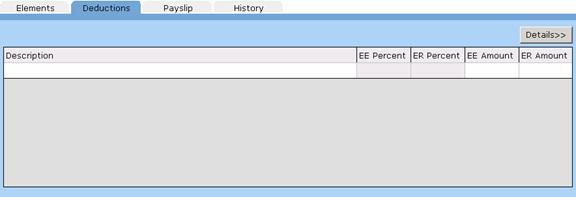
If you wish to set up (temporary) voluntary deductions, use this tab. This is useful for one off payments, such as the full repayment of a small loan. It is used in the same manner as the deductions tab in the employee screen.
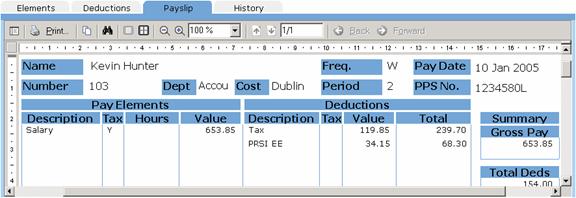
This tab allows you to preview the payslip. Old payslips can also be viewed by selecting the required date from the calendar. Double click on the payslip to display a larger payslip.
Double Clicking the Payslip
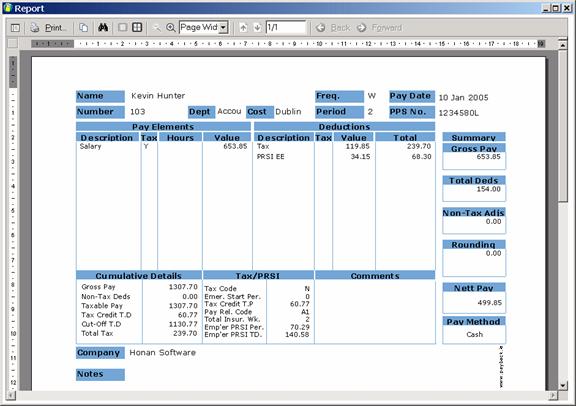
Payslips can also be printed or copied to the windows clipboard from here.
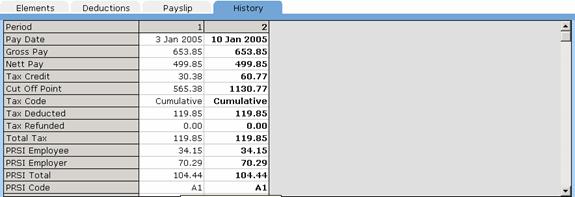
The history tab allows you to refer back to previous periods. Using the history tab, you can compare the pending payment details with previous processed periods. By scrolling down (using the scroll bar at the right of the grid) you’ll be able to see how the pay was calculated.
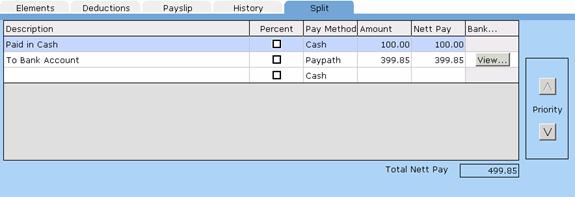
Some employees may wish to be paid by more than one method. Using the split pay screen, payment amounts can be allocated to different payment methods.
This is quite similar to the split pay tab in the employee screen. However, there is a new column, ‘Nett Pay’. This column indicates how much money is allocated to each payment method. Payment methods can also be prioritised using the ‘Priority’ arrows at the right hand side of the grid.
To set up multiple payment methods, input each payment into the Split Pay grid. Payments are prioritised, the closer to the top of the grid, the higher the priority.
They have to be prioritised in case the employee does not get paid enough to cover all of the payment methods. Below is an example of how prioritising payment methods work:
An employee is paid €1000 Nett. Here is how the payment methods were prioritised:
Cheque: €500
Paypath: €400
Cash: €100
(Total: €1000)
One month, the employee only works two weeks. They only get paid €600. Here is how their wages will be split:
Cheque: €500
Paypath: €100
Cash: €0
(Total: €600)
Cheque took the priority because it was at the top of the list. Next came Paypath, followed by Cash. ‘Cash’ was allocated a zero amount because it was the lowest priority.
The following month the employee does overtime, resulting in getting paid €1500. Here is how the pay will be apportioned:
Cheque: €1000
Paypath: €400
Cash: €100
(Total: €1500)
Note that ‘Cheque’ received the balance. This is because it was highest priority.
Payment methods may receive amounts that are different to what was originally allocated. This will happen if the employee is paid more or less than what the total split payments add up to (as in the above examples). To cater for this, there are two columns, ‘Amount’ and ‘Nett Pay’.
Here is an example of the ‘Amount’ and ‘Nett Pay’ columns. The employee is only paid €600:
Amount Nett Pay
Cheque: €500 €500
Paypath: €400 €100
Cash: €100 €0
(Total: €1000 €600)
Although €1000 was allocated, the employee was actually paid €600.
When setting up employees, only the ‘Amount’ Column will be visible. This is because we won’t know at that stage how much the employee will actually be paid.
The other columns are:
Description – A brief description about the payment.
Percent – Is the amount value expressed as a percentage of the nett pay, or a flat amount. (€50 or 50% of nett pay)
Amount – The target amount in either a percentage of nett pay, or a flat amount (depending on whether you ticked the ‘Percentage’ column)
Nett Pay – The actual amount paid to the employee
Bank… - If paying by Paypath, click on View… to display the bank account details. It is possible to pay money into more than one bank account for the same employee.
The pay details can be saved without having to process a period. This function is useful if you wish to input all the details of the employee first, before processing the payment. Saving the pay details does not process the period.
Many payroll professionals will enter in timesheet information, and then enter in adjustments and deductions and finally process the payroll. Click the ‘Save’ button to save the information without processing it.
When you are happy that the payment details are correct, click this button to process the payment for the highlighted payment period. Only the selected employee and period will be paid. Once paid, the row will turn from bold to normal text on the tax deduction grid.
NOTE: Clicking the Pay button doesn’t transfer any money. If you make a mistake, you can easily undo it using the ‘Rewind’ Button. You will only be able to rewind the last period paid (the period before the bold period).
When all of the pay periods have the correct payment details, click this button to process all the periods for the employee. The full year will be processed all at once. This will overwrite any processed periods, so use this facility with caution.
This undoes a processed payment for the highlighted period. It will only reverse the pay for the currently selected employee and period. Only the last period paid can be rewound. This is because of the way pay is calculated (on a cumulative basis). Refer to the history tab at the bottom half of the screen to see which periods have been processed. To find the last period paid, refer to the Pay Details tab in the Employee Screen.
If you have paid an employee up to and including period 35, but made a mistake on period 26, you can rewind to period 26. Select period 35 on the grid and click the ‘Rewind’ button. Do this for periods 34, 33, 32, 31, 30, 29, 28, 27 and then 26. It is important that you do this in reverse order. You will not be able to rewind period 30 before you have rewound period 31 etc.
To undo all processed payments for an employee, you will have to systematically rewind all periods from the last paid period to the beginning of the year or use the ‘rewind full year’ facility.
Rewinding a full year should be used with extreme caution. All of the saved and processed payment information will be deleted for the selected employee. It is advised that you back up your data before performing this function.
- Select the year, company and employee as described above.
- Click the ‘Rewind Full Year’ Button.
- Confirm the action by clicking ‘Ok’ when the dialogue box appears.