To use Payback you must first type in your company details, such as company name and employer number. Once you have your company information typed in, then you need to put in your employees’ details. In order to run a payroll, Payback needs to know this information.
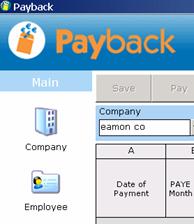
To start typing in your company details, click on the ‘Company’ picture on the menu at the left hand side of your screen (the main menu).
Once you have clicked on the ‘Company’ icon, the company screen will appear. This is where you type in your company details. There are two ways you can put the company details in, ‘Wizard’ mode or ‘Classic’ mode. When you first started up payback, you were asked to choose between:
Would you like to start in 'wizard mode'? This will guide you through the process of running a payroll.
Or
Would you like to start in 'Classic mode'? This will allow you to enter payroll information directly.
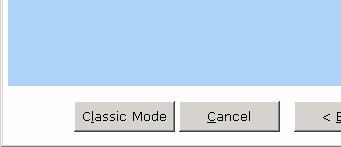
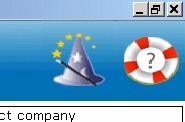
You can switch between 'classic' and 'wizard' modes at any time, while you are using the software. Click the Wizard hat at the top right of the screen to enter Wizard mode. Click ‘Classic mode’ to return to classic mode.
Click the wizard hat at the top of the screen
The ‘Add Company’ wizard screen will appear
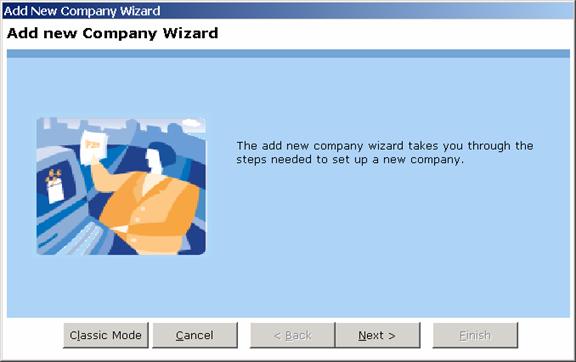
Click the ‘Next’ button, to set up your company
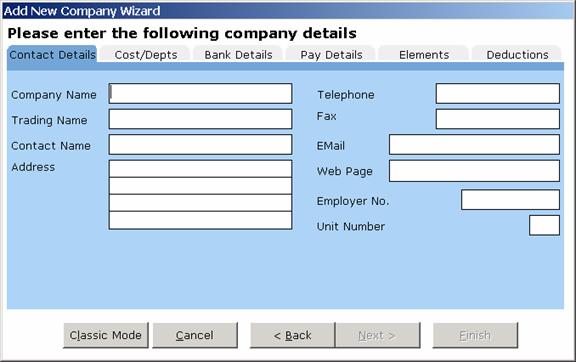
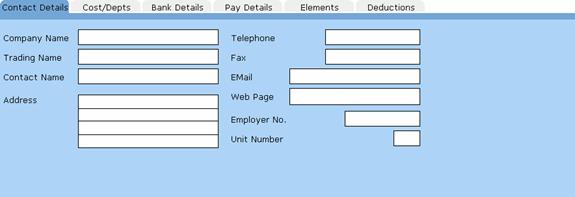
The cursor will appear on the ‘Company Name’ box. Type the name of your company, followed by the ‘tab’ key, or the ‘return’ key.
Type the ‘trading name’
When you have finished filling in all the boxes, select the next tab. Click on ‘Cost/Depts’. Alternatively, click the ‘Next >’ button at the bottom of the wizard screen.
Note: You will not be able to proceed until you have at least filled in the company name.
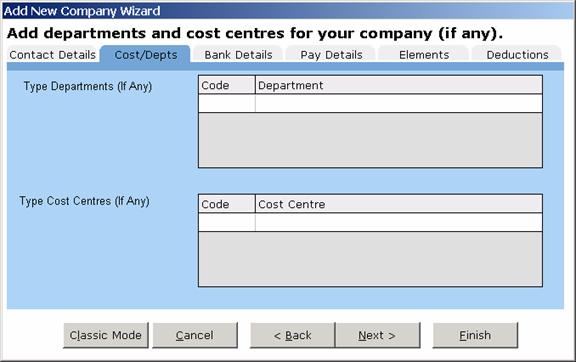
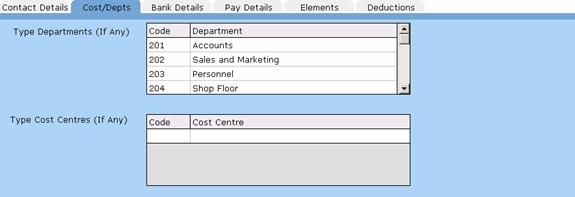
Cost centres and departments are optional. Not every company will have cost centres or departments. If your company has departments (such as accounts, sales and marketing etc), then click on the first blank row of the department table. A cursor will appear.
Some companies give their departments shortened codes, to help with administration. If you wish to do this, type the department code in the first column, and the department name in the second column.
When you’ve finished typing in a department, a blank line will appear in the table. This is for the next department. If you wish to add another department, click on the blank line and type the details.
When all departments have been entered, you may proceed to enter your company’s cost centres (if there are any)
If your company has cost centres (such as different branches - Dublin, Cork etc.) then enter your cost centres in the same way you entered the departments.
NOTE: There is no relationship between cost centres and departments in Payback
You are now ready to enter your company’s bank account details. These details are required if you wish to pay your employees by the Paypath system.
Click the ‘Bank Details’ tab.
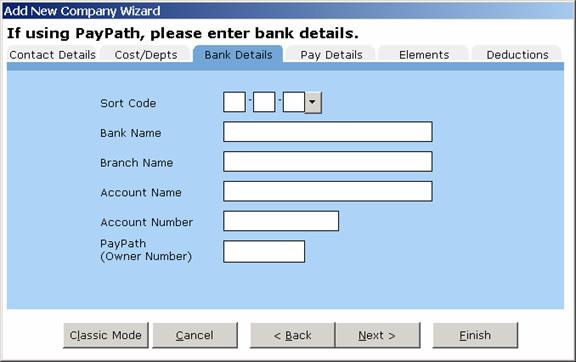
There are six items to fill in on this screen. Fill in the details like you did for the first tab (‘contact details’). Pay particular attention to the account number.
Click the Pay Details tab.
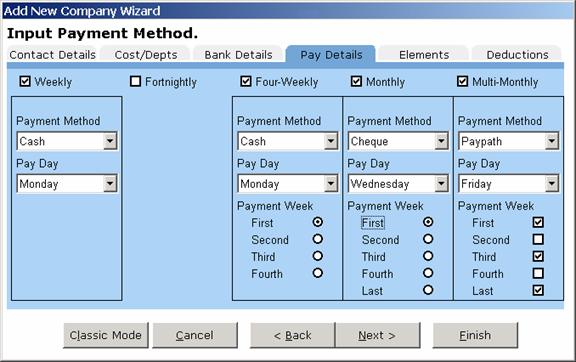
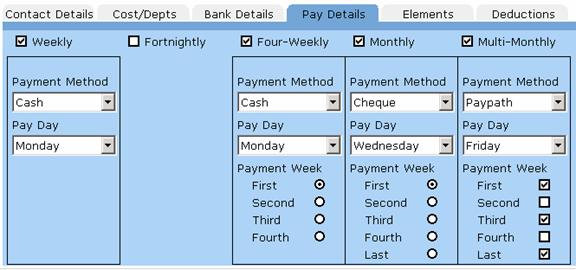
In Payback, you can pay your employees many different ways, within the same company. The default is every Monday, in cash.
Tick which pay frequencies you wish to set up for your company. If you have Monthly paid employees only, tick the ‘Monthly’ check box, and then un-tick the ‘Weekly’ check box. You may tick as many as you like. If you have both weekly and monthly paid employees, tick both ‘Weekly’ and ‘Monthly’.
Select the preferred payment method for each frequency. You may select from ‘Cash, Cheque or Paypath’. This will be the default setting, and can be changed for individual employees.
Select the pay day. This is the day that your employees expect to be paid. (It is recommended to run the pay roll in advance to ensure employees are paid on time)
Choose which week you want to pay employees.
If ‘Weekly’, employees will be paid every week.
For ‘Fortnightly’ if ‘First week’ is selected, employees will be paid like this:
1 Jan to 7 Jan – Week1 ß Paid here
8 Jan to 14 Jan – Week2
15 Jan to 21 Jan – Week3 ß Paid here
22 Jan to 28 Jan – Week4
etc…
For ‘Fortnightly Second week’, employees will be paid like this:
1 Jan to 7 Jan – Week1
8 Jan to 14 Jan – Week2 ß Paid here
15 Jan to 21 Jan – Week3
22 Jan to 28 Jan – Week4 ß Paid here
etc…
For ‘Four-Weekly’, employees will be paid on every fourth week, starting from the specified week. There will be 13 Payments a year (52 weeks divided by 4 equals 13). ‘Four-weekly, second week’ will be like this:
1 Jan to 7 Jan – Week1
8 Jan to 14 Jan – Week2 ß Paid here
15 Jan to 21 Jan – Week3
22 Jan to 28 Jan – Week4
29 Jan to 4 Feb – Week5
5 Feb to 11 Feb – Week6 ß Paid here
12 Feb to 18 Feb – Week7
19 Feb to 25 Feb – Week8
etc…
For Monthly, employees will be paid every calendar month, so there will be 12 payments a year. ‘Last’ means the last week in the calendar month, and ‘First’ is the first week in the calendar month. If ‘First Monday’ is selected, then employees will be paid the first Monday in every calendar month.
You can customise the payment frequency for ‘Multi-Monthly’. This allows you to pay employees mid-week, and again at the last week in the month.
Click the ‘Elements’ Tab.
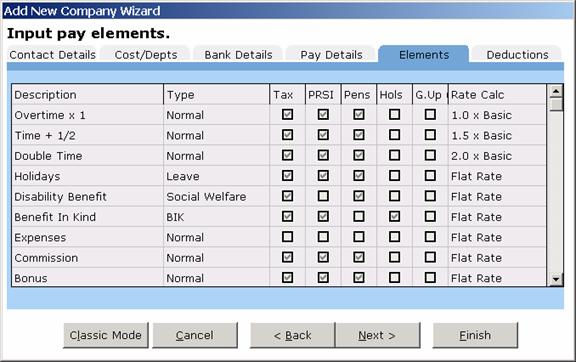
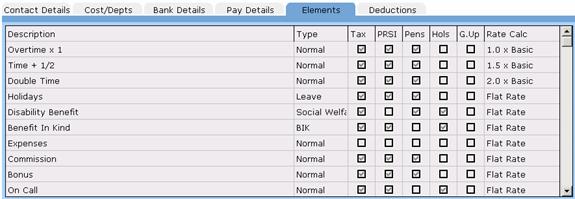
There are ten predefined payment elements. Every company is different, so you might like to set up additional elements. There is no limit to the number of elements you can set up. A ‘Payment Element’ is what an employee’s pay is made up of. For example, if an employee does some overtime, this is recorded as a ‘payment element’. If they get commission, this would be another ‘payment element’ their pay would look something like this:
Basic Pay
Overtime
Commission
Some companies might have a ‘rain allowance’. This would be set up as a new payment element.
Setting up a new Company Pay Element.
Click on the last line in the elements table. You may have to scroll down to see the last line. A cursor will appear.
Type the name of the element you wish to add eg. ‘Rain ‘Allowance’
Select which type of element this is from the list. ‘Rain allowance’ would be ‘Normal’. Other choices are:
BIK – Benefit In Kind. If your pay element is a Benefit In Kind, select this.
Social Welfare – Disability benefit
Leave – holidays and unpaid leave
Next is a row of five check boxes. Click on whichever ones apply. Here is an explanation of each of the checkboxes:
Tax – Is this element going to be taxed? Most elements have to be taxed.
PRSI – Is PRSI payable on this element? Some social welfare payments are not liable to PRSI. PRSI will have to be paid on most elements.
Pens – Is this element to be included when calculating pension deductions? Often pension payments are calculated as a percentage of income. If this element is to be included in this income, tick the box.
Hols – Is the employee going to be paid this even when they are on holiday? Benefit in Kind will sometimes be paid, even when the employee is on holidays (They might have the private use of a company car for example)
G.Up – Gross Up. Do you want the amount paid to be the actual amount the employee receives, after tax has been paid? If you want an employee to receive €100, you might actually have to pay them €120+ (including PRSI and Tax). When you tick this box, payback works out the extra amount and automatically adds it to the amount paid.
If a row is displayed with a grey background, this means you can’t change the settings. This is to stop users accidentally making expenses taxable, for example. When you have finished adding your additional elements, you can add some voluntary deductions.
Click the ‘Deductions’ tab.
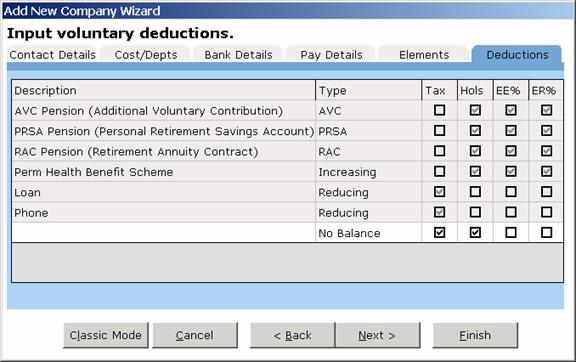
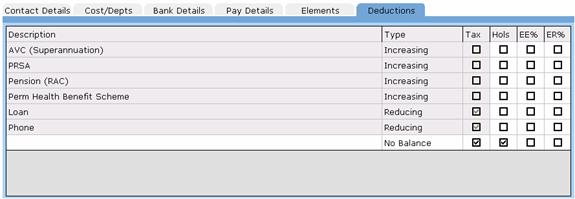
There are six voluntary deductions already set up. Your company might have extra voluntary deductions, such as Christmas savings schemes or union fees.
Setting up a new Company Voluntary Deduction.
Click on the last line in the deductions table. You may have to scroll down to see the last line. A cursor will appear.
Type the name of the deduction you wish to add eg. ‘Rain ‘Allowance’
Select which type of deduction this is from the list. ‘Reducing’, ‘Increasing’ or ‘No Balance’. This refers to the balance of the deduction. If the employee has a loan to pay off, the balance would be reducing. Each payment would reduce the final balance. If the employee were contributing towards a pension, the balance would be increasing. The employee might like to know the total contributed.
Next is a row of four check boxes, in a similar fashion to the elements.
Tax – Does this deduction have an effect on tax?
Hols – Should this deduction still be paid if the employee is on holidays?
EE% – is the deduction calculated as a percentage of pay, or as a flat rate?
ER% – is the employer’s contribution calculated as a percentage or flat rate?
Click the ‘Finish’ button once you are happy with the company details you have just entered
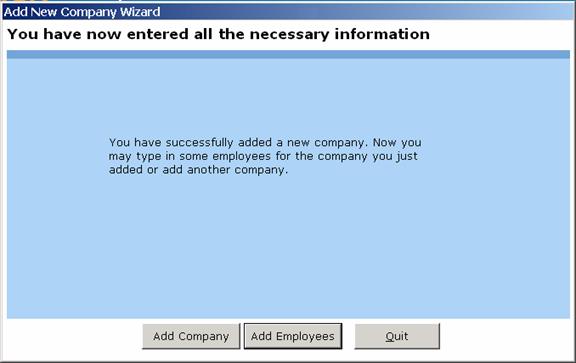
You are now given the choice to either add another company (If you are running a payroll bureau), add some employees to the company you’ve just typed in, or exit the wizard. The ‘Add Company’ will take you back to the start of the company wizard, and the ‘Add Employees’ will take you into the employee wizard (please refer to the next chapter – setting up employees). Whatever choice you make will not affect the company you’ve just added.
Click ‘Add New Company’ at top of the screen
The cursor will appear on the ‘Company Name’ box. Type the name of your company, followed by the ‘tab’ key, or the ‘return’ key.
Type the ‘trading name’
When you have finished filling in all the boxes, select the next tab. Click on ‘Cost/Depts’.
Cost centres and departments are optional. Not every company will have cost centres or departments. If your company has departments (such as accounts, sales and marketing etc), then click on the first blank row of the department table. A cursor will appear.
Some companies give their departments shortened codes, to help with administration. If you wish to do this, type the department code in the first column, and the department name in the second column.
When you’ve finished typing in a department, a blank line will appear in the table. This is for the next department. If you wish to add another department, click on the blank line and type the details.
When all departments have been entered, you may proceed to enter your company’s cost centres (if there are any)
If your company has cost centres (such as different branches - Dublin, Cork etc.) then enter your cost centres in the same way you entered the departments.
NOTE: There is no relationship between cost centres and departments in Payback
You are now ready to enter your company’s bank account details. These details are required if you wish to pay your employees by the Paypath system.
Click the ‘Bank Details’ tab.

There are six items to fill in on this screen. Fill in the details like you did for the first tab (‘contact details’). Pay particular attention to the account number.
Click the Pay Details tab.
In Payback, you can pay your employees many different ways, within the same company. The default is every Monday, in cash.
Tick which pay frequencies you wish to set up for your company. If you have Monthly paid employees only, tick the ‘Monthly’ check box, and then un-tick the ‘Weekly’ check box. You may tick as many as you like. If you have both weekly and monthly paid employees, tick both ‘Weekly’ and ‘Monthly’.
Select the preferred payment method for each frequency. You may select from ‘Cash, Cheque or Paypath’. This will be the default setting, and can be changed for individual employees.
Select the pay day. This is the day that your employees expect to be paid. (It is recommended to run the pay roll in advance to ensure employees are paid on time)
Choose which week you want to pay employees.
If ‘Weekly’, employees will be paid every week.
For ‘Fortnightly’ if ‘First week’ is selected, employees will be paid like this:
1 Jan to 7 Jan – Week1 ß Paid here
8 Jan to 14 Jan – Week2
15 Jan to 21 Jan – Week3 ß Paid here
22 Jan to 28 Jan – Week4
etc…
For ‘Fortnightly Second week’, employees will be paid like this:
1 Jan to 7 Jan – Week1
8 Jan to 14 Jan – Week2 ß Paid here
15 Jan to 21 Jan – Week3
22 Jan to 28 Jan – Week4 ß Paid here
etc…
For ‘Four-Weekly’, employees will be paid on every fourth week, starting from the specified week. There will be 13 Payments a year (52 weeks divided by 4 equals 13). ‘Four-weekly, second week’ will be like this:
1 Jan to 7 Jan – Week1
8 Jan to 14 Jan – Week2 ß Paid here
15 Jan to 21 Jan – Week3
22 Jan to 28 Jan – Week4
29 Jan to 4 Feb – Week5
5 Feb to 11 Feb – Week6 ß Paid here
12 Feb to 18 Feb – Week7
19 Feb to 25 Feb – Week8
etc…
For Monthly, employees will be paid every calendar month, so there will be 12 payments a year. ‘Last’ means the last week in the calendar month, and ‘First’ is the first week in the calendar month. If ‘First Monday’ is selected, then employees will be paid the first Monday in every calendar month.
You can customise the payment frequency for ‘Multi-Monthly’. This allows you to pay employees mid-week, and again at the last week in the month.
Click the ‘Elements’ Tab.
There are ten predefined payment elements. Every company is different, so you might like to set up additional elements. There is no limit to the number of elements you can set up. A ‘Payment Element’ is what an employee’s pay is made up of. For example, if an employee does some overtime, this is recorded as a ‘payment element’. If they get commission, this would be another ‘payment element’ their pay would look something like this:
Basic Pay
Overtime
Commission
Some companies might have a ‘rain allowance’. This would be set up as a new payment element.
Setting up a new Company Pay Element.
Click on the last line in the elements table. You may have to scroll down to see the last line. A cursor will appear.
Type the name of the element you wish to add eg. ‘Rain ‘Allowance’
Select which type of element this is from the list. ‘Rain allowance’ would be ‘Normal’. Other choices are:
BIK – Benefit In Kind. If your pay element is a Benefit In Kind, select this.
Social Welfare – Disability benefit
Leave – holidays and unpaid leave
Next is a row of five check boxes. Click on whichever ones apply. Here is an explanation of each of the checkboxes:
Tax – Is this element going to be taxed? Most elements have to be taxed.
PRSI – Is PRSI payable on this element? Some social welfare payments are not liable to PRSI. PRSI will have to be paid on most elements.
Pens – Is this element to be included when calculating pension deductions? Often pension payments are calculated as a percentage of income. If this element is to be included in this income, tick the box.
Hols – Is the employee going to be paid this even when they are on holiday? Benefit in Kind will sometimes be paid, even when the employee is on holidays (They might have the private use of a company car for example)
G.Up – Gross Up. Do you want the amount paid to be the actual amount the employee receives, after tax has been paid? If you want an employee to receive €100, you might actually have to pay them €120+ (including PRSI and Tax). When you tick this box, payback works out the extra amount and automatically adds it to the amount paid.
Rate Calc – How is this element amount going to be calculated? Is it an amount per hour or a flat rate? This allows you to set up rates.
If a row is displayed with a grey background, this means you can’t change the settings. This is to stop users accidentally making expenses taxable, for example. When you have finished adding your additional elements, you can add some voluntary deductions.
Click the ‘Deductions’ tab.
There are six voluntary deductions already set up. Your company might have extra voluntary deductions, such as Christmas savings schemes or union fees.
Setting up a new Company Voluntary Deduction.
Click on the last line in the deductions table. You may have to scroll down to see the last line. A cursor will appear.
Type the name of the deduction you wish to add eg. ‘Union Fee’
Select which type of deduction this is from the list. ‘Reducing’, ‘Increasing’ or ‘No Balance’. This refers to the balance of the deduction. If the employee has a loan to pay off, the balance would be reducing. Each payment would reduce the final balance. If the employee were contributing towards a pension, the balance would be increasing. The employee might like to know the total contributed.
Next is a row of four check boxes, in a similar fashion to the elements.
Tax – Does this deduction have an effect on tax?
Hols – Should this deduction still be paid if the employee is on holidays?
EE% – is the deduction calculated as a percentage of pay, or as a flat rate?
ER% – is the employer’s contribution calculated as a percentage or flat rate?
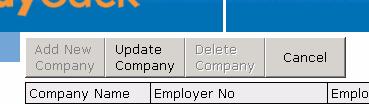
Once you have finished inputting all the company information, click the ‘Update Company’ button at the top of the screen.
Now you may set up another company, if you are running a bureau for example, or set up some employees. Each company you set up can have its own Payment Frequencies, Pay Elements and Voluntary Deductions.
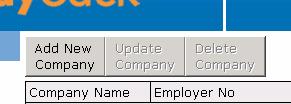
The four buttons at the top of the company screen are used to add new companies, change the details of companies you’ve already set up, and to delete companies.
If you wish to add a new company, click the ‘Add New Company’ button. Enter all the details as described above. Click ‘Update Company’ when you are finished. If you change your mind mid-way through adding a company, click the ‘Cancel’ button. Any changes will be lost.
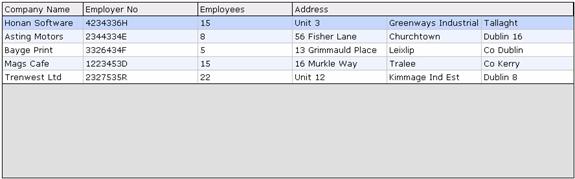
To update an existing company, first select the company by clicking on the companies’ table.
The tabs will automatically fill in all the company details. Make whatever amendments are required, and click the ‘Update Company’ button.
To delete a company, select whichever company you wish to delete from the companies table. Click the ‘Delete Company’ button. Payback will ask if you’re sure you wish to delete the company. If you are, click ‘yes’.
Note: As a precaution, you will be unable to delete companies that have employees set up. The employees column in the grid will be greater than zero. You will have to first delete all the employees in the company, before proceeding to delete the company.