Once you have set up one or more companies, you can start typing in your employees’ information. Once this is complete, you can process payrolls. The employee screen will be disabled until at least one company is set up.
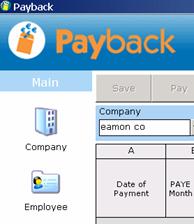
To start typing in your employee details, click on the ‘Employee’ picture on the menu at the left hand side of your screen (the main menu).
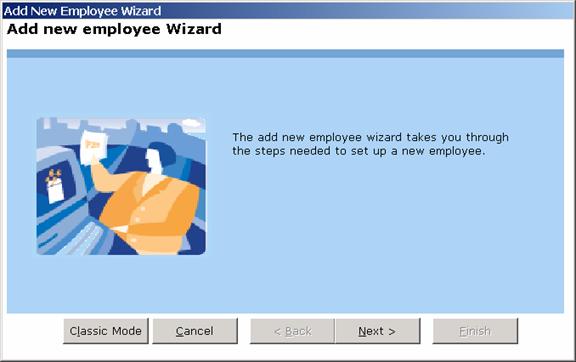
Once you have clicked on the ‘Employee’ icon, the employee screen will appear. This is where you type in your employee details. There are two ways you can put the employee details in, ‘Wizard’ mode or ‘Classic’ mode. When you first started up payback, you were asked to choose between:
Would you like to start in 'wizard mode'? This will guide you through the process of running a payroll.
Or
Would you like to start in 'Classic mode'? This will allow you to enter payroll information directly.
You can switch between 'classic' and 'wizard' modes at any time, while you are using the software. Click the Wizard hat at the top right of the screen to enter Wizard mode. Click ‘Classic mode’ to return to classic mode.
Click the ‘Next’ Button to start setting up employee information.
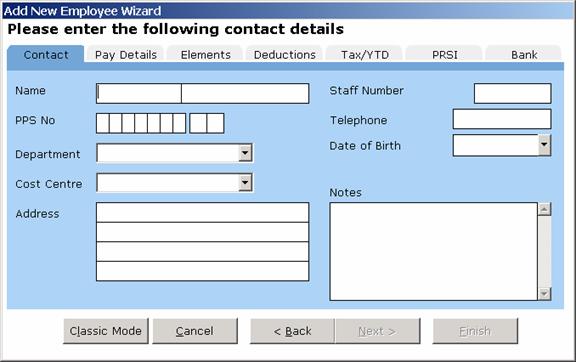
The cursor will appear on the ‘Employees First Name’ box. Type the name of the employee, followed by the ‘tab’ key, or the ‘return’ key.
Type the surname, followed by the ‘tab’ key or the ‘return’ key.
Type in the employee’s PPSN. If this number is correct, payback will display the caption ‘(Valid PPS)’ next to the number.
When you have finished filling in all the boxes, select the next tab. Click on ‘Next’.
Note: You will not be able to proceed until you have at least filled in the employee’s surname
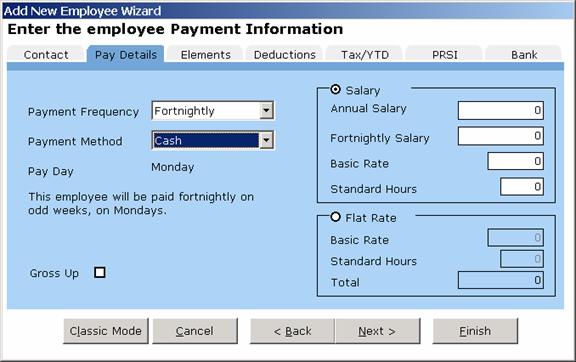
Select the payment frequency. This is taken from the company set up. If you only selected ‘Weekly’ when you were setting up the company, then only ‘Weekly’ will be available.
If the payment frequency you require is not available, you will first have to set up in the company screen.
The payment method defaults to whatever you selected in the company set up. You may override this and select from ‘Cash’, ‘Cheque’ or ‘Paypath’
Note that when you fill in the payment frequency details, an explanation appears describing exactly when the employee is going to be paid. Please ensure that this tallies with what is expected.
If you want the wages to be grossed up, check the ‘Gross Up’ button. This means that if an employee is paid €1000, they will receive €1000 after statutory deductions (PAYE & PRSI). Their gross pay will be more than €1000, to cover these deductions. Their nett pay will be €1000.
If the employee is paid by the hour, click the ‘Flat Rate’ option. If the employee is on an annual salary, select ‘Salary’.
If an employee is on a salary, there is also an option to input an hourly rate. This is because some companies allow people on salary to get paid extra for overtime, sometimes on a different rate to their standard salary. If you leave this blank, then the rate for overtime etc will be zero for people on a salary.
For salary, type either the annual salary or the amount per payment frequency (weekly, monthly etc.)
Payback will calculate the annual salary or the amount per payment frequency. (Depending on what was entered)
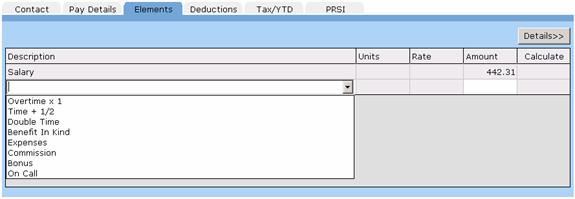
Next Click ‘Next’ or the ‘Elements’ tab

Notice that all the elements you set up in the company elements screen are visible when you click on the ‘Description’ column drop-down, shown above.
The elements grid displays all the elements for this employee. The elements you set up in this grid will appear every time the employee gets paid. As a rule of thumb, if a pay element (such as overtime) is going to be a once off payment, then it should not be recorded here. If an element is going to be for every pay period (such as benefit in kind for a company car), then set it up here.
To set up a new element, select it from the drop down list or type it directly in.
If the element is based on a rate (such as Overtime or Time + ½) then input the the hours, (or days, or whatever time frame or unit is relevant) into the ‘Units’ column
The rate column is based on the rate input in the pay details tab.
Input the rate (for example 10, for €10 per hour) in the Rate Column, if it has not already been filled in.
The total amount will be automatically calculated.
If the element is a lump sum amount (not based on a rate) then just the ‘amount’ column will be active. The value of the element may be entered here.
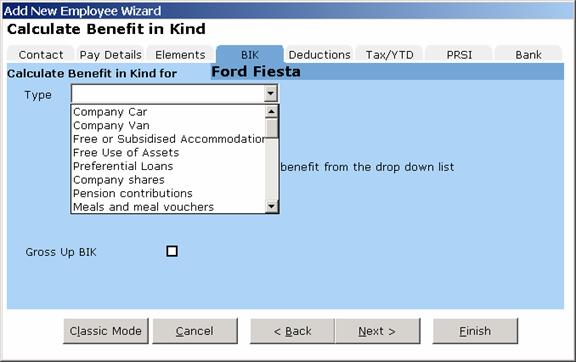
If you are setting up a Benefit in Kind element, then a new tab will appear. See Chapter 6 for more details on Benefit In Kind.
If the element is not in the list, you can set up your own employee element.
To set up your own employee element, type the name of the element directly into the elements grid (don’t select from the drop down list)
Click the ‘Details’ button to set up how the element is going to be calculated.
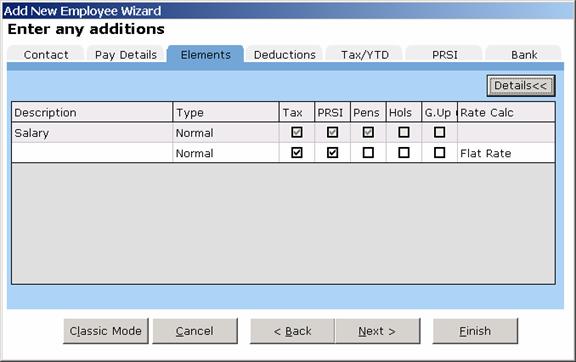
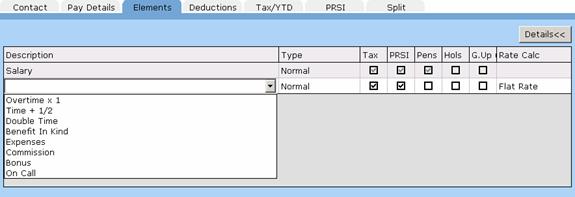
Seven new columns will appear, ‘Type’, ‘Tax’, ‘PRSI’, ‘Pens’, Hols’, ‘G.Up’ and ‘Rate Calc’. This is similar to setting up elements in the Company Screen.
Type – Two types can be selected in the Employees Screen.
Normal – This is the default type. This allows you to tailor the element, specifying whether it is going to be taxed, if PRSI is going to be applied etc.
BIK – Benefit In Kind. If your pay element is a Benefit In Kind, select this. You will not be able to specify the Tax, PRSI etc, because a BIK is always taxed.
Tax – Is this element going to be taxed? Most elements have to be taxed.
PRSI – Is PRSI payable on this element? Some social welfare payments are not liable to PRSI. PRSI will have to be paid on most elements.
Pens – Is this element to be included when calculating pension deductions? Often pension payments are calculated as a percentage of income. If this element is to be included in this income, tick the box.
Hols – Is the employee going to be paid this even when they are on holiday? Benefit in Kind will sometimes be paid, even when the employee is on holidays (They might have the private use of a company car for example)
G.Up – Gross Up. Do you want the amount paid to be the actual amount the employee receives, after tax has been paid? If you want an employee to receive €100, you might actually have to pay them €120+ (including PRSI and Tax). When you tick this box, payback works out the extra amount and automatically adds it to the amount paid.
Rate Calc – How is this element amount going to be calculated? Is it an amount per hour or a flat rate? This allows you to set up rates.
Select the type, and tick the text boxes with apply to your new element (If it is not a type Benefit In Kind)
If you want to enter a value for the element, click the ‘Details<<’ button to display the value columns. Input the value of the element.
Click ‘Update Employee’ to save your new element.
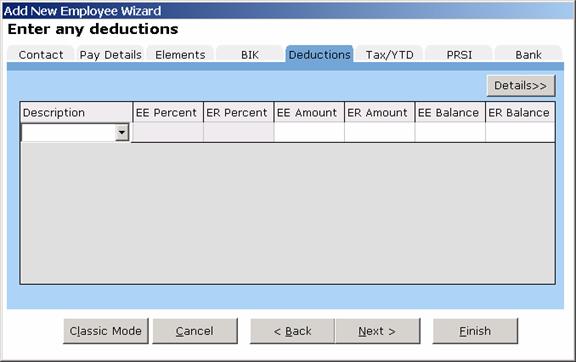
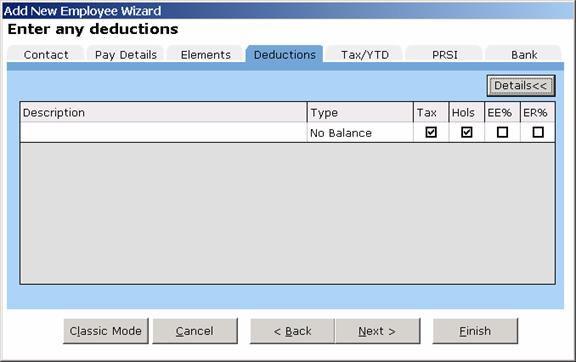
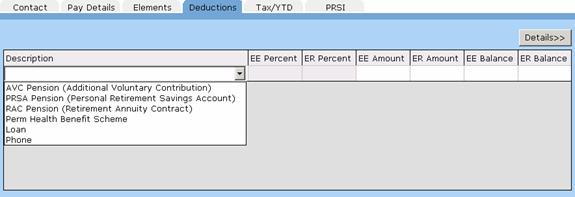
Notice that all the deductions you set up in the company deductions screen are visible when you click on the ‘Description’ column drop-down, shown above.
The deductions grid displays all the voluntary deductions for this employee. The deductions you set up in this grid will appear every time the employee gets paid. As a rule of thumb, if a voluntary deduction (such as the full payment of a loan) is going to be a once off deduction, then it should not be recorded here. If an deduction is going to be for every pay period (such as a pension), then set it up here.
This grid does not include statutory deductions such as PAYE and PRSI. These are automatically calculated within payback.
To set up a new deduction, select it from the drop down list or type it directly in.
Deductions can be a percentage of the gross pay, or a flat amount. Many deductions also have an employer contribution as well as an employee contribution.
The default for pensions is to input contributions as a percentage of Gross Pay (for example 5%), for loans the default is a flat amount (For example €100).
Here is a description of the columns:
EE Percent – The employee’s contribution as a percentage of gross pay
EE Amount – The employee’s contribution as a flat rate.
ER Amount – The employer’s contribution as a flat rate
EE Balance – For type of ‘Increasing’ or ‘Pension’, the total amount paid by the employee. For type of ‘Reducing’ the amount remaining to be paid (for example, balance on a loan)
ER Balance – For type of ‘Increasing’ or ‘Pension’, the total amount paid by the employer. For type of ‘Reducing’ the amount remaining to be paid.
The balance column can be overwritten to reflect the amount already paid into a fund, or the amount of an outstanding loan. If the ‘Type’ is reducing, the balance will be reduced by the contribution each time a payment period is processed. If the ‘Type’ is increasing, the balance will increase with each payment.
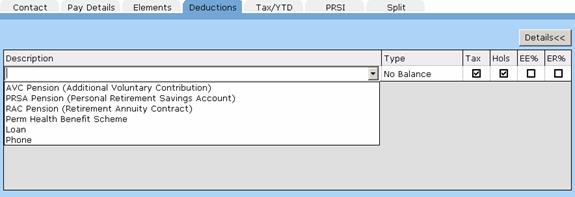
If the deduction is not in the list, you can set up your own employee deduction.
To set up your own employee deduction, type the name of the deduction directly into the deductions grid (don’t select from the drop down list)
Click the ‘Details’ button to set up how the deduction is going to be calculated.
Type – Is the contribution going to reduce, increase or have no effect on the balance?
Tax – Does this deduction have an effect on tax?
Hols – Should this deduction still be paid if the employee is on holidays?
EE% – is the deduction calculated as a percentage of pay, or as a flat rate?
ER% – is the employer’s contribution calculated as a percentage or flat rate?
If you wish to pay a voluntary deduction as a percent of gross, tick the percentage column. If the payment is to be a flat amount, deselect the tick box.
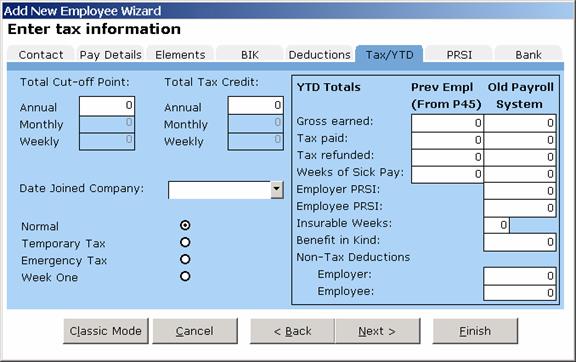
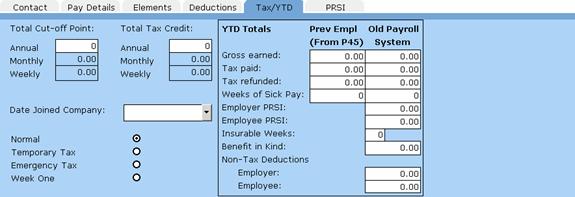
Before processing a payroll, you will need to know the employee’s Standard Rate Cut-off Point and their Tax Credits. This information can be found on either their Tax Deduction Card or a Certificate of Tax Credits (Form P2). Both of these can be obtained from the Revenue. (Leave these fields blank if the employee is on Emergency Tax)
Fill in the ‘Date Joined Company’ only if the employee has joined in the current tax year. This is necessary for the P60.
Which Tax Basis to Use:
Normal (Cumulative). If you have received a Certificate of Tax Credits (Form P2) from the employee, not specifying a week1/month1 basis.
Temporary. If you have received a P45, issued by the employee’s former employer in the current or previous income tax year, but have yet to receive a Certificate of Tax Credits.
Emergency. The emergency basis applies where:
An employee has not received either a certificate of tax credits and standard rate cut-off point, or a tax deduction card for an employee for the current year.
Or
The employer has not received a Form P45 issued in the current or previous income tax year from a new employee.
Or
The employee has given the employer a Form P45 issued by a previous employer indicating that that employer applied the emergency basis.
Or
The employee has given the employer a completed Form P45 without a PPS number and not indicating that the previous employer applied the emergency basis.
Week 1 (Week1/Month1 non-cumulative). In certain circumstances an employee will receive a certificate of tax credits and standard rate cut-off point, which is issued on a Week1/Month1 basis.
This tab is also used for employees who are starting employment mid-year. If you have purchased Payback mid-year, you can use this screen to copy your employees’ information across. If a new employee is joining your company, you may also use this screen to input their P45 data.
There are two columns, ‘Prev Empl (From P45)’ and ‘Old Payroll System’. If you are changing your payroll system, then use the ‘Old Payroll System’ to key in your totals to date. You will not have to re-process every payment period. The totals you’ve typed in will be used to calculate the wages and for reports. Once you pay an employee, these totals will be locked, preventing further editing. This is to prevent incorrect payroll calculations. If you’ve inadvertently typed a incorrect figure, but have already processed pay for the employee, you will first have to rewind all pay periods before you can change these totals.
The ‘Gross Earned’ field refers to the gross taxable pay and does not include any non-taxable deductions (such as pensions etc).
The ‘Prev Empl (From P45)’ is used to input payment details from a P45, issued by a previous employer for the current tax year.
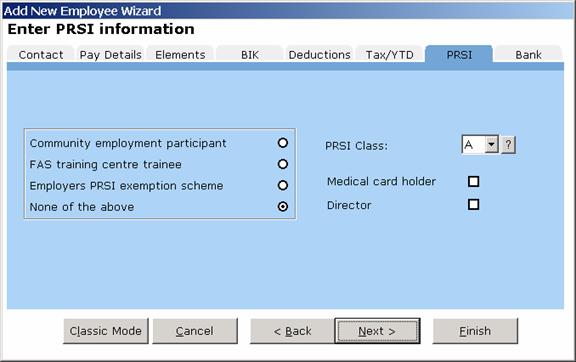
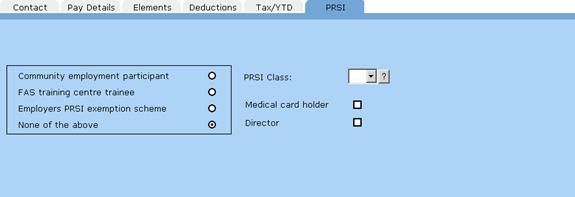
Unlike most other payroll software, with Payback you only have to enter your main PRSI class. Payback will work out your sub-class automatically. For example, if you tick ‘Medical card holder’, it will also automatically switch to ‘A2’. Note that a director can be either class ‘S’ or class ‘A’.
To ensure Payback selects the correct PRSI subclass, please tick the appropriate boxes.
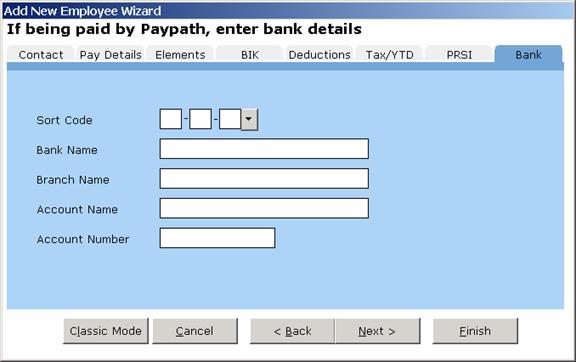
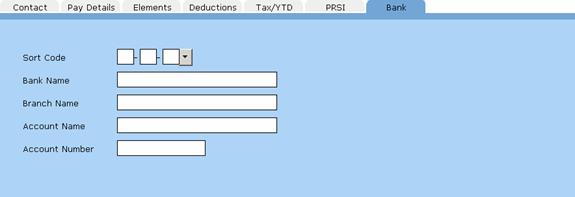
If the employee is being paid by Paypath, then you will have to input their bank account details. This is so that the money can be transferred to the correct bank account.
Click on the drop down arrow next to the sort code to search for a bank, or just type the sort code directly in. The other fields will be automatically filled in.
If the bank is new and isn’t in the list, then you can directly type in the bank details.
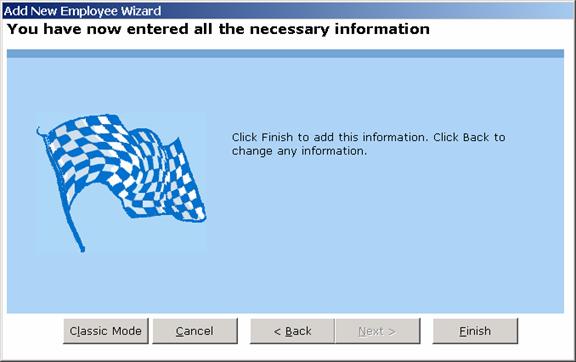
Congratulations, you’ve just entered your employee’s details. Click the ‘Finish’ button to continue.
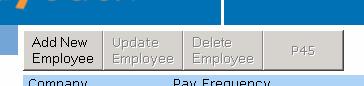
Click ‘Add New Employee’ at top of the screen
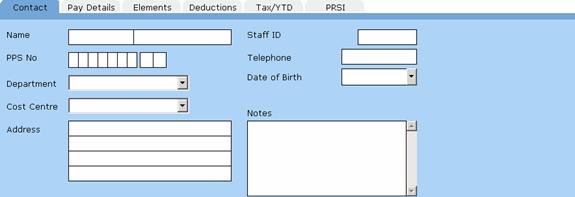
The cursor will appear on the ‘Employees First Name’ box. Type the name of the employee, followed by the ‘tab’ key, or the ‘return’ key.
Type the surname, followed by the ‘tab’ key or the ‘return’ key.
Type in the employee’s PPSN. If this number is correct, payback will display the caption ‘(Valid PPS)’ next to the number.
When you have finished filling in all the boxes, select the next tab. Click on ‘Paydetails’.
Note: You will not be able to proceed until you have at least filled in the employee’s surname
Note: Once an employee has been paid, the last payment period and date is also displayed on this tab. This is useful information when rewinding an employee’s payments.
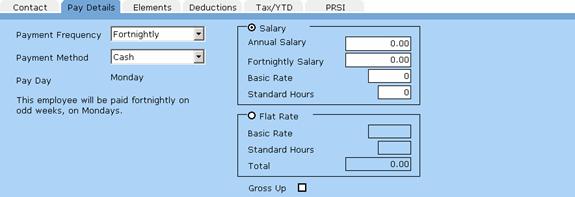
Select the payment frequency. This is taken from the company set up. If you only selected ‘Weekly’ when you were setting up the company, then only ‘Weekly’ will be available.
If the payment frequency you require is not available, you will first have to set up in the company screen.
The payment method defaults to whatever you selected in the company set up. You may override this and select from ‘Cash’, ‘Cheque’, ‘Paypath’ or ‘Split pay’
Note that when you fill in the payment frequency details, an explanation appears describing exactly when the employee is going to be paid. Please ensure that this tallies with what is expected.
If you want the wages to be grossed up, check the ‘Gross Up’ button. This means that if an employee is paid €1000, they will receive €1000 after statutory deductions (PAYE & PRSI). Their gross pay will be more than €1000, to cover these deductions. Their nett pay will be €1000.
If the employee is paid by the hour, click the ‘Flat Rate’ option. If the employee is on an annual salary, select ‘Salary’.
If an employee is on a salary, there is also an option to input an hourly rate. This is because some companies allow people on salary to get paid extra for overtime, sometimes on a different rate to their standard salary. If you leave this blank, then the rate for overtime etc will be zero for people on a salary.
For salary, type either the annual salary or the amount per payment frequency (weekly, monthly etc.)
Payback will calculate the annual salary or the amount per payment frequency. (Depending on what was entered)
Next Click the ‘Elements’ tab
Notice that all the elements you set up in the company elements screen are visible when you click on the ‘Description’ column drop-down, shown above.
The elements grid displays all the elements for this employee. The elements you set up in this grid will appear every time the employee gets paid. As a rule of thumb, if a pay element (such as overtime) is going to be a once off payment, then it should not be recorded here. If an element is going to be for every pay period (such as benefit in kind for a company car), then set it up here.
To set up a new element, select it from the drop down list or type it directly in.
If the element is based on a rate (such as Overtime or Time + ½) then input the the hours, (or days, or whatever time frame or unit is relevant) into the ‘Units’ column
The rate column is based on the rate input in the pay details tab.
Input the rate (for example 10, for €10 per hour) in the Rate Column, if it has not already been filled in.
The total amount will be automatically calculated.
If the element is a lump sum amount (not based on a rate) then just the ‘amount’ column will be active. The value of the element may be entered here.
If you are setting up a Benefit in Kind element, then a ‘View’ button will appear in the grid
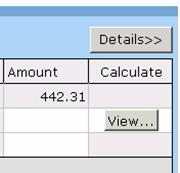
The ‘View’ button will appear if Benefit In Kind, Disability Benefit or Leave is selected as an element. To automatically calculate the value of the benefit, click this button.
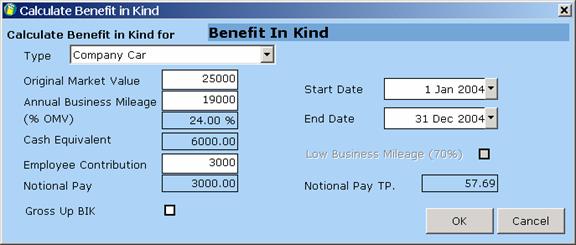
The Benefit In Kind screen appears once the ‘View’ button is pressed. See Chapter 6 for more details on Benefit In Kind.
If the element is not in the list, you can set up your own employee element.
To set up your own employee element, type the name of the element directly into the elements grid (don’t select from the drop down list)
Click the ‘Details’ button to set up how the element is going to be calculated.
Seven new columns will appear, ‘Type’, ‘Tax’, ‘PRSI’, ‘Pens’, Hols’, ‘G.Up’ and ‘Rate Calc’. This is similar to setting up elements in the Company Screen.
Type – Two types can be selected in the Employees Screen.
Normal – This is the default type. This allows you to tailor the element, specifying whether it is going to be taxed, if PRSI is going to be applied etc.
BIK – Benefit In Kind. If your pay element is a Benefit In Kind, select this. You will not be able to specify the Tax, PRSI etc, because a BIK is always taxed.
Tax – Is this element going to be taxed? Most elements have to be taxed.
PRSI – Is PRSI payable on this element? Some social welfare payments are not liable to PRSI. PRSI will have to be paid on most elements.
Pens – Is this element to be included when calculating pension deductions? Often pension payments are calculated as a percentage of income. If this element is to be included in this income, tick the box.
Hols – Is the employee going to be paid this even when they are on holiday? Benefit in Kind will sometimes be paid, even when the employee is on holidays (They might have the private use of a company car for example)
G.Up – Gross Up. Do you want the amount paid to be the actual amount the employee receives, after tax has been paid? If you want an employee to receive €100, you might actually have to pay them €120+ (including PRSI and Tax). When you tick this box, payback works out the extra amount and automatically adds it to the amount paid.
Rate Calc – How is this element amount going to be calculated? Is it an amount per hour or a flat rate? This allows you to set up rates.
Select the type, and tick the text boxes with apply to your new element (If it is not a type Benefit In Kind)
If you want to enter a value for the element, click the ‘Details<<’ button to display the value columns. Input the value of the element.
Click ‘Update Employee’ to save your new element.
Notice that all the deductions you set up in the company deductions screen are visible when you click on the ‘Description’ column drop-down, shown above.
The deductions grid displays all the voluntary deductions for this employee. The deductions you set up in this grid will appear every time the employee gets paid. As a rule of thumb, if a voluntary deduction (such as the full payment of a loan) is going to be a once off deduction, then it should not be recorded here. If an deduction is going to be for every pay period (such as a pension), then set it up here.
This grid does not include statutory deductions such as PAYE and PRSI. These are automatically calculated within payback.
To set up a new deduction, select it from the drop down list or type it directly in.
Deductions can be a percentage of the gross pay, or a flat amount. Many deductions also have an employer contribution as well as an employee contribution.
The default for pensions is to input contributions as a percentage of Gross Pay (for example 5%), for loans the default is a flat amount (For example €100).
Here is a description of the columns:
EE Percent – The employee’s contribution as a percentage of gross pay
EE Amount – The employee’s contribution as a flat rate.
ER Amount – The employer’s contribution as a flat rate
EE Balance – For type of ‘Increasing’ or ‘Pension’, the total amount paid by the employee. For type of ‘Reducing’ the amount remaining to be paid (for example, balance on a loan)
ER Balance – For type of ‘Increasing’ or ‘Pension’, the total amount paid by the employer. For type of ‘Reducing’ the amount remaining to be paid.
The balance column can be overwritten to reflect the amount already paid into a fund, or the amount of an outstanding loan. If the ‘Type’ is reducing, the balance will be reduced by the contribution each time a payment period is processed. If the ‘Type’ is increasing, the balance will increase with each payment.
If the deduction is not in the list, you can set up your own employee deduction.
To set up your own employee deduction, type the name of the deduction directly into the deductions grid (don’t select from the drop down list)
Click the ‘Details’ button to set up how the deduction is going to be calculated.
Type – Is the contribution going to reduce, increase or have no effect on the balance?
Tax – Does this deduction have an effect on tax?
Hols – Should this deduction still be paid if the employee is on holidays?
EE% – is the deduction calculated as a percentage of pay, or as a flat rate?
ER% – is the employer’s contribution calculated as a percentage or flat rate?
If you wish to pay a voluntary deduction as a percent of gross, tick the percentage column. If the payment is to be a flat amount, deselect the tick box.
Before processing a payroll, you will need to know the employee’s Standard Rate Cut-off Point and their Tax Credits. This information can be found on either their Tax Deduction Card or a Certificate of Tax Credits (Form P2). Both of these can be obtained from the Revenue. (Leave these fields blank if the employee is on Emergency Tax)
Fill in the ‘Date Joined Company’ only if the employee has joined in the current tax year. This is necessary for the P60.
Which Tax Basis to Use:
Normal (Cumulative). If you have received a Certificate of Tax Credits (Form P2) from the employee, not specifying a week1/month1 basis.
Temporary. If you have received a P45, issued by the employee’s former employer in the current or previous income tax year, but have yet to receive a Certificate of Tax Credits.
Emergency. The emergency basis applies where:
An employee has not received either a certificate of tax credits and standard rate cut-off point, or a tax deduction card for an employee for the current year.
Or
The employer has not received a Form P45 issued in the current or previous income tax year from a new employee.
Or
The employee has given the employer a Form P45 issued by a previous employer indicating that that employer applied the emergency basis.
Or
The employee has given the employer a completed Form P45 without a PPS number and not indicating that the previous employer applied the emergency basis.
Week 1 (Week1/Month1 non-cumulative). In certain circumstances an employee will receive a certificate of tax credits and standard rate cut-off point, which is issued on a Week1/Month1 basis.
This tab is also used for employees who are starting employment mid-year. If you have purchased Payback mid-year, you can use this screen to copy your employees’ information across. If a new employee is joining your company, you may also use this screen to input their P45 data.
There are two columns, ‘Prev Empl (From P45)’ and ‘Old Payroll System’. If you are changing your payroll system, then use the ‘Old Payroll System’ to key in your totals to date. You will not have to re-process every payment period. The totals you’ve typed in will be used to calculate the wages and for reports. Once you pay an employee, these totals will be locked, preventing further editing. This is to prevent incorrect payroll calculations. If you’ve inadvertently typed a incorrect figure, but have already processed pay for the employee, you will first have to rewind all pay periods before you can change these totals.
The ‘Gross Earned’ field refers to the gross taxable pay and does not include any non-taxable deductions (such as pensions etc).
The ‘Prev Empl (From P45)’ is used to input payment details from a P45, issued by a previous employer for the current tax year.
Unlike most other payroll software, with Payback you only have to enter your main PRSI class. Payback will work out your sub-class automatically. For example, if you tick ‘Medical card holder’, it will also automatically switch to ‘A2’. Note that a director can be either class ‘S’ or class ‘A’.
To ensure Payback selects the correct PRSI subclass, please tick the appropriate boxes.
If the employee is being paid by Paypath, then you will have to input their bank account details. This is so that the money can be transferred to the correct bank account.
Click on the drop down arrow next to the sort code to search for a bank, or just type the sort code directly in. The other fields will be automatically filled in.
If the bank is new and isn’t in the list, then you can directly type in the bank details.
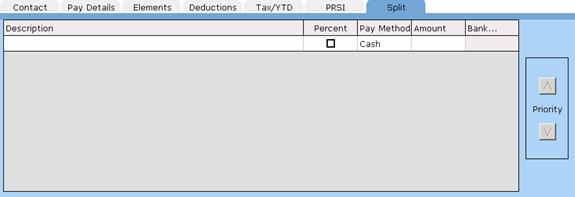
Some employees may wish to be paid by more than one method. Using the split pay screen, payment amounts can be allocated to different payment methods. Payment methods can be prioritised using the ‘Priority’ arrows at the right hand side of the grid.
To set up multiple payment methods, input each payment into the Split Pay grid. Payments are prioritised, the closer to the top of the grid, the higher the priority.
They have to be prioritised in case the employee does not get paid enough to cover all of the payment methods. Below is an example of how prioritising payment methods work:
An employee is paid €1000 Nett. Here is how the payment methods were prioritised:
Cheque: €500
Paypath: €400
Cash: €100
(Total: €1000)
One month, the employee only works two weeks. They only get paid €600. Here is how their wages will be split:
Cheque: €500
Paypath: €100
Cash: €0
(Total: €600)
Cheque took the priority because it was at the top of the list. Next came Paypath, followed by Cash. ‘Cash’ was allocated a zero amount because it was the lowest priority.
The following month the employee does overtime, resulting in getting paid €1500. Here is how the pay will be apportioned:
Cheque: €1000
Paypath: €400
Cash: €100
(Total: €1500)
Note that ‘Cheque’ received the balance. This is because it was highest priority.
Payment methods may receive amounts that are different to what was originally allocated. This will happen if the employee is paid more or less than what the total split payments add up to (as in the above examples). To cater for this, when you pay the employee in the Payroll screen, there will be an additional column, ‘Nett Pay’.
When setting up employees, only the ‘Amount’ Column is visible. This is because we won’t know at that stage how much the employee will actually be paid.
The other columns are:
Description – A brief description about the payment.
Percent – Is the amount value expressed as a percentage of the nett pay, or a flat amount. (€50 or 50% of nett pay)
Amount – The target amount in either a percentage of nett pay, or a flat amount (depending on whether you ticked the ‘Percentage’ column)
(Nett Pay – The actual amount paid to the employee – only visible on the Payroll Screen)
Bank… - If paying by Paypath, click on View… to display the bank account details. It is possible to pay money into more than one bank account for the same employee.
The five buttons at the top of the employee screen are used to add new employees, change the details of employees you’ve already set up, to delete employees and to issue and reverse P45s.
If you wish to add a new employee, click the ‘Add New Employee’ button. Enter all the details as described above. Click ‘Update Employee’ when you are finished. If you change your mind mid-way through adding a Employee, click the ‘Cancel’ button. Any changes will be lost.
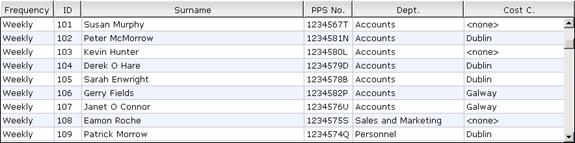
To update an existing employee, first select the employee by clicking on the employees’ list.
The tabs will automatically fill in all the employee details. Make whatever amendments are required, and click the ‘Update Employee’ button.
To delete an employee, select whichever employee you wish to delete from the employees list. Click the ‘Delete Employee’ button. Payback will ask if you’re sure you wish to delete the employee. If you are, click ‘yes’.
Note: As a precaution, you will be unable to delete employees that have had one or more payment periods processed. You will first have to rewind the Payments. This has to be done in reverse order.
If you’ve paid up to period 12, you will have to rewind
periods 12, 11, 10, 9…3, 2, 1 (for the employee) before you can delete the
employee. This is a safety feature to prevent accidental deletion of payroll
data. To check the last period that an employee has been paid, click on the
‘Pay Details’ tab on the employee screen.