Data Extract Utility
Cloudpay has a data extract utility where you can select which fields you which to appear in a report. The fields are arranged in four group:
- Employee: These are related the employee. Such as Name, Address, PPS Number etc.
- Payment: When you process a payment, these fields are used, such as Gross Pay, Pay date, net pay etc.
- Elements: Any additions to the pay set up by the users in the Elements grid, such as Expenses, Maternity pay etc
- Deductions: Any deductions to the pay set up by the users in the deductions grid, such as Pensions, Loans etc
All employees can be extracted for the output, or just a selection. You can also specify departments, cost centres and date ranges.
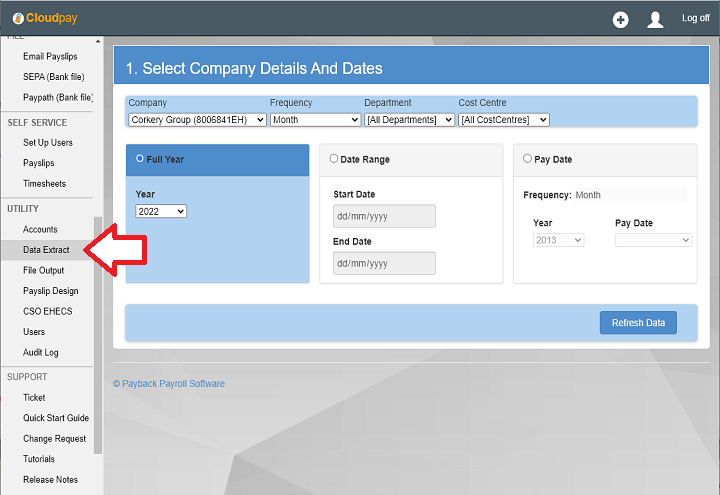
Filtering the Data
Use the filter drop downs (Company, pay frequency, cost centre and department) at the top of the extract screen to select the data you require.
You can also select date ranges or a single pay date. Note that for larger date ranges (eg, a full year) it will take longer to load the data. Only select the date range that you require.
Then click the 'Refresh Data' button
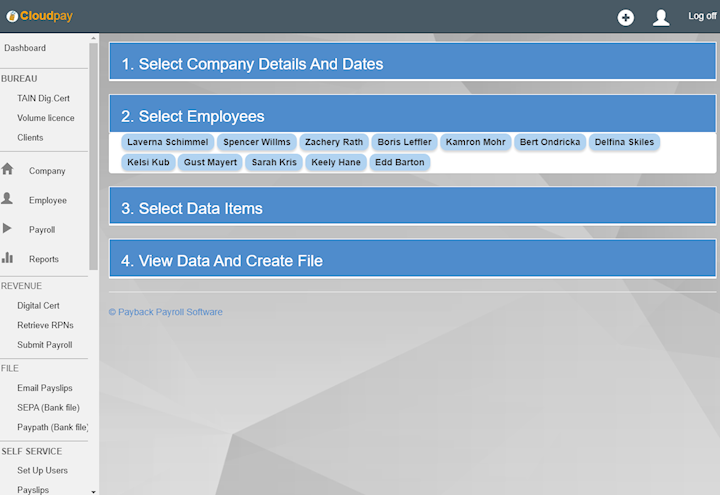
Select the employees
The next step is to select the employees.
Click on the employee 'Bubble' to select or to deselect them. The bubble will turn blue to indicate the employee is selected, and grey for not selected.
Employees displayed in Grey will not appear in the report.
Choose the Data Fields
In a similar way to the way the employees were selected, you can choose the data fields.
At the bottom of each group are 'All' and 'None' buttons. Clicking these will either select all the data items in the group or make it so that no data items are selected.
Note that if there is a great deal of data, for example there a lots of employees and you are extracting all pay dates for the year, then it will take longer to retrieve the data.
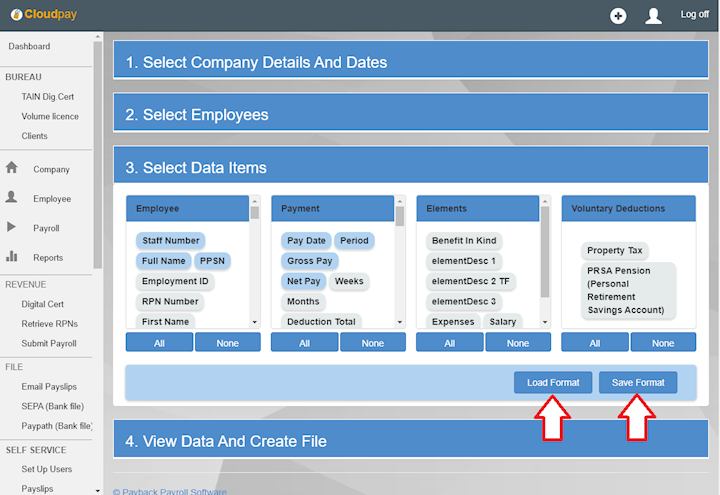
Saving your Selection
If you need to extract the same data after each pay run, you can save your field selection. The next time you use the data extract utility, you can load your pre-set selection so that you do not have to keep selecting the fields.
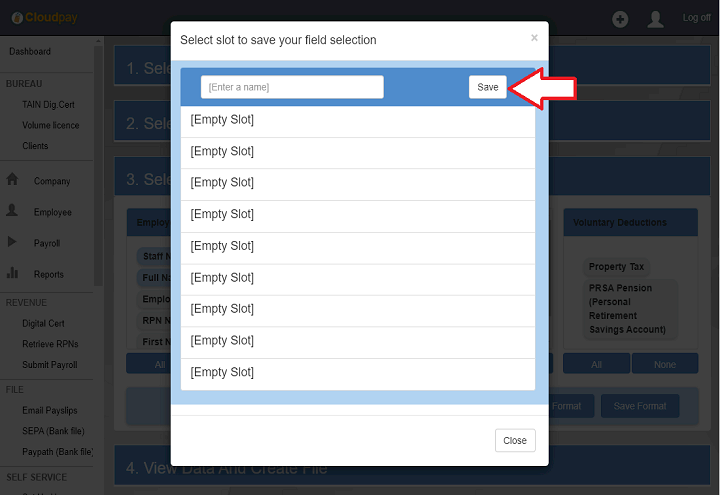
To save a field selection, click the 'Save Format' button. A save dialogue will appear with ten empty slots. Click on one of them and enter a description, or name for your selection.
Then click the 'Save' button. (The save button changes to 'Overwrite' if you select a slot that is already in use)
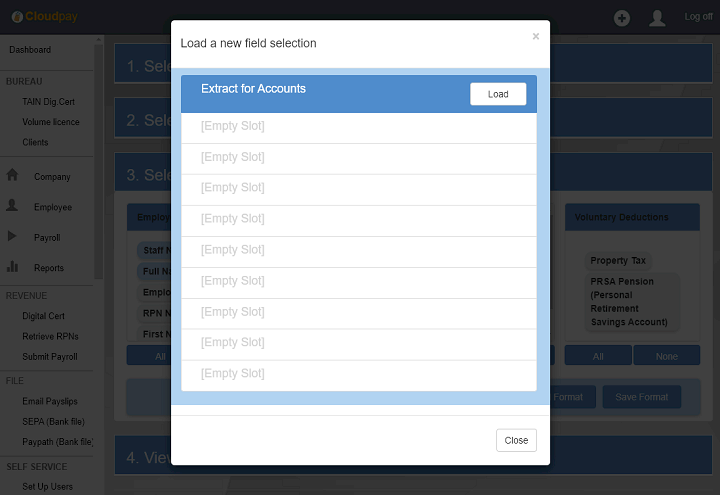
Loading a previously saved selection
If you have previously saved a field selection, this can be recalled by click the 'Load Format' button.
This works in a similar way to the Save Dialogue. Click on the Slot you wish to load and it will turn blue. Then click the Load button that appears to the right.
Note that the more data you are selecting, the longer the load will take
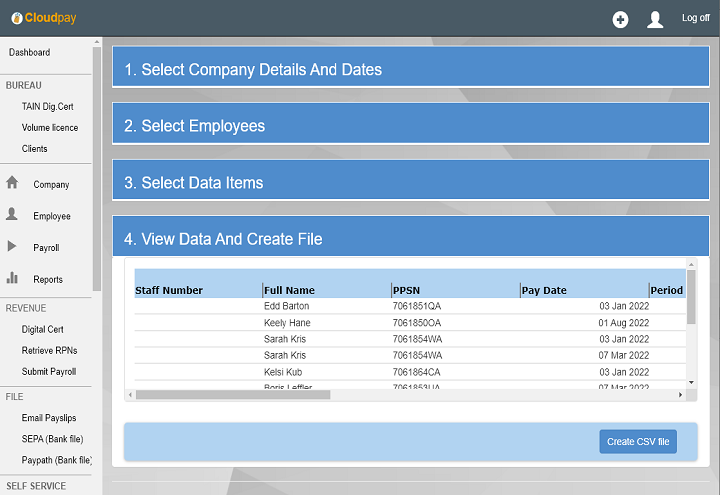
Saving your Data
The last step is to save your data.
The data will be saved in a CSV format. CSV stands for Comma Separated Values. This format can be used by any spreadsheet application and many other third party products like accounts, costing or personnel software.
Click 'Create CSV File' to save your data.
Larger amounts of data
If your company does not have many employees or you are not selecting many pay dates, then you will see your data in the grid in Section Four of the Data extract utility.
For larger amount of data you will have to select your pre-defined selection that you created and directly download the CSV file. You will not be able to select individual employees, instead all employees will appear in the extract. You can filter these in Excel or a spreadsheet application accordingly.
This happens because the data export utility can be very resource intensive for larger amounts of data. It does not effect the contents CSV file or anything else.
Data Warning
Sometimes this warning will appear.
It means that you will not be able to see your data in the grid before downloading it.
You will have to select a pre-saved format to create your CSV file.

Saving larger files
To save your CSV file, select it from the drop down (Circled in Red opposite)
Click the 'Create CSV file' button and your data extract will be downloaded in your browser.
Note that if nothing appears in the drop down, this means that you have not yet saved a data extract format. Please see 'Saving your Selection' above.
