Introduction
Before processing payments for employees, Revenue instruct that the correct tax details be applied. You can do this by retrieving RPNs. To help understand how this works you should know what the terms Employment ID and RPN mean. If you know this already, you can skip the rest of this introduction.
Employment ID Every employment an employee has in the year, is allocated a unique employment ID. The Employment ID can be any text, such as numbers (0, 1, 2, 3 etc) or descriptions ('WW45X', '1000PQS' etc) Each Employment ID gets its own RPN. If an employee leaves their job and starts a new one, they will get a new employment ID
RPN This stands for Revenue Payroll Notification. It replaces the old Tax Credits certificates and includes information such as Tax Credits, Standard Rate Cut Off point, USC rates and tax paid from previous employments.
Importing RPNs
Once you have imported your digital certificate, you'll be able to connect directly with the Revenue Server to import PRNs.
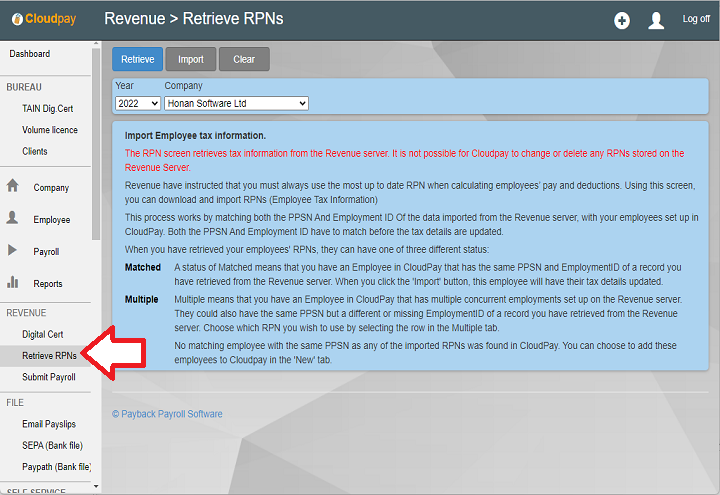
On the Menu at the right of the screen, select Retrieve RPNs
Select the Company at the top of the screen, if is not already selected, and click Ok
Click the Retrieve button.
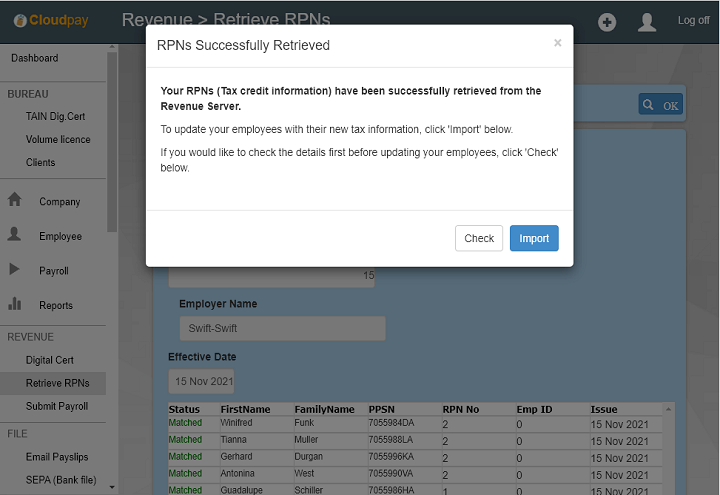
RPNs Imported Dialogue
Cloudpay will connect to the Revenue server and import the RPNs.
You will be given the chance to go ahead and update your employee records with the new RPN details or to inspect them first.
If you select Check, you'll still be able to update your employees.
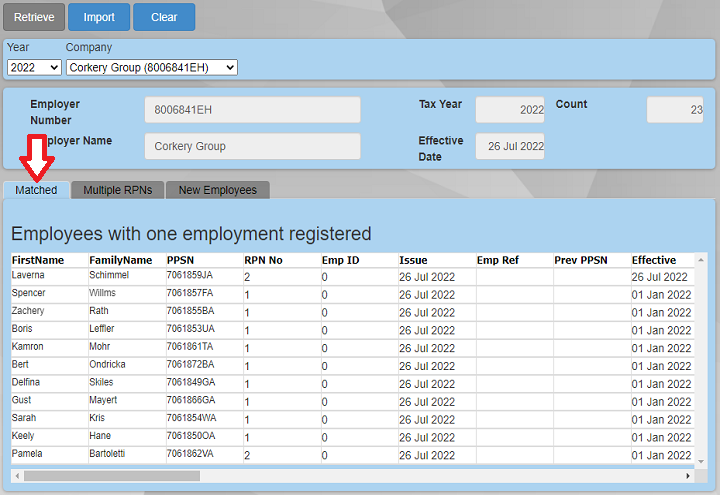
Matched tab
The employee RPN screen will fill with all the RPNs that are on the Revenue server for each employee.
The Match tab contains all the RPN records for employee with only one employment registered with the selected company.
RPNs are matched based on PPS Number and Employment ID. For most employees, both of these will match and the correct RPN will be updated.
If the employee's PPS number matches, but their Employment ID does not, You can still import this RPN as you'll be able to assign it later.
Note that the tax credits and standard rate cut off point columns are coloured in blue for easy reference.
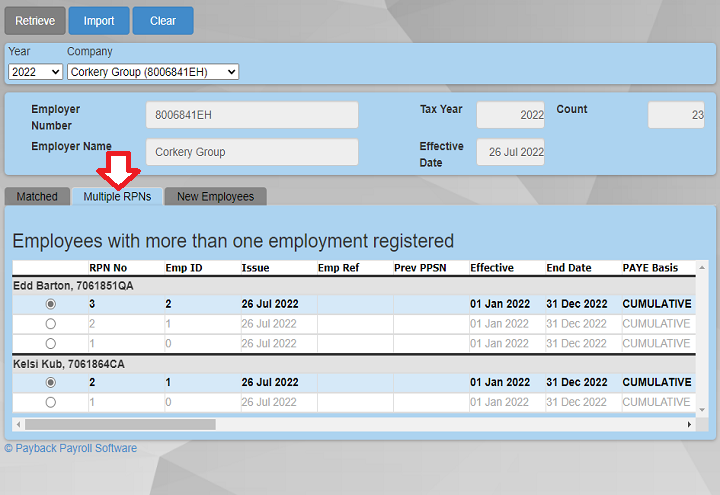
Multiple tab
If the employee has multiple RPNs set up on the Revenue server, then the employee will be listed in this screen.
The grid is grouped by employee. Under each employee name are the RPNs stored on the Revenue server. Note that the default RPN is that which matches the current Employment ID set up for the employee in the Employee screen
Select which RPN you wish to use for each employee by clicking on the appropriate row.
When you import the RPNs, the employee's Employment ID and tax details will be updated to the selected RPN.
It is also possible to change the RPN in the Employee screen PAYE tab
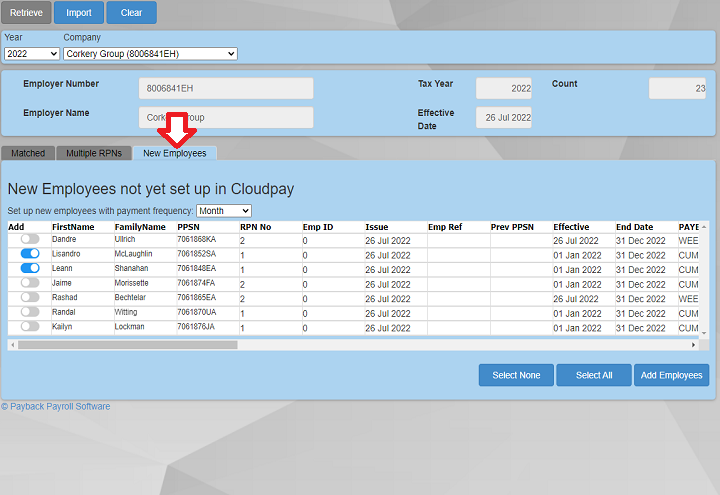
New Employee tab
Employees that have RPNs on the Revenue server, but are not set up in the currently selected company in Cloudpay will appear in the New Employees tab.
If you wish to set these employees up in Cloudpay, first select the employee(s) by clicking on the slider at the left of the grid.
Select the payment Frequency using the drop down, that you would like these employees to have and then click the 'Add Employees' button.
If the employees are a mix of more than one payment frequency, then you can select each frequency in turn.
Once the 'Add employees' button has been clicked and the employees are set up, then click the Import button at the top of the screen to import their RPNs.
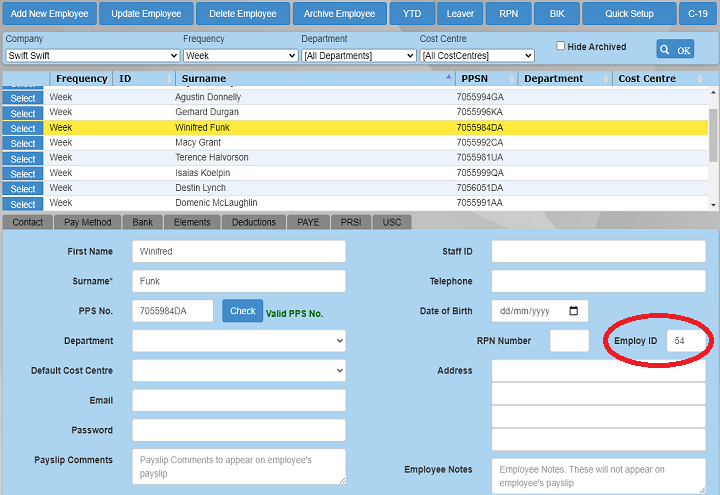
Checking Employment ID
To check an employee's Employment ID, go to the employee screen contact tab.
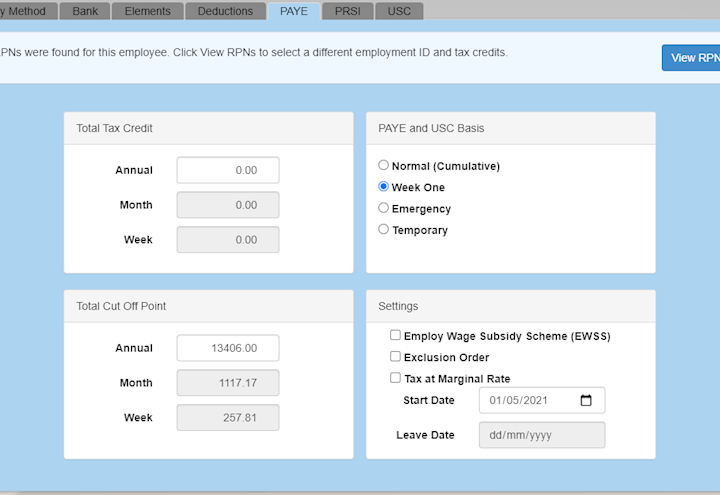
In this example the Employment ID in Cloudpay is 54, but in the RPN screen (Emp ID column) it is 0
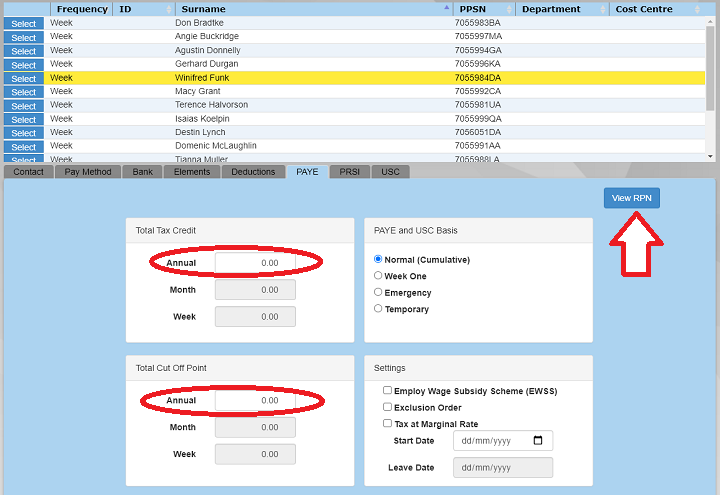
Applying an RPN where the employment IDs did not match
To assign the partially matched RPN to Winifred, click on the PAYE tab of the employee screen.
Note that their tax credits were not updated and they are zero.
Click the View RPN button.
This button will appear for all employees that have RPNs imported during the current year.
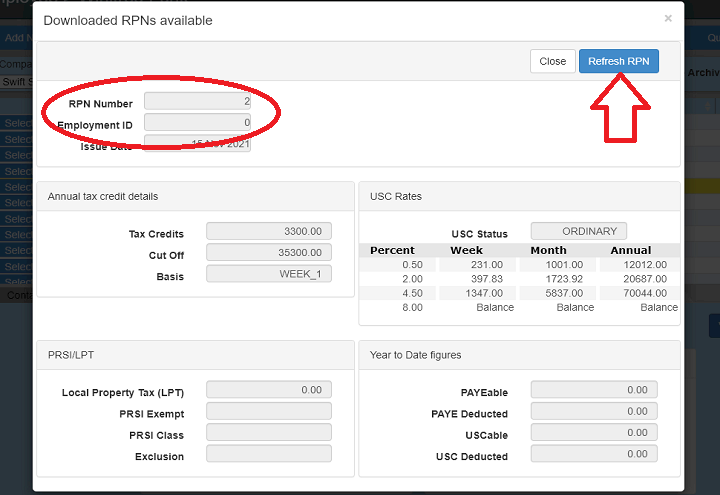
Selecting the RPN
The RPN screen will appear. This displays all RPNs that have ever been imported for this employee throughout the current year, regardless of Employment ID.
For this example, we've only ever imported one RPN for Winifred.
Note the Employment ID is 0 and the RPN number is 2
Click the Refresh RPN button.
Updating the Employee
When you click the Refresh RPN button, the employees tax credits, standard rate cut off point and other tax details will all be updated.
Their Employment ID will also be updated to that of the RPN you have applied. In this case, Winifred's Employment ID was updated from 54 to 0. You can see this in the Contact tab.
Note the RPN number as also been updated.
This means that the next time RPNs are imported for the company, their tax details will automatically be updated without having to go through the PAYE tab RPN screen.

Employees with Multiple RPNs and Employment IDs
Sometimes an employee will have multiple RPNs. This can happen if they have multiple employments or Revenue have issued more than one RPN throughout the year.
As well as selecting the appropriate RPN in the import screen, it is also possible to assign different RPNs directly from the Employee screen. This means that you do not have to retrieve all the RPNs if you only wish to change one or two employees' RPNs.
If there are multiple RPNs available for the employee, then the Button in the PAYE tab will say 'View RPNs'
Click the button to see all the alternative RPNs for the employee.
Selecting from multiple RPNs
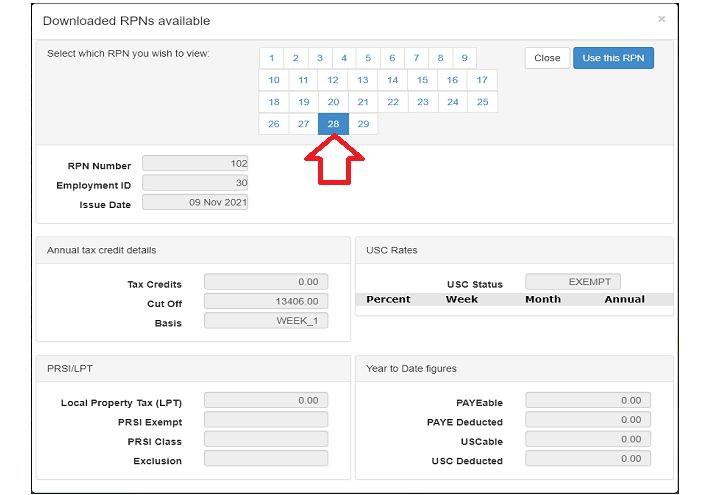
In this case the employee has 29 RPNs that have been downloaded.
This can be caused by Revenue updating the employee's tax details multiple times as well as the employee have multiple employments throughout the year.
However, to have so many RPNs is rare.
The correct RPN can by selected by clicking on the number (1 to 29) at the top of the RPN dialogue. Then click Use This RPN
Year to Date figures
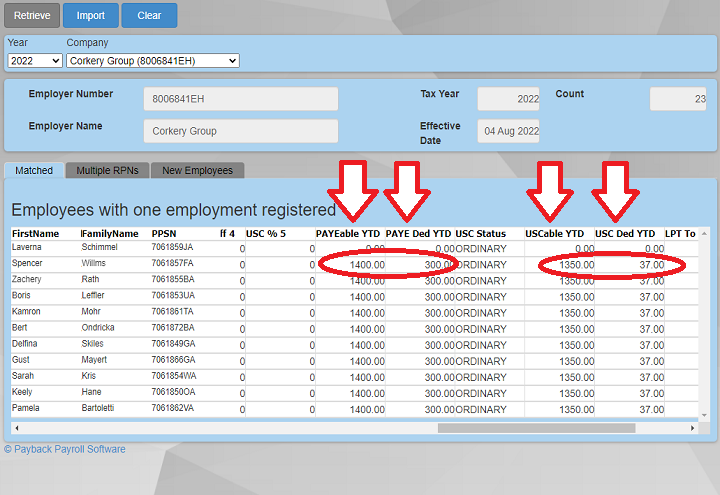
Sometimes RPNs retrieved from the Revenue server will have year to date figures in them. You can see these if you scroll across the grid and see these columns:
- PAYEable YTD - Income liable for PAYE since the beginning of the year
- PAYE Ded YTD - PAYE paid since the beginning of the year
- USCable YTD - Income liable for USC since the beginning of the year
- USC Ded YTD - USC paid since the beginning of the year
- LPT To Ded - Property tax (LPT) paid since the beginning of the year
These figures come from any previous employments submitted to Revenue since the beginning of the year. As these are strored on the Revenue Server, it is not possible to delete or change these figures.
Importing year to date figures
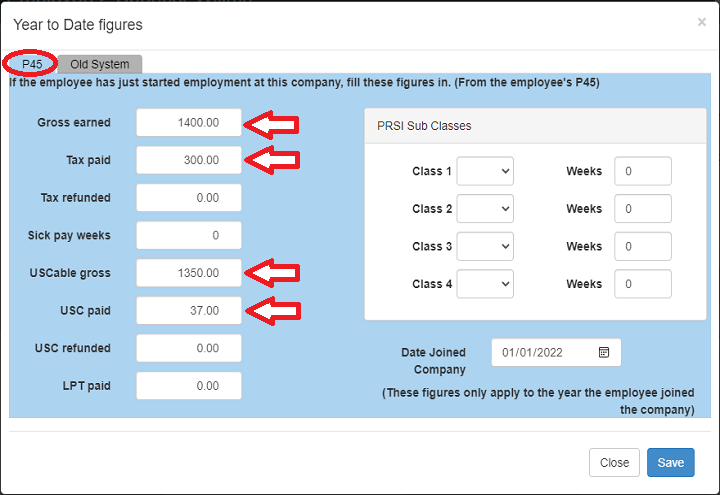
When an RPN is imported, if it has year to date figures in it these are also imported. You can see these figures in the Employee screen by clicking on the YTD (year to date) button at the top of the Employee screen.
A dialogue will appear with two tabs. Only the P45 tab gets updated with the figures from the RPN. The Old System figures do not get updated.
These figures have a bearing on how payments are calculated. Revenue instruct that these figures should be included when processing payments, as previous employments for the year should be taken into consideration.
If these figures are incorrect, then the Employee should inform Revenue.
If you do not wish to import these figures, then you should request a new RPN without these figures, and change the employment ID to match.
Why do my employees have so many RPNs?
Usually an employee may have one or two RPNs that they use for the entire year. However, sometimes users report that employees have multiple RPNs issued. Occasionally, this can be over 40 or 50 RPNs.
RPNs can be created in the following ways:
In Cloudpay
- The 'New RPN Request'. This is the 'RPN' button at the top of the Employee screen.
- Sending a Payroll submission to Revenue with a new Employment ID for the employee. For example, if for the first week then employee has employment ID of '001', and then for the next week the employment ID is changed to '002', then an additional RPN will be created on the Revenue server.
Outside Cloudpay
There are other reasons where a new RPN may be triggered, mainly to do with changes to an employee's Tax Calculation. On employment commencement or where there is a change to an employment involving any of the following, an RPN will be triggered:
- Employment Credit allocations
- Employment Rate Band allocations
- Employment USC Band allocations
- PRSI class
- Week 1/Cumulative status
- USC Exemption marker
- PAYE Exemption marker
- LPT amount
- Exclusion order
- Pay and Tax Details (to date of cessation).
- Top Rate of USC marker where an active medical card is present or the taxpayer is aged over 70
- PRSI Exemption marker
- Medical Card Marker
The most likely explanation for employees having a very large number of RPNs is if the employment ID is changed between Payroll Submissions (PSRs). Please avoid changing the Employment ID if you do not need to.
Notes
- RPN is incorrect If the RPN is all zeros or some other way incorrect, then it is up to the employee to contact Revenue to get them to fix it. Revenue will only deal with the employee directly.
- Tax refund after importing RPNs Please check:
- The new RPN that has been applied may have increased tax credits or standard rate cut off point, reducing the tax liability.
- The tax basis may have changed from week one to cumulative (or cumulative to week one. see below).
- The USC may have changed to Exempt or a reduced rate.
- Tax increase after importing RPNs Please check:
- The new RPN that has been applied may have decreased tax credits or standard rate cut off point, increasing the tax liability.
- The tax basis may have changed from week one to cumulative (or cumulative to week one. see below).
- The USC may have changed from Exempt or a reduced rate to a standard rate.
- There may now be year to date figures added. You can see these by clicking the YTD button at the top of the employee screen.
- Employee does not have any RPNs in the grid When you set up a new employment, you should request a new RPN for the employee. Guidance for doing this can be found here: https://www.payback.ie/cloudpay/new-starters/ The next time you import the RPNs the employee should be listed. If it is not, please contact Revenue.
- The Staff ID in the Employee screen is NOT the Employment ID
- The RPN number in the Employee screen is NOT the Employment ID
Cumulative Basis Payroll can be calculated on either a 'week one' or cumulative basis. Revenue determines which basis is to be used for each employee. Cumulative is the most common way of calculating payments. Using this method, previous tax and taxable pay amounts paid for the year are taken into consideration when calculating the current payment.
For example, An employee received €10,000 net pay for the first payment of the year and did not pay any tax on this amount. The correct tax credits were then applied for the second week. Under the cumulative basis of calculating tax, the previous weeks are also taken into account when calculating the second week. In this case the employee will likely pay much more tax for the second week as the €10,000 from the previous payment is added onto their liability.
Week One Basis This means that only the current pay date is taken into consideration when calculating tax, and previous payments are ignored.
For example, An employee received €10,000 net pay for the first payment of the year and did not pay any tax on this amount. The correct tax credits were then applied for the second week. Under the week one basis of calculating tax, the previous weeks are not taken into account when calculating the second week. In this case the employee will pay only what they owe for the second week's worth of gross pay. Nothing is added on.