Introduction
It is possible to make corrections to the current pay date and also change previous payments.
Current Payment
If you need to correct an error with the current payment, then depending on which stage you are at this can be amended:
Scenario 1: You have clicked the Pay button in the Payroll screen and have not done anything else
In this case select the employee and pay date and then click the Rewind button at the top of the screen. The payroll will return to the state is was in before the payment was processed. Correct the payment and click the Pay button again.
Scenario 2: You have clicked the Pay button in the Payroll screen and have submitted the payroll to Revenue in the submission screen.
In this case select the employee and pay date and then click the Rewind button at the top of the screen. The payroll will return to the state is was in before the payment was processed. Correct the payment and click the Pay button again. Then in the Revenue> Submit Payroll screen, select the pay date and click the Submit button again. The previous incorrect submission will be automatically deleted and replaced with the new submission. If you want to totally delete the submission without resubmitting, click the Delete button in the Submit payroll screen.
Scenario 3: You have clicked the Pay button in the Payroll screen, have submitted the payroll to Revenue in the submission screen and paid the employee.
If the employee has given back the money, then select the employee and pay date and then click the Rewind button at the top of the screen. The payroll will return to the state is was in before the payment was processed. Correct the payment and click the Pay button again. Then in the Revenue> Submit Payroll screen, select the pay date and click the Submit button again. The previous incorrect submission will be automatically deleted and replaced with the new submission. If you want to totally delete the submission without resubmitting, click the Delete button in the Submit payroll screen.
If the employee is keeping the money, then you will have to make an adjustment to their payment in the next pay run.
Correcting an old payment
If you need to correct a payment you made on a previous pay date, you will find the that Rewind button in the Payroll screen is disabled. This is by design.
Payments should not be processed or rewound outside of date order. This is because payroll is calculated cumulatively. In other words, the current payment depends on the results of payments that went before.
For example:
| Pay Date | Gross | Cumulative Gross | Standard Cut Off | Tax credits | Cumulative PAYE | PAYE |
| 3 Jan 2022 | 3000.00 | 3000.00 | 2791.67 | 250.00 | 391.67 | 391.67 |
| 7 Feb 2022 | 3000.00 | 6000.00 | 5583.33 | 500.00 | 783.33 | 391.67 |
| 7 Mar 2022 | 3000.00 | 9000.00 | 8375.00 | 750.00 | 1175.00 | 391.67 |
| 4 Apr 2022 | 3000.00 | 12000.00 | 11166.67 | 1000.00 | 1566.67 | 391.67 |
| 2 May 2022 | 3000.00 | 15000.00 | 13958.33 | 1250.00 | 1958.33 | 391.67 |
The Payroll operator is informed that the employee should only have been paid €500 for 7 Mar 2022. If just 7 Mar 2022 is changed in isolation from €3000 to €500, then 4 Apr 2022 and 2 May2022 are now incorrect. The PAYE for these two payments should now be €350.00, not €391.67
In order to make sure that all payments are correct at all times, May and April must also be re-calculated if March is changed.
Correction Example
An employee was paid €3000 for the first five months of the year. The payroll operator has been informed that the third month, March, was incorrect and should have been a payment of €500.
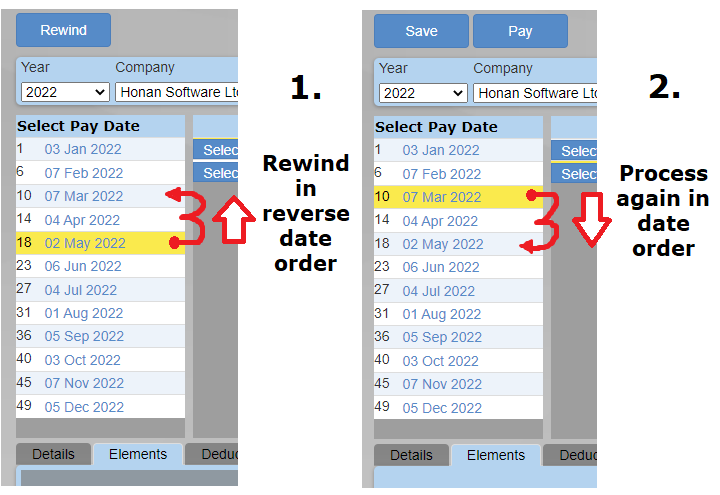
- Take a copy of all the employee's pay slips from the pay date that need correction, onwards. In this case the pay slips for March, April and May should saved.
- Rewind the payments in reverse order, from the last payment up to the payment that you need to correct. In this case the operator would need to rewind May, April and finally March.
- Check that the correct RPN details (PAYE, PRSI and USC Rates) are being used from when the original payment was processed. This is especially important when old years are being corrected.
- Make the appropriate change to the payment. In this case the gross pay is being changed to €500
- Reprocess (click Pay) March, April and then May.
- If you are happy that the figures are what you are expecting (check against the pay slips you saved earlier), re-submit March, April and May to Revenue in the Revenue Submission screen.
- If there are any differences in the amount of net pay you paid the employee, then reconcile these.
- If you had previously submitted the corrected payments to Revenue, click the Submit button once more in the Revenue Submission screen for each of the corrected pay dates. The previous submission will be automatically deleted and replaced with the new one.
Skipped Payment
This is a very similar process to the above.
- Take a copy of all the employee's pay slips from the pay date that was skipped, onwards. If February was skipped then the pay slips for March, April and May should saved.
- Rewind the payments in reverse order, from the last payment up to the payment that you need to correct. In this case the operator would need to rewind May, April and finally March.
- Check that the correct RPN details (PAYE, PRSI and USC Rates) are being used from when the original payment was processed. This is especially important when old years are being corrected.
- Process the February payment.
- Reprocess (click Pay) March, April and then May.
- If you are happy that the figures are what you are expecting (check against the pay slips you saved earlier), re-submit March, April and May to Revenue in the Revenue Submission screen.
- If there are any differences in the amount of net pay you paid the employee, then reconcile these.
- If you had previously submitted the corrected payments to Revenue, click the Submit button once more in the Revenue Submission screen for each of the corrected pay dates. The previous submission will be automatically deleted and replaced with the new one.
Correction Scenarios
The following are correction scenarios where the current payment corrects a mistake made on one or more previous payments.
These corrections can be used where it is not possible to rewind and reprocess the mistake.
If you use one of these examples, it is recommended that you check the figures are correct.
Scenario A - Incorrect Sacrifice
In this scenario a deduction of €500 was set up for a Salary Sacrifice, but the PAYE, PRSI and USC boxes were all incorrectly ticked. This meant that the taxable pay for the employee was too high.
The employer processed two payments before they released the error, so the total incorrect deduction was €1000 (2 x €500)
Note that this example can also be used to correct Taxsaver Tickets and Cycle to work

Scenario A - Solution
For the third payment, first the taxable pay has to be reduced by €1000. This is done by setting up a deduction for €1000 with all the boxes (PAYE, PRSI and USC) unticked.
Next, an element has to be added to 'reinstate' the €1000 deducted so that the employee is not short pay. This is done by adding an element for €1000 with all the boxes (PAYE, PRSI and USC) unticked.
Finally, the correct sacrifice is put in. This is another deduction with all the boxes (PAYE, PRSI and USC) unticked, for the weekly sacrifice amount of €500

Scenario B - Health Insurance overpayment
Here a monthly paid employee, being paid €5000 a month was paying €1000 Health insurance for two months. They should not have paid this and have requested a refund. This example reverses the health insurance.

Scenario B - Solution
The total amount of incorrect health insurance amounts have been added up (1000+1000 = 2000)
Tax was overpaid. To fix the tax over payment the total taxable pay must be reduced. This is done by added a new deduction with PAYE, PRSI and USC all unticked.
However, the employee has also been underpaid so this must be reimbursed without effecting the new tax amount, so a new Element, also for €2000 is added. PAYE, USC and PRSI are all unticked.
The end result is the same as if the employee was just paid €5000 for three months.

Scenario C - Wrong number of Insurable Weeks
At the end of the year, the number of insurable weeks should not exceed 52 (or 53 in certain circumstances)
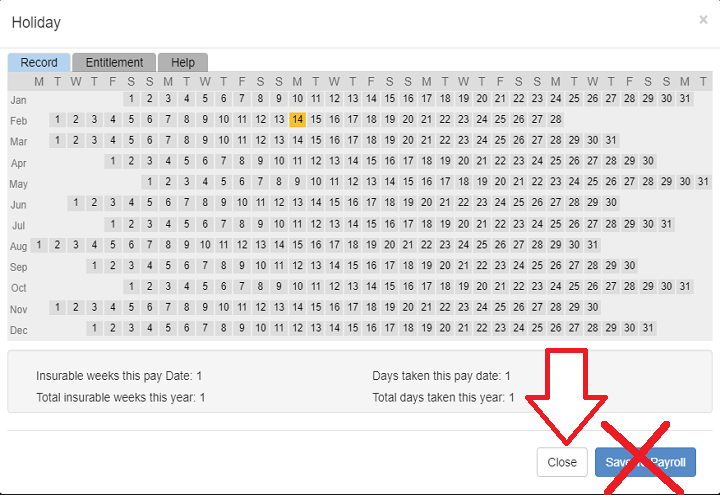
To check the weeks, click the History tab in the Payroll screen. Click the 'Hide/Show' slider at the top right so you can the columns in the opposite screenshot.
Scroll across until you can see the 'Weeks' column. These are the insurable weeks.

Scenario C - Explanation
There are two ways the number of insurable weeks can be changed for a payment:
1. Directly entering a new value into the 'Weeks' box.
2. Entering Holidays and clicking 'Save to Payroll' instead of the close button
Clicking the 'Save to Payroll' button will add the total insurable weeks displayed at the bottom of the calendar to the total insurable weeks in the payroll screen. Only click 'Save to Payroll' for advance holiday pay, ie. where an employee is taking one or more weeks off and you are paying them in advance for these weeks. Click the 'Close' button if simply wish to use this calendar to record days off and not increase the insurable weeks.
Scenario C - Solution
In the example opposite, the employee has been paid 2 insurable weeks in the third week.
- Week 1: 1 Week of insurable employment
- Week 2: 1 Week of insurable employment
- Week 3: 2 Weeks of insurable employment
- Week 4: 1 Week of insurable employment
- Week 5: 1 Week of insurable employment
Note that their insurable weeks incorrectly add up to 6 ( 1 + 1 + 2 + 1 + 1 ). By the end of the year it will likely exceed 52.
If the employee was on holiday for Week 4 and was paid in advance on week 3, their payment weeks should look like this:
- Week 1: 1 Week of insurable employment
- Week 2: 1 Week of insurable employment
- Week 3: 2 Weeks of insurable employment <-- getting their one week holiday money here
- Week 4: 0 Week of insurable employment <-- on holiday here, and was already paid in week 3 for it
- Week 5: 1 Week of insurable employment <-- Back to work
Note that their insurable weeks now correctly add up to 5 ( 1 + 1 + 2 + 0 + 1 ).
However, if the employee did not take a week off for week 4, and their insurable weeks were incorrectly recorded for week 3, then it should look like this:
- Week 1: 1 Week of insurable employment
- Week 2: 1 Week of insurable employment
- Week 3: 1 Week of insurable employment
- Week 4: 1 Week of insurable employment
- Week 5: 1 Week of insurable employment
- Take a copy of all the employee's pay slips from the pay date that had the incorrect number of insurable weeks, onwards. In this example, periods 3, 4 and 5.
- Rewind the payments in reverse order, from the last payment up to the payment that you need to correct. In this case the operator would need to rewind 5, 4 and finally 3.
- Check that the correct RPN details (PAYE, PRSI and USC Rates) are being used from when the original payment was processed. This is especially important when old years are being corrected.
- Correct the weeks box in the Pay Details tab for week 3.
- Reprocess (click Pay) Weeks 3, 4 and 5
- If you are happy that the figures are what you are expecting (check against the pay slips you saved earlier), re-submit weeks 3, 4 and 5 to Revenue in the Revenue Submission screen.
- If there are any differences in the amount of net pay you paid the employee, then reconcile these.
- If you had previously submitted the corrected payments to Revenue, click the Submit button once more in the Revenue Submission screen for each of the corrected pay dates. The previous submission will be automatically deleted and replaced with the new one.
NOTES:
At the end of the year the total weeks should be 52 (or 53 in certain circumstances)
If using the Holiday screen, check the Weeks box is correct before processing the payment
Scenario D - Previous Years
Sometimes corrections have to made to previous years, often where payments have already been submitted to Revenue and employees have been paid.
Example: A Director starts paying Health Insurance through his company but did not inform his accountant until the following year.
Solution:
- Change the year in the Payroll screen to the one to be corrected.
- Take a copy of all the effected pay slips
- Rewind the payments in the payroll screen in reverse date order, just for the Director
- Add the Health Insurance BIK in the Employee screen
- Load the correct RPN for the year via the PAYE tab (If no RPNs are available, the tax details will have to be manually entered)
- Reprocess the payments in the Payroll screen, in date order.
- Resubmit all the effected pay dates in the Revenue>Submission screen
- Compare before and after pay slips and reconcile
- Change the year back to current one in the Payroll screen
- Reload the RPN for the Director for the current year
Notes:
It would be much easier to correct this if the director paid the full premium in the last payment of the year. That way there is only one period to rewind and re-submit.
RPNs for previous years are only available in the PAYE tab if they have been previously downloaded using Cloudpay. Revenue delete previous year RPNs from their server.
Scenario D - Incorrect PRSI class
Where payments have been submitted with an incorrect PRSI class, then they can be corrected as follows:
Example 1: A Director had class A recorded instead of class S
Solution 1:
- Take a copy of all the effected pay slips
- Rewind the payments in the payroll screen in reverse date order, just for the Director
- Change the PRSI class from A to S in the Employee screen
- Reprocess the payments in the Payroll screen, in date order.
- Resubmit all the effected pay dates in the Revenue>Submission screen
- Compare before and after pay slips and reconcile
Example 2: A Director had class A recorded instead of class S, for a previous year
Solution 2:
- Change the year in the Payroll screen to the one to be corrected.
- Take a copy of all the effected pay slips
- Rewind the payments in the payroll screen in reverse date order, just for the Director
- Change the PRSI class from A to S in the Employee screen
- Load the correct RPN for the year via the PAYE tab (If no RPNs are available, the tax details will have to be manually entered)
- Reprocess the payments in the Payroll screen, in date order.
- Resubmit all the effected pay dates in the Revenue>Submission screen
- Compare before and after pay slips and reconcile
- Change the year back to current one in the Payroll screen
- Reload the RPN for the Director for the current year
Notes:
Some PRSI class changes will effect Employer and Employee PRSI contributions, so consider this when reconciling.
We suggest using the Check facility. At the top right of the Payroll screen is a new button with three dots (...) After you have processed payments, clicking this will check the payroll for common problems such as missing or incorrect PPSNs. It will also check PRSI class Age scenarios.
Scenario E - Correcting an overpayment
In this example an employee was paid €100 too much. It is to be recouped in the following pay period.
To recoup the money a deduction should be set up with the PAYE, PRSI and USC check boxes all unticked. As is it a once-off deduction, set it up in the Payroll screen.
The Net pay will be reduced by €100 and the cumulative taxable pay will also be reduced by €100
