Introduction
For PAYE Modernisation, the P45 process has changed. You only need to include a leave date for the employee.
Pay the employee in the Payroll screen (Before entering a leave date), if you need to.
Click the Leaver button in the employee screen as usual and enter a leave date and update the employee.
Make sure that the 'Include leaver in next payroll submission (Leave dates after 2018)' box is ticked if the employee left after 1 Jan 2019.
The next payroll submission, Revenue will know that the employee has left. The employee will still appear in the submission screen, even if they were not paid for the period.
You no longer have to issue a P45 to the employee.
Use the Archive facility to remove leavers from the Employee screen. Click the Archive button for the leaver and make sure that Hide Archived tick box at the top of the screen is ticked.
Processing a leaver who is being paid on their last pay date
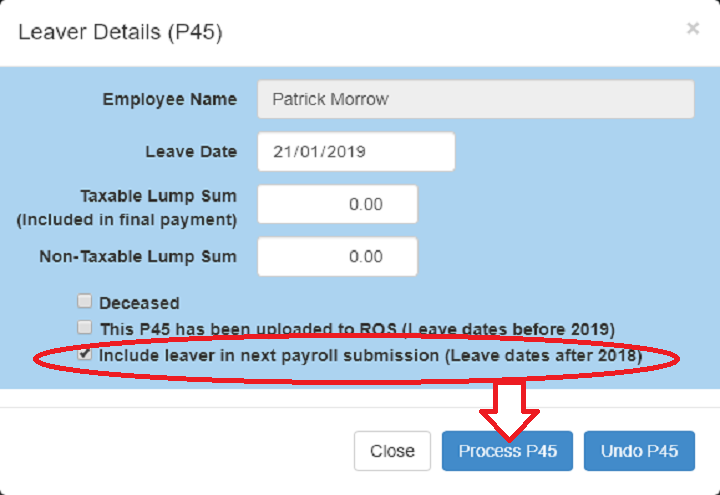
In this example the employee's leave date is 21 Jan 2019. Their last payment will be on 21 Jan 2019 and they will be getting €500.
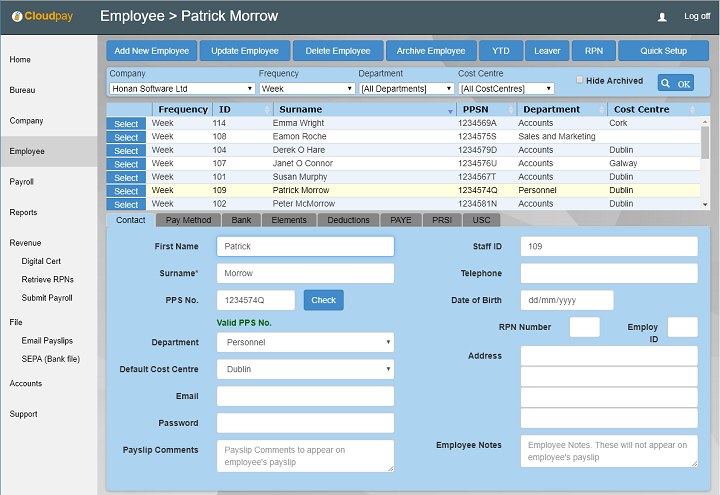
- Select the employee in the Employee screen.
- Click the 'Leaver' button at the top of the employee screen. The Leaver dialogue will appear.
The leaver dialogue box
- Enter the leave date
- If the leave date is on or after 1 Jan 2019, make sure that the Include leaver in next payroll submission (Leave dates after 2018) option is ticked
- Important: Click the Process P45 button. (don't just click off the dialogue, close it or click cancel)
Process the last payment
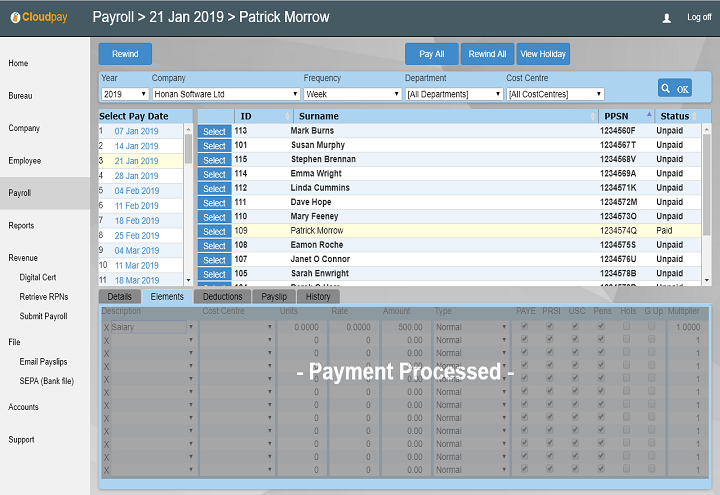
In the Payroll screen, process the last payment for the employee. Note that in this example the employee appears in the list in the Payroll screen because their last day coincides with the last pay date. If their leave date was before the pay date, they would not appear.
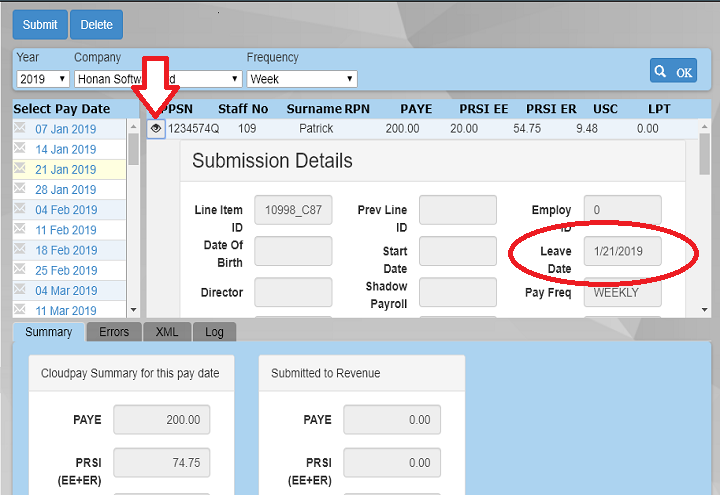
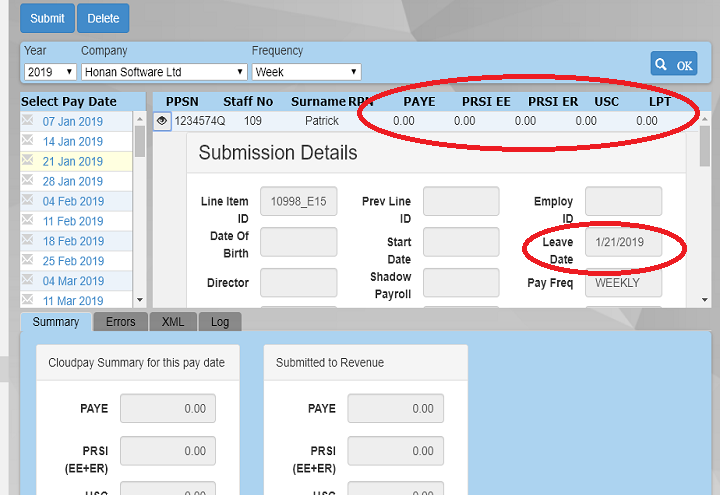
Submit Payment
The leaver will appear in the Revenue Submission screen. If you click the the 'Eye' icon next to the employee's name, you can check that a leave date is included for them in the submission.
Note
When the Submit button is clicked in the Revenue submission screen, the Include leaver in next payroll submission (Leave dates after 2018) tick box is automatically unticked in the Employee screen leaver dialogue box. This happens so that the employee is not inadvertently included in subsequent submissions.
If you need to re-submit, then you should first make sure that the Include leaver in next payroll submission (Leave dates after 2018) tick box is ticked and you have clicked the Process P45 button.
If the leave date is before the pay date selected in the Payroll screen, the employee will not appear in the list. When this happens, process the payment first in the payroll screen before processing the leaver in the Employee Leaver dialogue.
Leaver not due to be paid in next submission (zero payslip)
For this example, the leaver was fully paid on the previous pay date (14 Jan 2019). They are not due to be paid for the next submission (21 Jan 2019)
Follow the same process as above (Processing a leaver who is being paid on their last pay date), but do not process any payments in the Payroll screen for the employee.
Select the submission date in the Revenue Submission screen. Note that the employee still appears, even though they did not have a payment processed for the selected pay date. They appear because the Include leaver in next payroll submission (Leave dates after 2018) option is ticked.
Click the Eye icon next to the employee name and note that a zero payslip is being submitted with everything zero and the correct leave date.
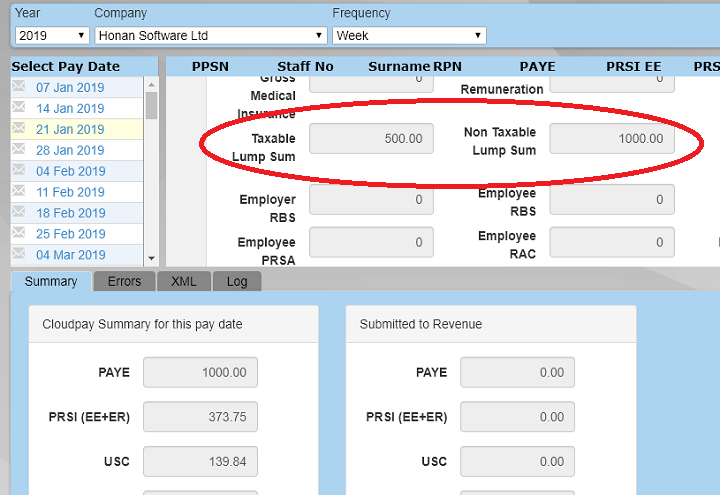
Paying Lump Sums
Taxable and Non-taxable lump sums can also be recorded. Enter the appropriate values in the Leaver screen.
In this example the employee is getting a €500 taxable amount and also a €1000 non taxable amount in addition to their wages

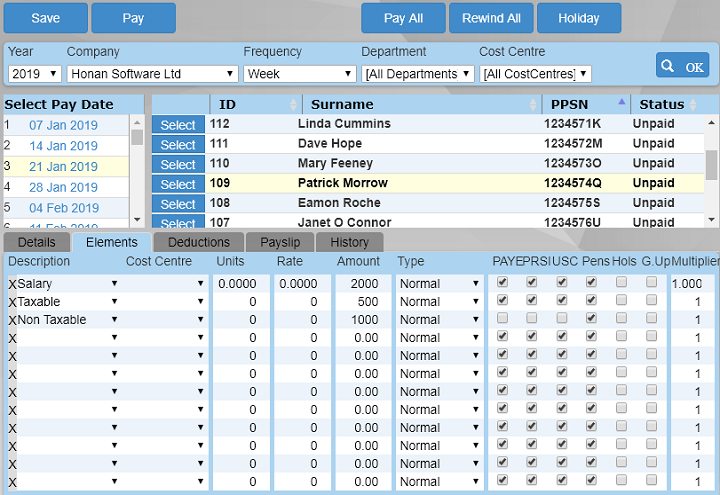
Add the elements
In the Payroll screen, add the appropriate taxable and/or non-taxable elements for the payment. Make sure that you untick PAYE, PRSI and USC for non-taxable lump sums.
Note that you have to add the elements here as well as specifying them in the Leaver dialogue.
Process the payment.
Submitting lump sums
Check that the correct leave date and the lump sum(s) are in the submission by clicking the eye icon next to the employee in the Submission screen.
RPN Notes
Employees who have left stay on the Revenue RPN server until the end of the year they left. Revenue will not remove these employees.
Employee tax details of subsequent employments including year to date figures, will still be available to old employers.
The way this works is outside of our control. If you log into ROS and retrieve RPNs, you can also see these employees.
When importing RPNs, it does not make a difference to the running of your payroll that these employee are listed, as they still have a leave entered and will not appear in the Payroll screen for pay dates after their leave date. Subsequent employments should also have a different Employment ID.